🟣 Purple Dot winding down your plan? See our Migration Guide →

Demand Planning & Forecasting for E-commerce: A modern approach for 2026

Accross Shopify and Amazon, stockouts have been shown to affect around 50% of products each year, while global estimates suggest over $1 trillion is lost through missed sales. That same set set of data found overstocking can increase storage and holding costs by 20-30%, leading to excess capital being tied up in unsold inventory. Demand forecasting for e-commerce sits at the intersection of these costly extremes, helping ecommerce brands answer a critical question: how much inventory should you hold, and when?

For established products with sales history, traditional forecasting methods work well. But what about new product launches, where no historical data exists? This is where most ecommerce brands struggle, often resorting to guesswork that leads to overproduction or missed opportunities.

This guide covers both traditional demand forecasting methods and an underutilized strategy: using pre-orders as forward-looking demand signals. You’ll learn how to predict customer demand accurately, avoid costly inventory mistakes, and validate new products before committing to production.

What Is Demand Forecasting in E-commerce?

Demand forecasting is the process of estimating future product demand using historical sales data combined with real-time market signals. It helps ecommerce brands determine how much inventory to order, when to restock, and which products will sell.

Demand forecasting differs from demand planning, which is the broader process that includes procurement, production scheduling, and supply chain coordination. Forecasting provides the demand estimates; planning turns those estimates into action.

Why it matters: accurate demand forecasting directly impacts your cash flow, customer satisfaction, and operational efficiency. 98% of companies now integrate AI into their supply chains (Q1 2025) because getting demand predictions right has become a competitive advantage.

The High Cost of Poor Demand Forecasting

When demand forecasting misses the mark, the financial impact compounds quickly across your entire operation.

Overstocking costs: Inventory distortion cost retailers a significant portion of total potential revenue. Excess inventory increases storage costs by 20-30%, and dead stock eats up to 20% of your inventory’s value annually just sitting in warehouses. For perspective, if your store holds $100,000 in inventory, you’re spending $20,000 to $30,000 yearly just to keep those products on hand.

Stockout costs: Missing inventory hits even harder. Stockouts cost retailers $984 billion annually in lost sales opportunities. 69% of online shoppers will abandon their purchase entirely and shop with competitors when items are unavailable. That’s not just a lost sale, it’s a lost customer relationship.

Accuracy gaps: Traditional forecasting methods often achieve only 60-70% accuracy, leading to consistent over or underordering. Modern AI-powered tools now achieve 89-92% accuracy with six months of historical data, showing the gap between old and new approaches.

Cash flow impact: 42% of small businesses struggle with overstocking, which directly impacts their ability to invest in growth, marketing, or new product development. Poor inventory management causes businesses to lose up to 11% of annual revenue through stockouts and overstocking combined.

Traditional Demand Forecasting Methods

Most ecommerce brands rely on three main forecasting approaches, each suited for different scenarios and data availability.

Quantitative Forecasting

Quantitative forecasting uses mathematical models applied to historical sales data. Common techniques include time-series analysis (moving averages, exponential smoothing, ARIMA models), trend analysis, and seasonal decomposition.

Best for: Products with at least six months of sales history, stable demand patterns, and minimal external disruption.

Limitation: Completely ineffective for new products with no sales history. You can’t forecast what hasn’t been sold yet.

Example: A Shopify brand selling yoga mats can analyze the past 18 months of sales to predict next quarter’s demand, accounting for seasonal spikes around New Year’s resolutions.

Qualitative Forecasting

Qualitative methods rely on expert opinions, market research, customer surveys, and competitive analysis rather than hard data. This includes techniques like the Delphi method (structured expert consensus), market testing in limited regions, and sales team input.

Best for: New product launches, significant market shifts, entering new customer segments, or when historical data is sparse or unreliable.

Limitation: Subjective and potentially biased. Expert opinions can be wrong, and market research doesn’t always translate to actual buying behavior.

Example: A fashion brand planning a limited-edition drop might survey their email list and social media followers to gauge interest before production.

AI & Machine Learning

AI-powered forecasting integrates multiple data sources in real-time: internal sales data, weather patterns, social media sentiment, competitor pricing, economic indicators, and search trends. Machine learning models continuously improve their predictions as new data arrives.

Modern AI systems can generate SKU-level daily forecasts and adapt to changing conditions without manual intervention. Target’s Inventory Ledger makes “billions of predictions each week” using AI to optimize inventory across thousands of locations.

Accuracy: Tools like Cogsy achieve 92% forecast accuracy for businesses with at least six months of data, while Fabrikator users see 20-40% improvement in forecasting accuracy within three months.

Best for: Established products with consistent data flow, brands with complex SKU portfolios, and operations where marginal accuracy improvements deliver significant value.

Limitation: Requires clean, consistent data; less effective for truly novel products; and can be expensive to implement for smaller operations.

Pre-orders: The Underutilized Demand Validation Tool

Here’s the new product problem: traditional forecasting methods all depend on historical data. When you’re launching something completely new, you have no history. Qualitative research and surveys provide directional guidance, but they don’t answer the critical question: will customers actually buy this?

Pre-orders solve this by gathering real demand signals before you commit to production or large inventory purchases. Instead of guessing based on market research, you measure actual purchase intent with customers putting money down.

Real Data Validation

PreProduct has processed $85.3 million across more than one million pre-orders between 2021 and Q1 2025. This dataset reveals patterns that help ecommerce brands forecast more accurately.

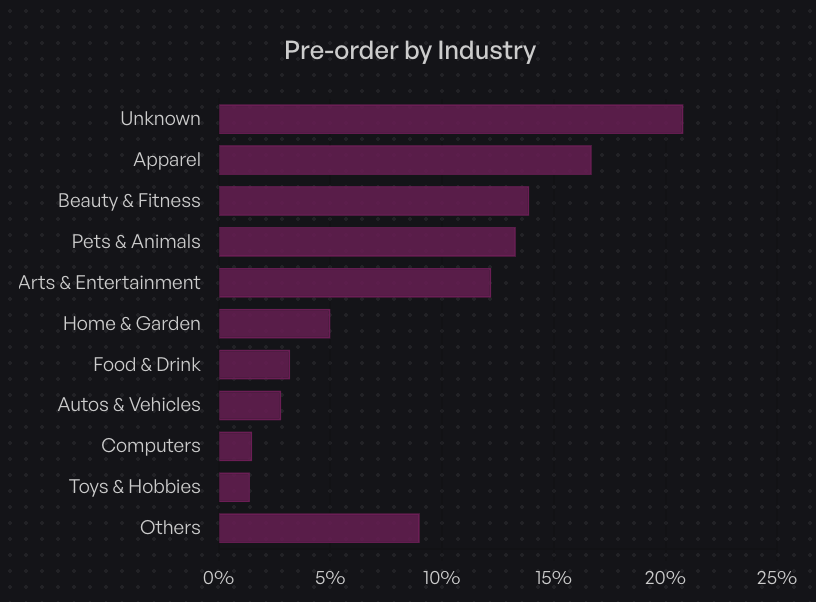
Pre-orders work particularly well for ecommerce categories with longer lead times. Top pre-order categories include Apparel (16.7%), Beauty & Fitness (13.9%), and Home & Garden (11.5%). These are products where customers are willing to wait for something they want.

Pre-order Demand Signals You Can Trust

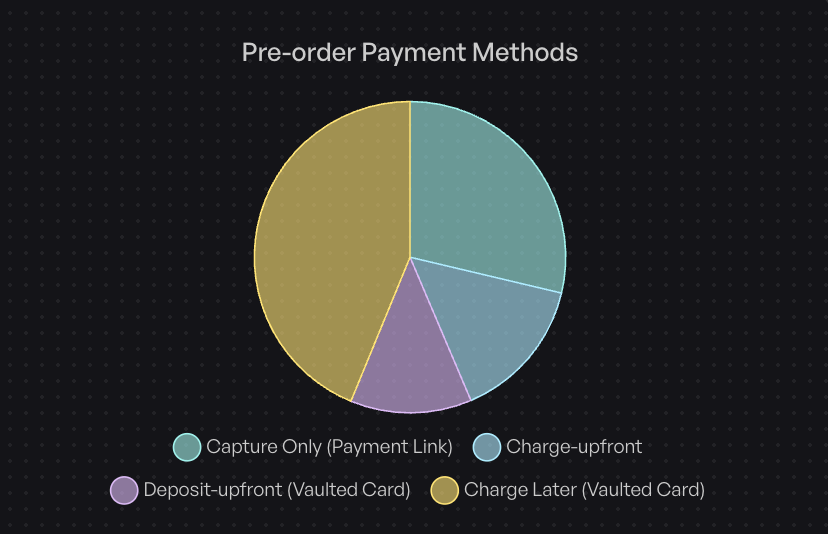
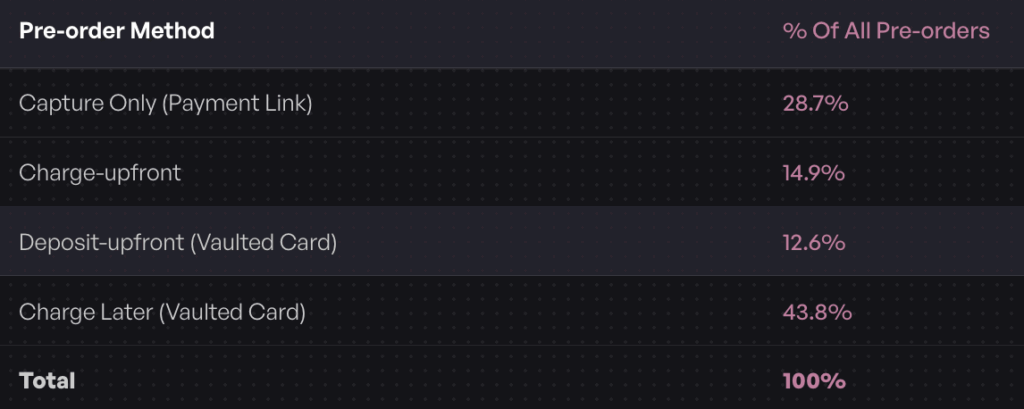
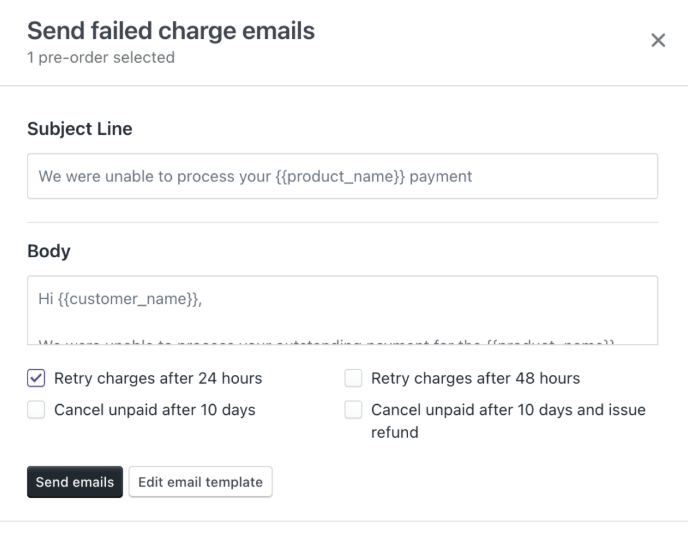
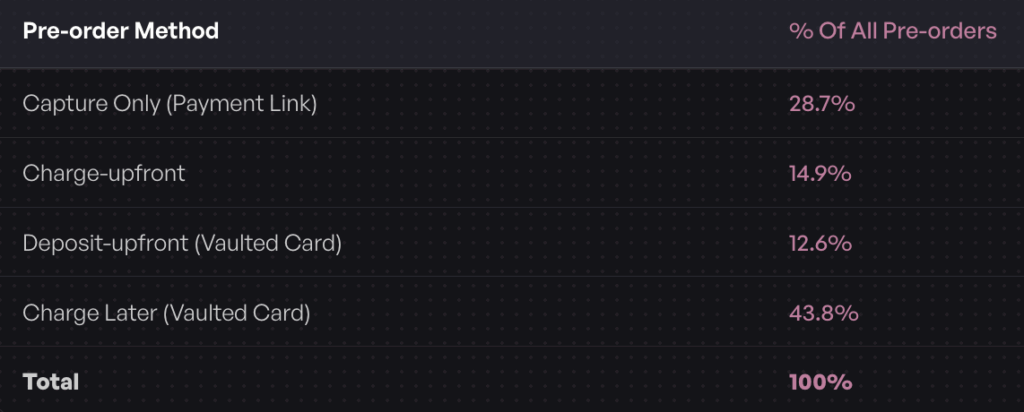
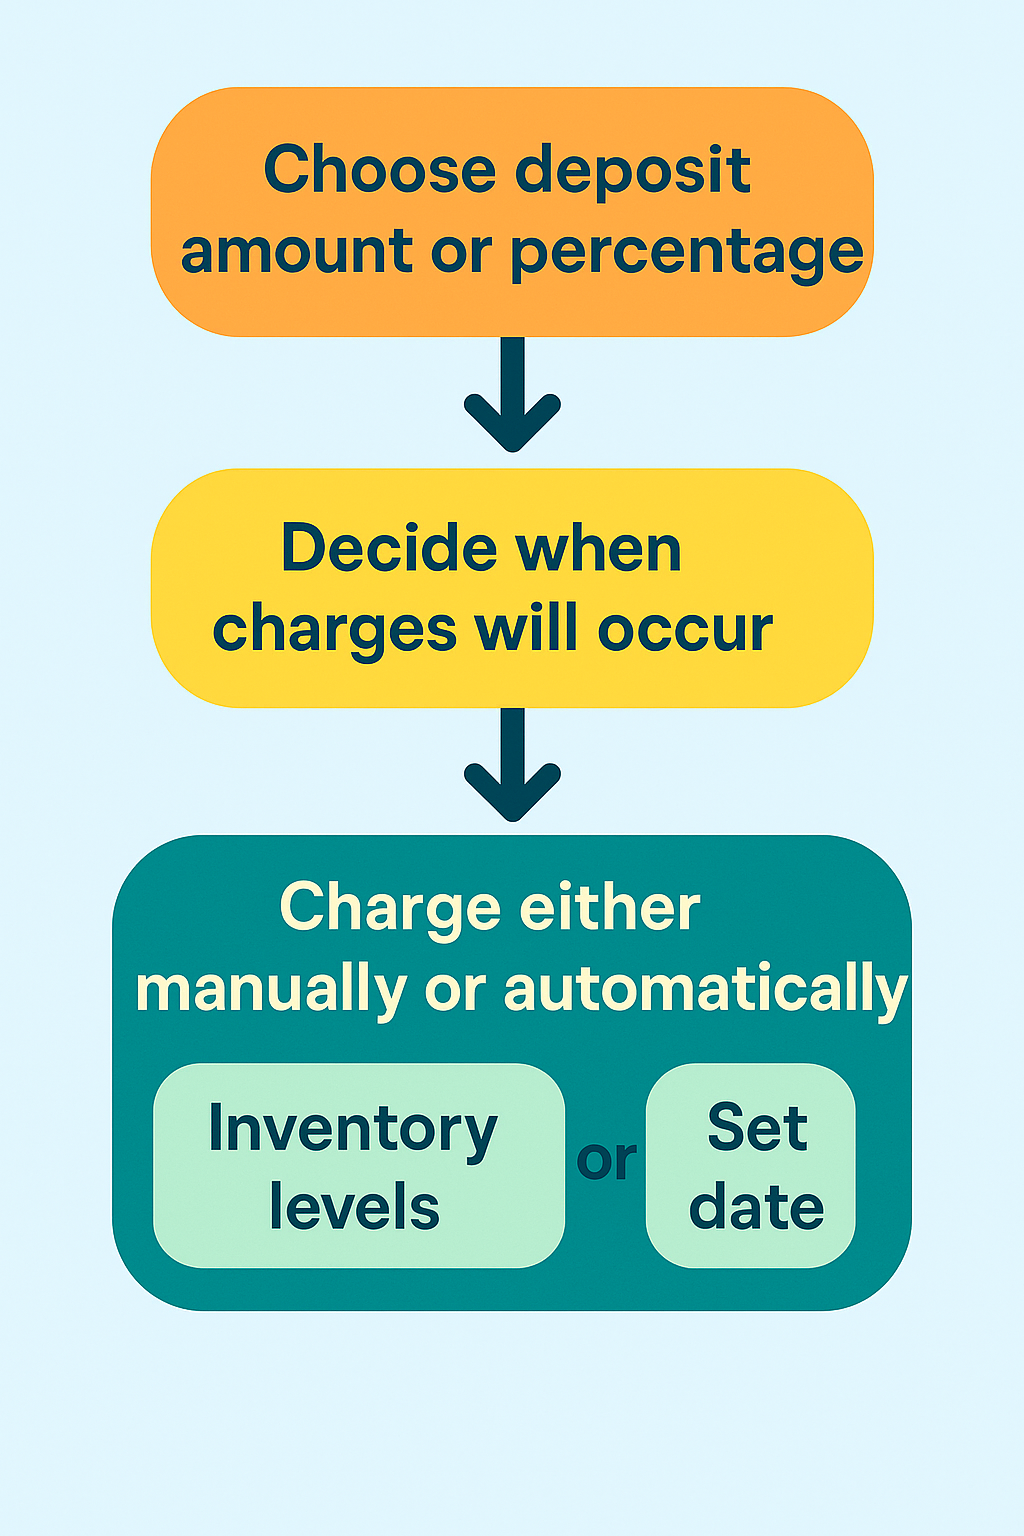
Not all pre-order signals carry equal weight. Payment timing reveals how committed customers really are.

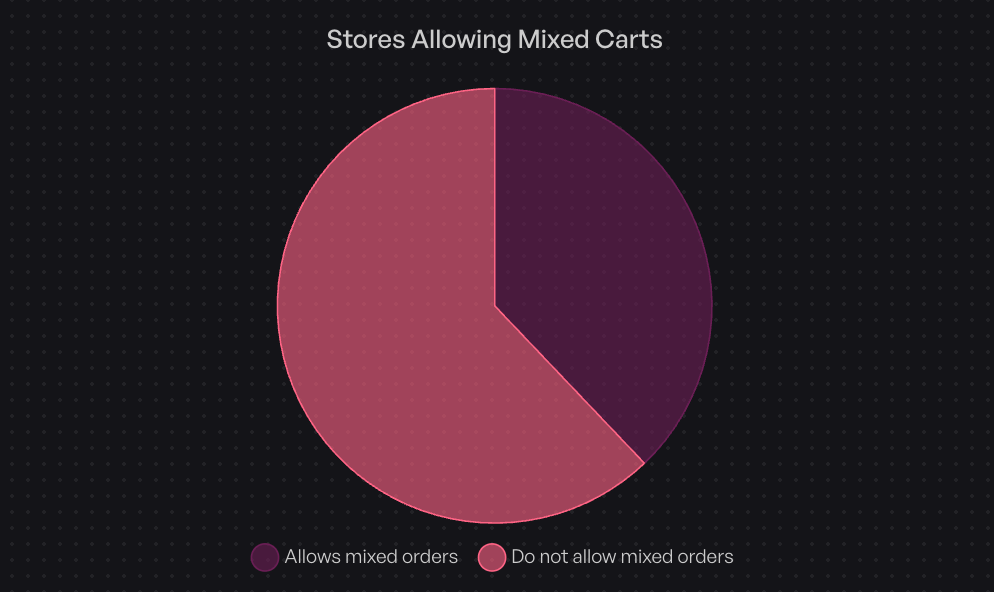
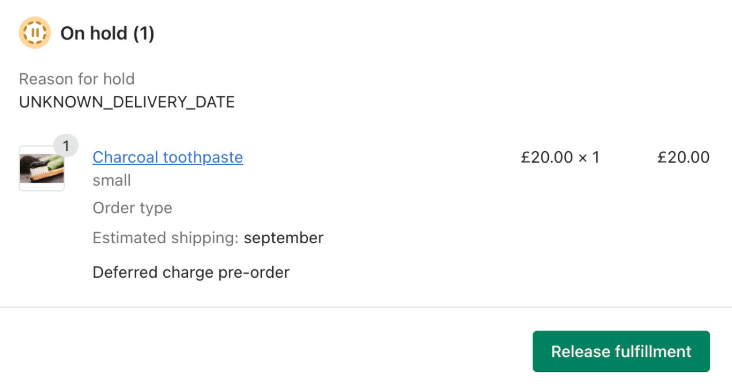
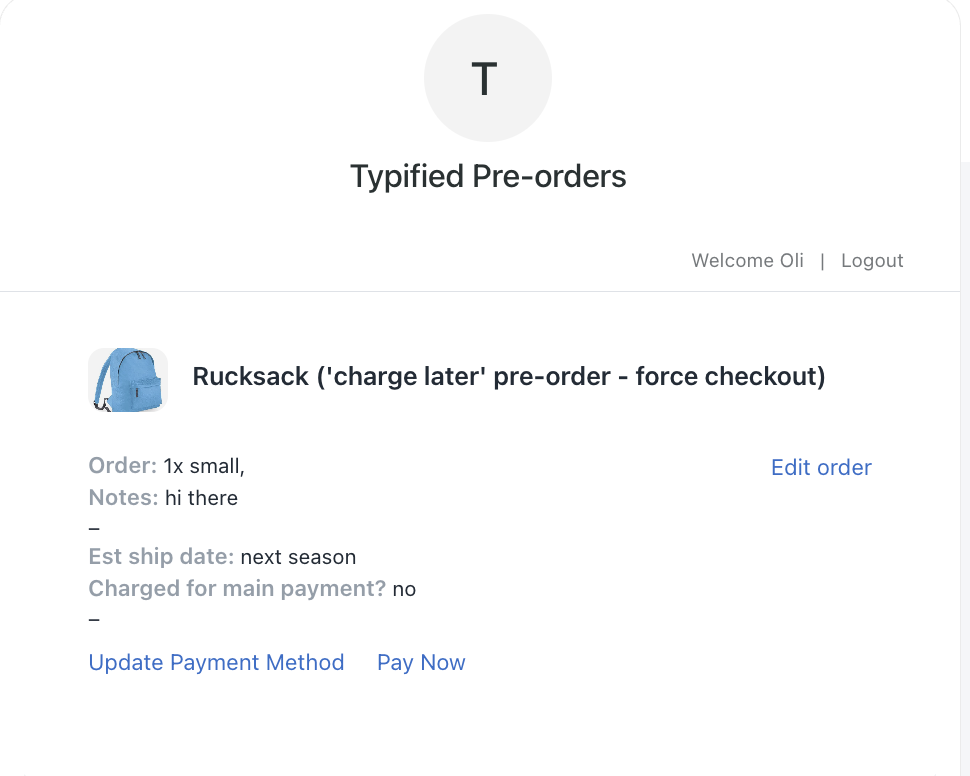
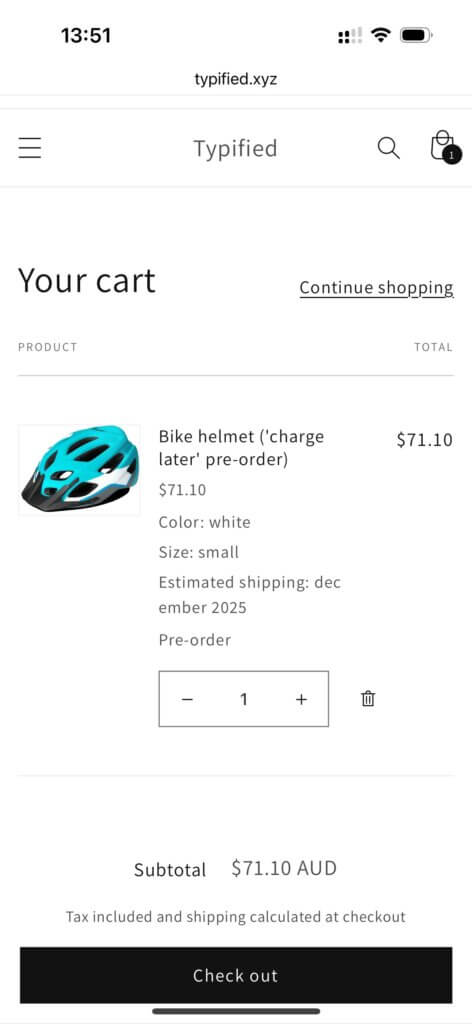
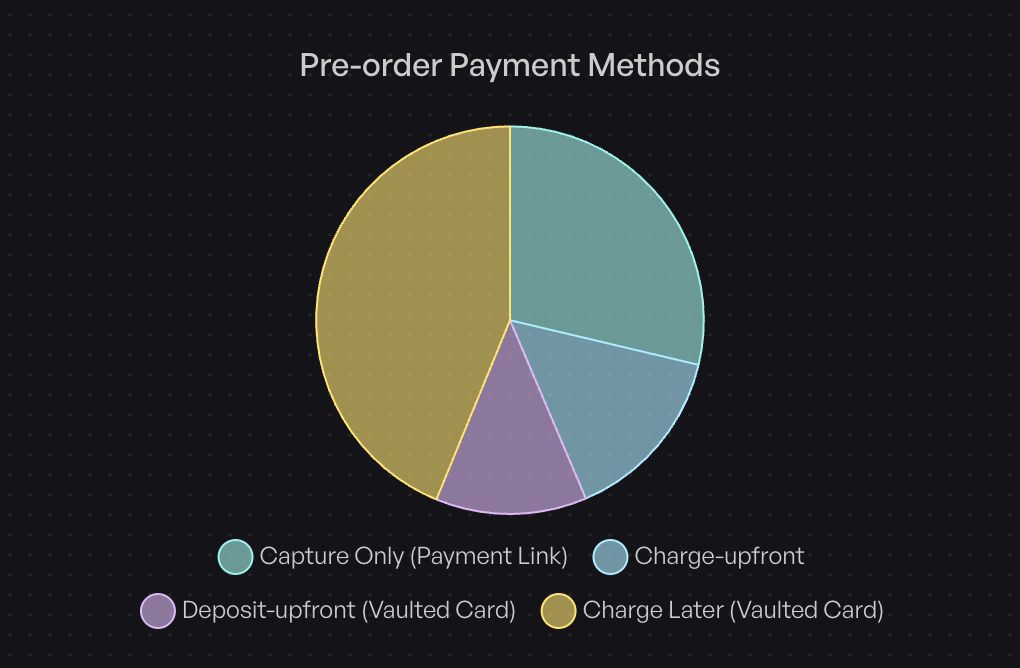
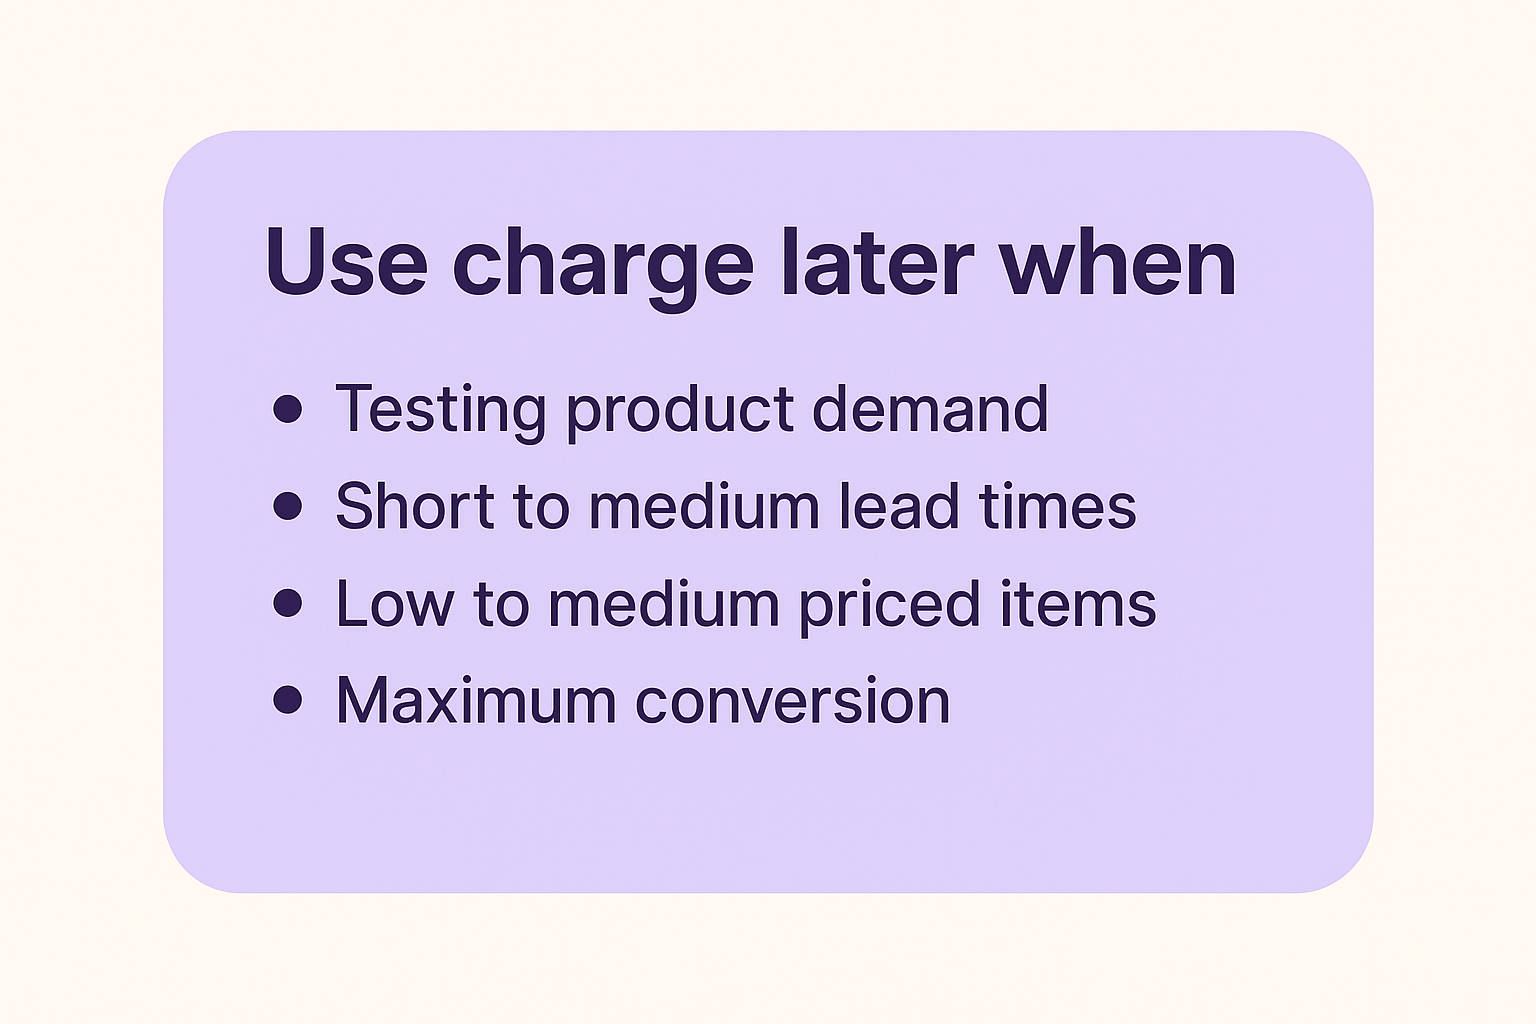
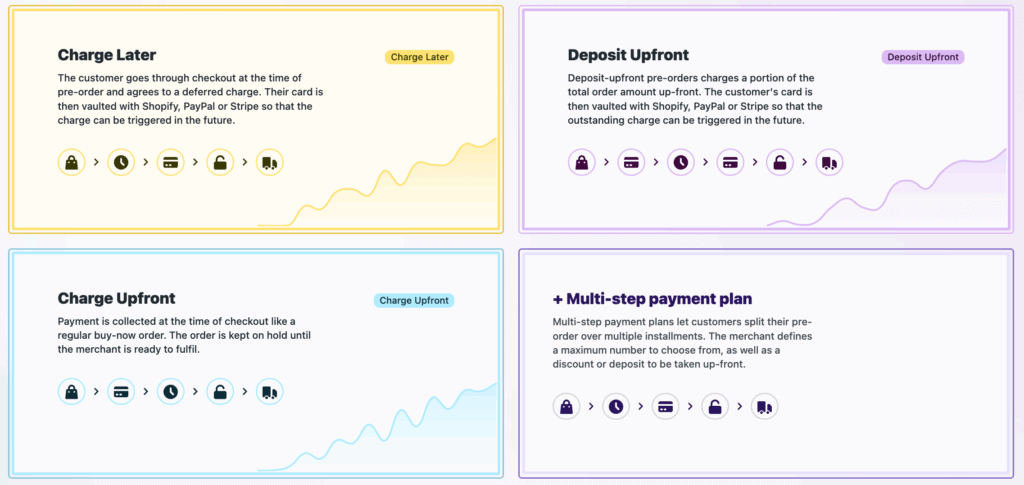
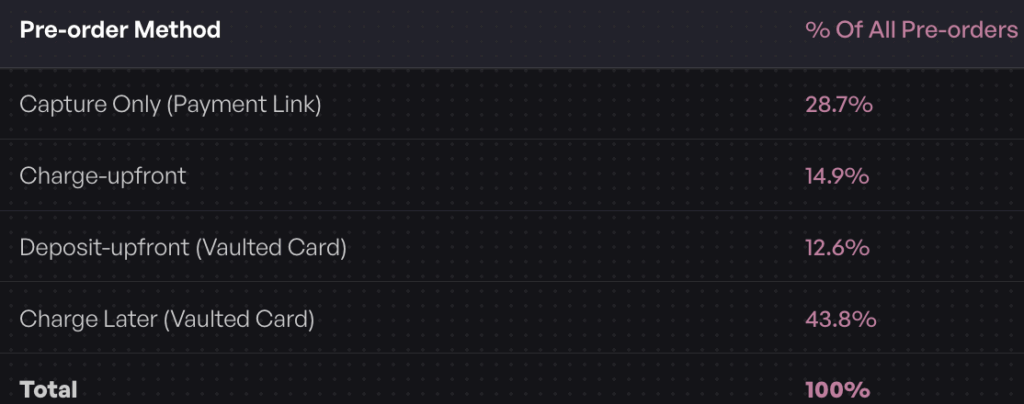
Payment timing reveals commitment level: 43.8% of pre-order listings use charge-later models, where customers authorize payment but aren’t charged until fulfillment. Another 25% charge upfront, collecting full payment immediately. These different payment models signal different levels of customer commitment.

Charge-upfront pre-orders indicate genuine demand and high commitment. When customers pay immediately for a product that won’t ship for months, they’re confident in their purchase. Use these signals as strong validation.

Charge-later pre-orders suggest exploratory interest with lower commitment. Customers are interested enough to place an order but not ready to part with money yet. Factor this into your forecasts by weighting charge-later orders at a lower conversion rate than upfront charges.

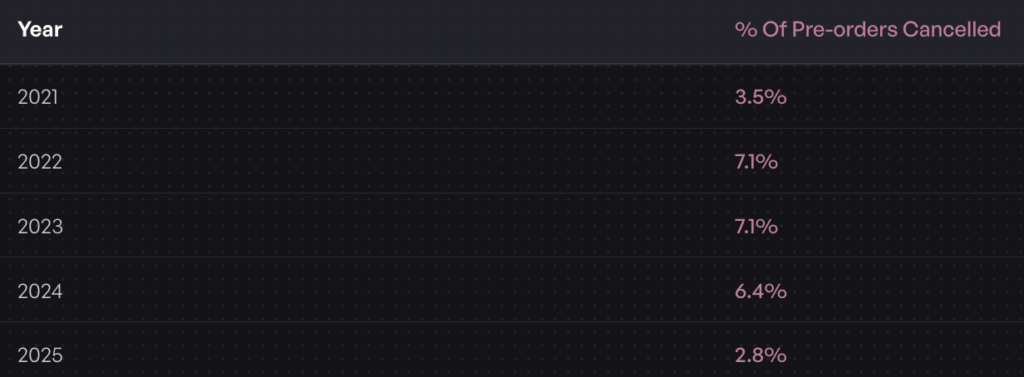
Cancellation rates as adjustment factors: Pre-orders average a 5.4% cancellation rate, with the rate dropping to 2.8% in 2025. Build this buffer into your production planning. If you need 1,000 units and your cancellation rate runs at 5%, you should gather 1,053 pre-orders to account for cancellations.

Lower cancellation rates often indicate improving targeting, better customer communication, or stronger product-market fit. Monitor your cancellation trends to refine your forecasting accuracy over time.

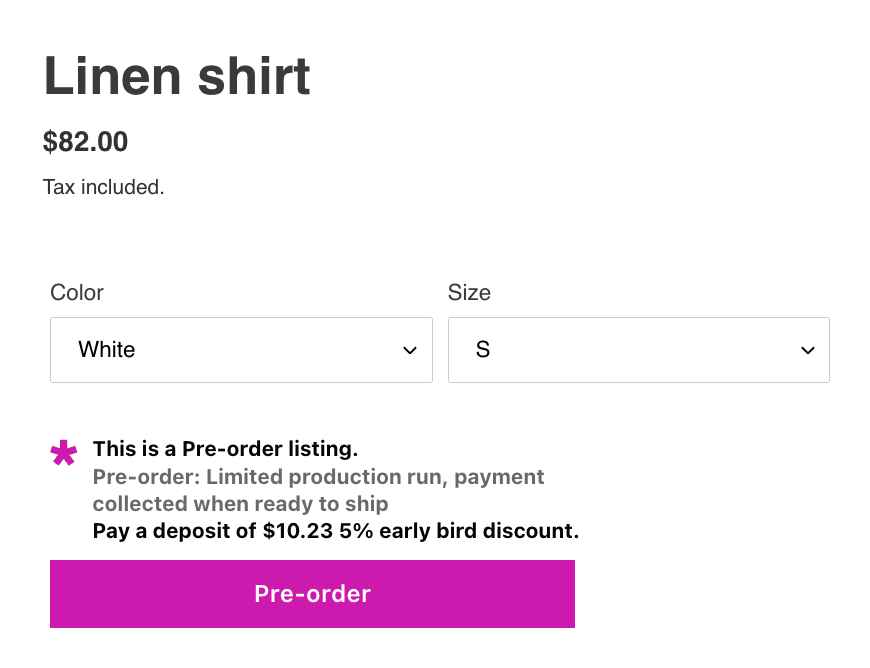
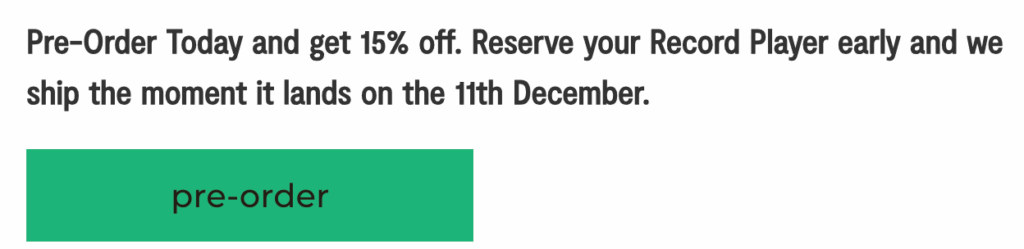
Price sensitivity insights: Products priced $25-50 generated 42.7% of individual pre-orders despite representing only 18.2% of listings. This price range represents a sweet spot for demand validation, low enough risk for impulse purchases but high enough to signal real interest.

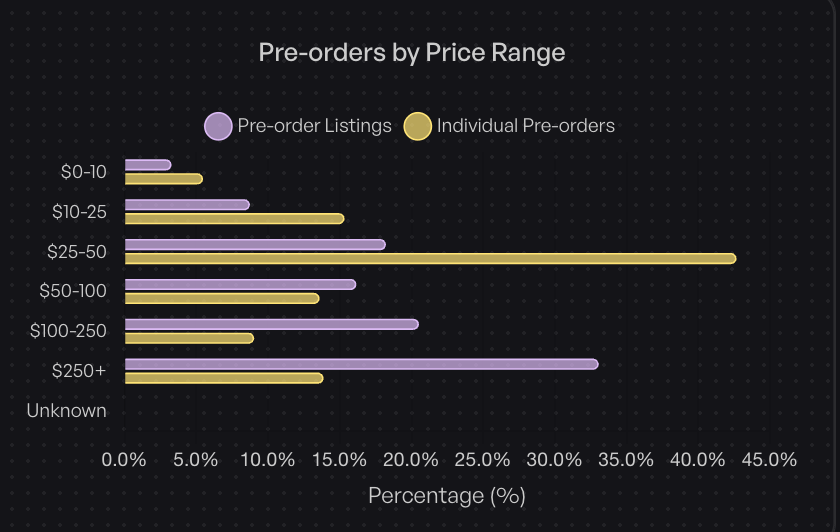
Use pre-orders to test price elasticity before full production. Launch at your target price and monitor conversion rates. If demand is weak, test a lower price or stronger positioning before committing to large inventory runs.

Lead Times & Supply Chain Planning

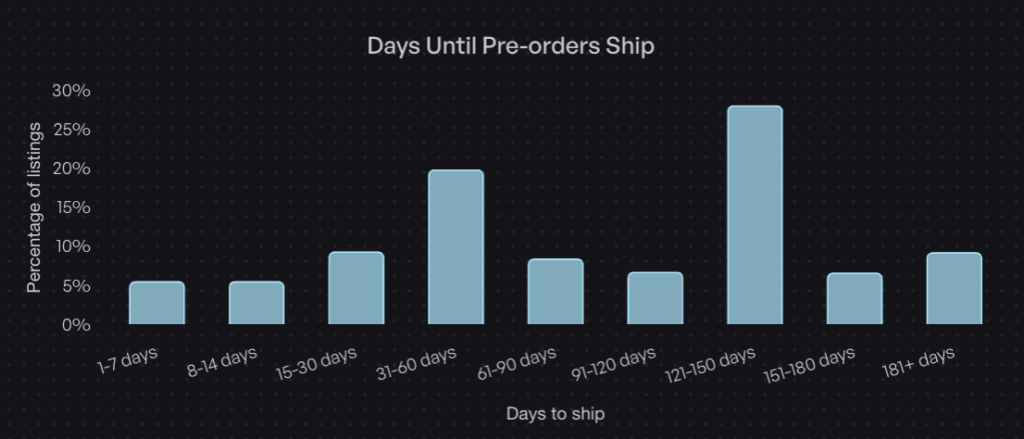
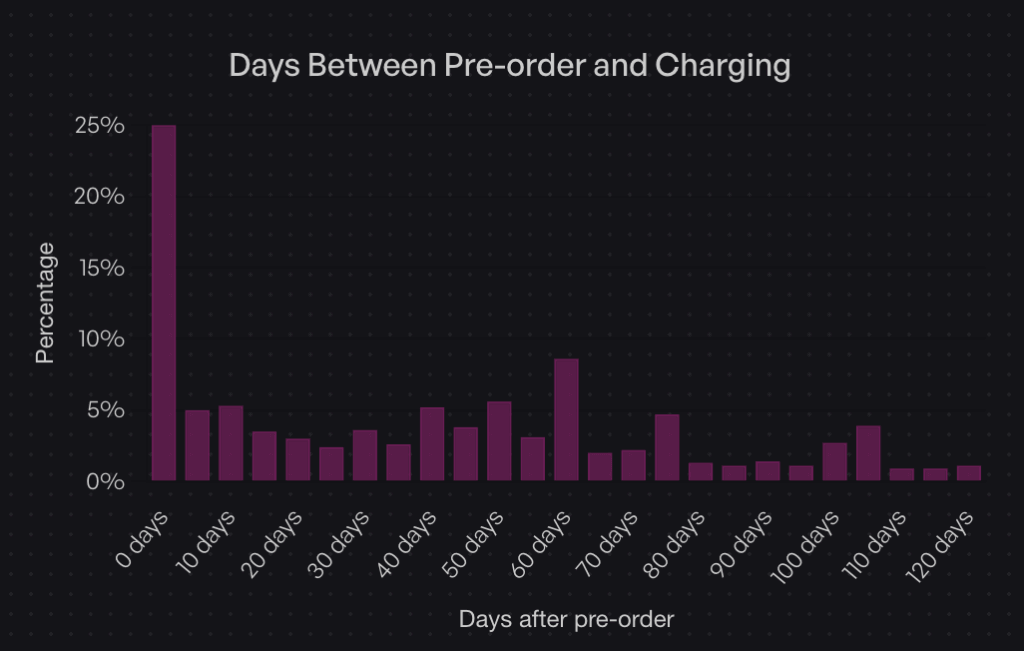
Pre-order shipping windows provide valuable supply chain visibility. 28.1% of pre-orders ship within 121-150 days, while 20.6% ship within 30 days. These extended timelines aren’t bugs, they’re features.

Longer pre-order windows give you time to align production schedules with confirmed demand. A four-month pre-order window lets you order materials, schedule production, and arrange logistics without rushing or guessing quantities.

Shorter pre-order windows (under 30 days) work well for restocks of proven products where you need to gauge immediate demand before the next production run arrives.

When to Use Pre-orders for Forecasting

Pre-orders provide the most value in specific scenarios where traditional forecasting falls short:

New product launches: When you have zero sales history, pre-orders are your only source of real demand data. Market research suggests interest; pre-orders prove it.

Limited editions or seasonal drops: For products with intentional scarcity or time-bound availability, pre-orders help you set production quantities without overproducing.

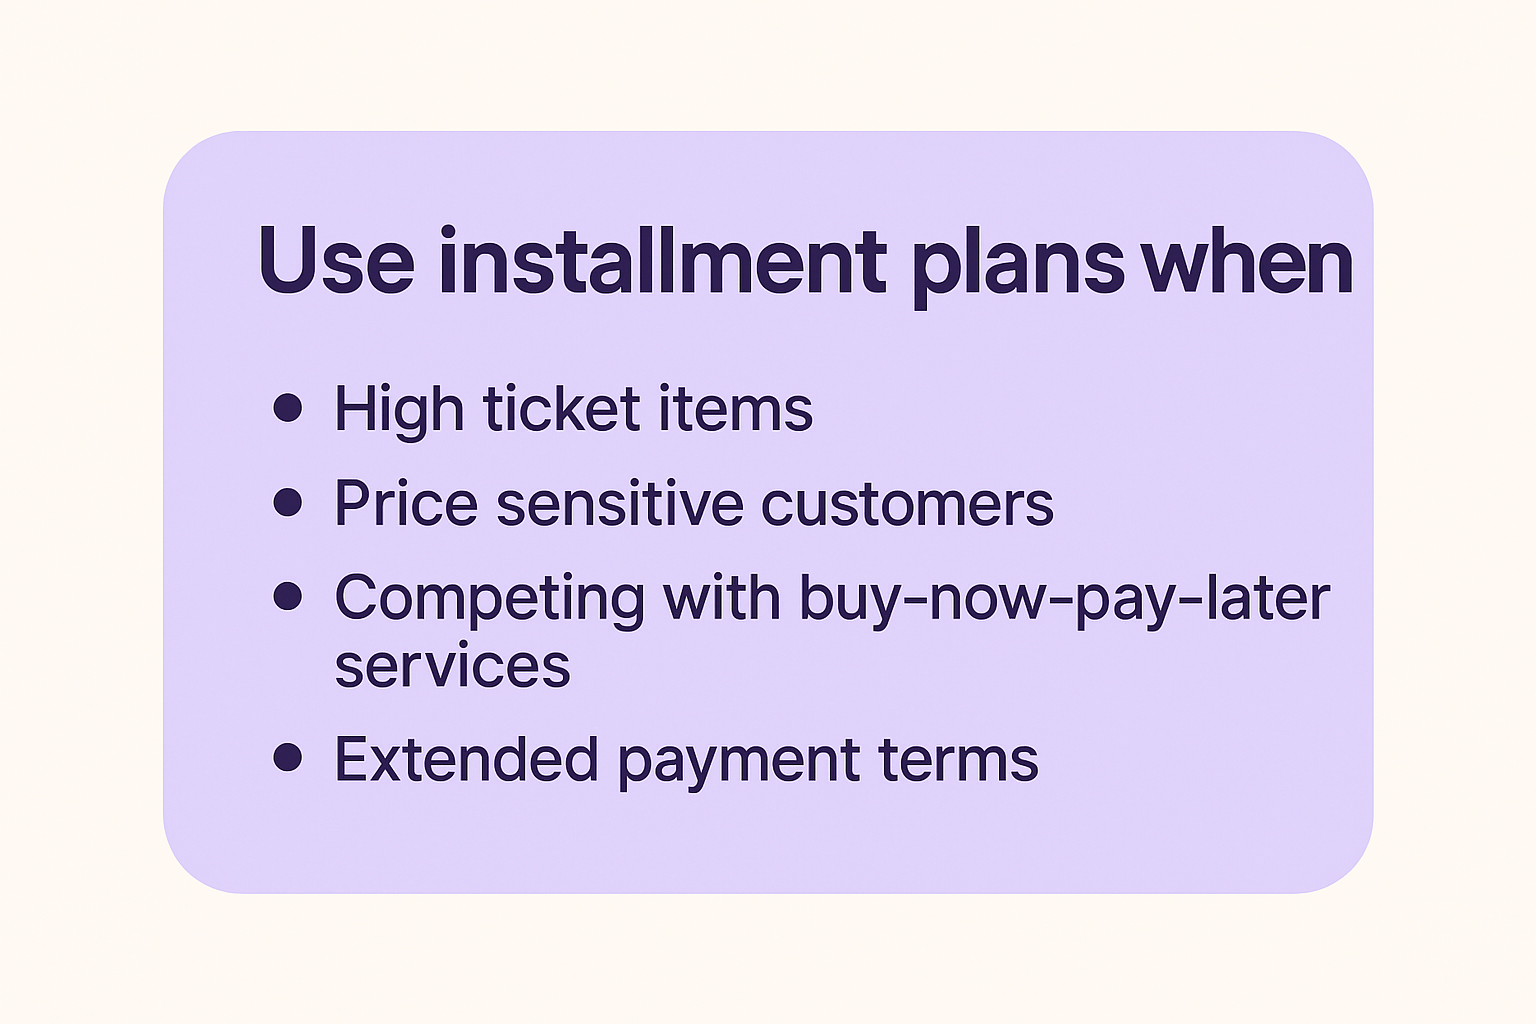
High-value items: Expensive products carry more inventory risk. A pre-order approach reduces that risk by confirming demand before you tie up capital in unsold inventory.

Made-to-order or custom products: When production only starts after an order arrives, pre-orders are the business model, not just a forecasting tool.

Testing new markets or customer segments: Expanding into new geographies or demographics? Pre-orders validate demand in that segment before you invest in local inventory or marketing.

Building Your E-commerce Demand Forecasting Process

Effective demand forecasting requires a systematic approach that combines data gathering, method selection, and continuous refinement.

Step 1: Gather Your Data Sources

Start by consolidating all available demand signals, both historical and forward-looking.

Internal data: Pull from your POS system, ERP, CRM, and website analytics. You need transaction history, inventory movement, customer behavior data, and return rates. Clean this data first, duplicate and incomplete records will skew your forecasts.

External data: Layer in market trends, seasonality patterns, economic indicators, and competitive intelligence. If you sell outdoor gear, weather forecasts matter. If you sell fashion, trend reports from major markets influence demand.

Forward-looking signals: Don’t ignore what’s happening right now. Pre-order data, waitlist sign-ups, email campaign engagement, and social media buzz all indicate future demand before it shows up in sales data.

The more data sources you integrate, the more accurate your forecasts become, assuming the data is clean and relevant.

Step 2: Choose Your Forecasting Method

Match your forecasting approach to your product lifecycle and data availability.

Existing products with history: Use quantitative methods, preferably AI-powered tools that can process multiple variables simultaneously. Historical sales patterns work well here.

New products: Combine pre-orders with qualitative research. Pre-orders provide hard numbers; market research adds context about positioning and target customers.

Hybrid approach: Most brands benefit from combining multiple methods. Use AI for established catalog items, pre-orders for new launches, and qualitative input for major market shifts or strategic decisions.

Don’t lock yourself into one method. Different products and scenarios call for different forecasting techniques.

Step 3: Set Your Forecast Parameters

Define the specifics of what you’re forecasting and over what time horizon.

Forecast horizon: Choose 30, 60, 90, or 180-day forecast windows based on your lead times and business cycle. Longer lead times require longer forecast horizons.

Granularity: Decide between SKU-level forecasts (more accurate but more complex) versus category-level forecasts (simpler but less precise). Most brands benefit from SKU-level forecasting for top sellers and category-level for long-tail products.

Confidence intervals: Build in buffers for forecast uncertainty. A forecast with a confidence interval acknowledges that actual demand might fall within a range, not hit a single number.

Step 4: Implement Human-AI Collaboration

The best forecasting systems combine algorithmic predictions with human judgment.

Trust AI for steady-demand products: Let automated systems handle forecasting for products with consistent, predictable demand patterns. The algorithm will outperform human guesses here.

Apply expert judgment for new items and external disruptions: When launching new products, facing supply chain disruptions, or dealing with major market shifts, layer in human expertise. Algorithms can’t predict the unpredictable.

Override capabilities: Maintain the ability to override automated forecasts when you have information the system doesn’t. If you know a major marketing campaign is launching or a competitor is going out of business, adjust forecasts accordingly.

Step 5: Monitor & Adjust

Demand forecasting isn’t a set-it-and-forget-it exercise. Continuous monitoring and refinement improve accuracy over time.

Track forecast accuracy: Measure how close your predictions came to actual demand. Use metrics like MAPE (Mean Absolute Percentage Error) to quantify accuracy.

Review regularly: Check forecasts weekly for fast-moving products and monthly for steady sellers. Adjust as you gather new information.

Refine models: As actual sales data comes in, feed it back into your forecasting models. Machine learning systems improve automatically; manual processes require intentional updates.

Key Metrics to Track

Effective demand forecasting requires monitoring specific KPIs that measure both forecast quality and inventory health.

Forecast accuracy (MAPE): Mean Absolute Percentage Error measures how far your forecasts deviate from actual demand. Aim for MAPE under 10%, though this varies by product category and lifecycle stage.

Forecast Value-Added (FVA): Does your forecast beat a naive baseline (like assuming next month equals this month)? If your sophisticated model doesn’t outperform simple baselines, simplify your approach.

Days of supply: How long will current inventory last at predicted demand rates? This metric helps you time reorders and avoid stockouts.

Stock-out rate: Target under 2%, though the industry average sits around 8%. Track this by SKU to identify chronic stock-out problems.

Inventory turnover: How quickly you sell through stock indicates forecasting efficiency. Higher turnover (assuming you avoid stockouts) suggests accurate demand prediction.

Pre-order conversion rate: For products using pre-orders, track the percentage of pre-order interest that converts to completed orders. This validates your demand forecasting assumptions.

Cancellation rate: Monitor pre-order cancellations (5.4% average) and factor this into future forecasts. Rising cancellation rates might indicate pricing, positioning, or communication issues.

Demand Forecasting Best Practices

Follow these principles to improve forecast accuracy and operational efficiency.

Start with quality data: Clean, consistent historical data is the foundation. Remove duplicates, fix missing values, and standardize formats before feeding data into forecasting models. Bad data leads to bad forecasts.

Segment your forecasts: Different product types require different approaches. New launches need pre-order validation; established bestsellers need time-series analysis; seasonal products need year-over-year comparisons.

Layer pre-orders into new launches: Don’t guess on new product demand. Use pre-orders to gather real purchase intent before committing to large production runs. This reduces the single biggest forecasting risk: products with no history.

Factor in seasonality: Adjust for known demand patterns tied to holidays, weather, or industry cycles. A ski shop knows winter drives demand; build those patterns into forecasts rather than treating each month as independent.

Collaborate cross-functionally: Align marketing, operations, and finance teams around demand forecasts. Marketing knows campaign timing; operations knows lead times; finance knows cash constraints. Better forecasts emerge from combined perspectives.

Use multiple data sources: Don’t rely solely on historical sales. Integrate market research, competitive intelligence, economic indicators, and forward-looking signals like pre-order data and waitlist growth.

Build in buffers: Account for cancellations, returns, and demand variability. Perfect forecasts don’t exist; buffers protect against the inevitable misses.

Review regularly: Fast-moving products need weekly reviews; steady products need monthly check-ins. Update forecasts as new information arrives rather than sticking with outdated predictions.

Choosing Demand Forecasting Tools

The right forecasting tools depend on your business size, technical capabilities, and accuracy requirements.

Considerations: Evaluate integration with your existing tech stack (Shopify, ERP, 3PL systems), forecast accuracy rates (ask for MAPE benchmarks), learning curve and team capabilities, and total cost including implementation and ongoing fees.

AI-powered options: Cogsy achieves 92% accuracy for businesses with six months of data, specializing in Shopify DTC brands. Fabrikator users see 20-40% improvement in forecast accuracy within three months, with strong ERP integration.

Enterprise solutions: NetSuite and SAP offer comprehensive demand planning within larger ERP suites, suited for complex, multi-channel operations.

Shopify-specific: Shopify’s Sidekick brings AI-powered forecasting directly into the Shopify admin, convenient for Shopify-native brands.

For new products: PreProduct enables pre-order demand validation for new product launches, helping you gather real purchase intent before committing to inventory. This complements traditional forecasting for established products by filling the new-product gap.

For most ecommerce brands, a hybrid approach works best: AI-powered tools for established catalog items and pre-order validation for new launches and major restocks.

Conclusion

Demand forecasting prevents the costly extremes of stockouts and overstocking, keeping cash flow healthy and customers satisfied. The right approach depends on your product lifecycle: traditional quantitative methods work well for existing products with sales history, while pre-orders fill the critical gap for new launches where no data exists.

Combine quantitative forecasting, qualitative insights, and forward-looking signals like pre-orders to build a comprehensive demand planning system. Start with clean data, choose tools that fit your operation, and adjust forecasts regularly as new information arrives.

Key takeaways:

  • Poor forecasting costs retailers over $1 trillion annually through stockouts and overstocking combined
  • AI-powered tools can now achieve 89-92% accuracy, significantly outperforming traditional methods
  • Pre-orders provide real demand signals for new products, with payment timing revealing commitment levels
  • Build in 5.4% cancellation buffers for pre-order forecasts
  • Products priced $25-50 see the highest pre-order conversion rates

Ready to improve your demand forecasting? For established products, explore inventory management best practices. For new launches, start validating demand with pre-orders before you commit to production. Real demand data beats guesswork every time.

Pre-sell With PreProduct

7 day free trial with all plans

Shopify Charge Later: Complete Guide to Deferred Payments for Pre-orders

Prefer to watch a video? Click here to see Oli talk charging later on Shopify.

In analyzing $85 million in pre-order sales data, one payment method stands out: 43.8% of successful pre-order listings use charge-later payments. This approach dominates because it solves a critical problem for Shopify merchants running pre-orders with extended lead times. Here’s why this method works and how to implement it for your store.

Shopify’s standard authorization period creates a significant challenge for pre-orders. You’re forced to either charge customers before their products are ready (increasing refund risk) or pay surcharges to extend authorization holds. Charge-later payments with vaulted cards eliminate this problem entirely, giving you unlimited flexibility on when to collect payment.

By the end of this guide, you’ll understand exactly when to use charge-later payments, how to set them up on Shopify, and how to handle the edge cases that trip up most merchants. We’ll show you the technical setup and the operational workflows, backed by real data from over one million pre-orders.

Shopify charge later payments concept showing abstract payment processing with credit card

What is Charge Later on Shopify?

Charge later (also called deferred payments or deferred charges) allows customers to place a pre-order and complete checkout without being charged immediately. Instead, their payment details are securely vaulted with Shopify Payments, PayPal, or Stripe, and you trigger the charge when you’re ready to fulfill, whether that’s 30 days, 90 days, or six months later.

The customer goes through a normal checkout experience at the time of pre-order. They agree to a future charge, their card details are saved securely, and you collect payment when stock lands or production completes. This is different from a traditional authorization hold, which expires after 7-30 days and incurs surcharges.

How Vaulted Card Technology Works

When a customer checks out for a charge-later pre-order, Shopify creates a payment mandate. This represents the customer’s permission for you to charge their saved payment method at a future date. The card details are stored securely (vaulted) by the payment processor, not by you or your pre-order app.

The technical foundation uses Shopify’s selling plan API and payment mandate system. Your pre-order app configures billing policies that specify “charge at a future date” rather than “charge now.” When you’re ready to collect payment, you trigger the deferred charge through the orderCreateMandatePayment mutation.

For merchants, this means you maintain complete control over payment timing without worrying about authorization periods expiring. For customers, it means they can commit to a purchase without the immediate financial outlay.

Why Charge Later Matters for Pre-orders

Authorization periods create artificial constraints on pre-orders. Shopify Payments provides a standard 7-day authorization window. After day seven, you pay an additional 1.75% surcharge on top of regular processing fees. The maximum authorization period is 30 days, even with surcharges.

This doesn’t work for most pre-orders. If your production timeline is 60 days, 90 days, or longer, authorization holds fail completely. You’d need to charge customers immediately or risk losing the authorization entirely.

Charge-later payments solve this by removing time constraints. You pay standard Shopify Payments rates (typically 2.9% + 30¢) regardless of when you charge, whether that’s three days or three months after checkout. There’s no surcharge for waiting, and no expiration date on the vaulted card.

From a customer psychology perspective, charge-later also converts better for longer lead times. Being charged when the product ships rather than months before feels fairer and builds trust. According to our data, 56.4% of merchants prefer charge-later methods over charge-upfront, making it the most popular pre-order approach.

How Charge Later Works: The Technical Foundation

Understanding the technical mechanics helps you set up charge-later pre-orders correctly and troubleshoot issues when they arise.

Shopify’s Vaulted Card System

Vaulted cards rely on Shopify’s purchase options framework, which was introduced to support pre-orders, try-before-you-buy programs, and subscriptions. As a merchant, you won’t be interacting with this framework directly; instead, you’ll be using it via a pre-order app like PreProduct. The system uses three key components:

Selling Plans define the payment structure. For charge-later pre-orders, the selling plan specifies a billing policy with a future charge date or interval. This can be a specific date (“charge on March 15”) or relative to checkout (“charge 30 days after purchase”).

Payment Mandates represent the customer’s authorization to charge their vaulted payment method. When a customer completes checkout for a deferred payment, Shopify creates a mandate that links their saved card to the specific order.

Payment Terms indicate when payment should be collected. You can query the PaymentTerms object to check the due date and remaining balance, then use the orderCreateMandatePayment mutation to trigger the charge.

Currently, both Shopify Payments and PayPal support deferred charges for Shopify stores. Any credit card type that functions in standard checkout can be vaulted for later charging. Stripe also supports vaulted cards for headless or custom implementations.

The Customer Experience

From the customer’s perspective, charge-later checkout looks nearly identical to a standard purchase. They add the pre-order item to their cart, proceed to checkout, and enter their payment information as usual.

The key difference is messaging. Best practices require clear communication that they’re agreeing to a future charge. This typically appears as a purchase options agreement label at checkout: “You agree to be charged the full amount when your order is ready to ship.”

After completing checkout, the customer receives an order confirmation email. The order appears in their Shopify account with a status indicating deferred payment. Many pre-order apps provide customer portals where buyers can view their order status, estimated ship date, and upcoming charges.

When you trigger the charge later, customers should receive an “upcoming charge” notification a few days before the payment processes. This gives them time to update payment methods if needed and sets clear expectations.

The Merchant Backend

In your Shopify admin, charge-later pre-orders appear as regular orders but with specific indicators that payment is deferred. The order status typically shows “Payment pending” or similar until you trigger the charge.

Your pre-order app (like PreProduct) provides the interface to manage deferred charges. You can trigger charges individually per customer, in bulk by listing, or through automated rules based on inventory levels.

When you’re ready to collect payment, you trigger the deferred charge. The system attempts to charge the vaulted card and updates the order status based on success or failure. Successful charges move the order to “paid” status and can proceed to fulfillment. Failed charges require retry attempts or customer contact to update payment methods.

For Shopify stores, fulfillment holds prevent pre-order items from shipping before payment collection. The order remains on hold until you both charge successfully and release the fulfillment hold, giving you complete control over the timing.

Charge Later vs Other Payment Methods

Choosing the right payment method for your pre-orders depends on lead time, product price, customer preferences, and operational capacity. Here’s how charge-later compares to alternatives:

MethodBest ForProsConsProcessing Cost
Charge-Later30-180 day lead timesLower refund risk, no time limits, customer preferencePotential failed charges, no upfront revenueStandard (2.9% + 30¢)
Charge-UpfrontUnder 7 daysImmediate cash flow, funds verifiedHigher refund risk, customer hesitationStandard (2.9% + 30¢)
Authorization Hold7-30 days*Funds verified, standard flow1.75% surcharge after day 7, 30-day maxHigher (4.65% + 30¢ after day 7)
Capture-OnlyUncertain timelinesMaximum flexibility, no payment until readyManual payment links, extra customer stepStandard (2.9% + 30¢)
DepositsHigh-value items ($300+)Secures commitment, improves cash flowMore complex, still need balance chargeStandard (2.9% + 30¢)

*Only Shopify+ has access to the extended 30 days authorization period.

When to Choose Charge-Later

Charge-later works best when:

Lead times extend beyond 30 days. This is the sweet spot where authorization holds become expensive or impossible, but shipping is too far out to charge upfront.

Product margins support cancellations and failed charges. While the cancellation rate is typically low (under 5%), you need enough margin to handle occasional losses from expired cards or insufficient funds.

You want to maximize quantity of pre-orders. For lead times over 30 days, we see charge-later pre-orders converting better on the product page than charge-upfront, due to customers not having to part with any money today.

You can communicate effectively. Charge-later requires clear messaging about payment timing, estimated ship dates, and charge notifications. Your pre-order app should faciliate this with clear messaging and notifications.

When Charge-Upfront Works Better

Some scenarios favor charging immediately:

Very short lead times mean customers are more comfortable paying upfront, as it’s essentially a regular order with slightly longer shipping times.

Critical cash flow needs require revenue now rather than later, especially for smaller businesses funding production.

Low refund risk products with proven demand and reliable timelines see fewer cancellations.

Established customer relationships with high trust may prefer to pay upfront and wait for delivery.

The Deposit Hybrid Approach

Taking a deposit upfront, then charging the balance later combines advantages of both methods. You collect 10-50% at checkout to secure commitment and improve cash flow, then charge the remaining balance when ready to ship.

According to our data, 12.6% of pre-orders use the deposit-upfront vaulted card method. This approach works particularly well for higher-ticket items ($300+) where full upfront payment feels like too much commitment, but a deposit demonstrates serious buyer intent.

The Data: Who Actually Uses Charge Later?

Real merchant behavior reveals what works in practice, not just theory.

Adoption Statistics

Analyzing one million pre-orders representing $85.3 million in sales, charge-later emerges as the clear favorite:

43.8% of pre-order listings use charge-later (75,781 listings), making it the single most popular payment method. This beats charge-upfront (14.9%), capture-only payment links (28.7%), and deposit-upfront arrangements (12.6%) combined.

47.8% of pre-orders are charged within 30 days of checkout, while 25.0% are charged immediately (day zero). This timing distribution shows merchants use charge-later flexibly based on their specific production and shipping schedules.

Notably, vaulted card functionality wasn’t available until 2022, showing rapid adoption since introduction. The technology has clearly solved a real pain point for pre-order merchants.

Why It’s the Most Popular Method

Several factors drive charge-later adoption:

Customer conversion advantages. For lead times over 30 days, asking customers to pay months before receiving their product creates psychological resistance. Charging when ready to ship feels fairer and reduces perceived risk.

Operational flexibility. Manufacturing and shipping timelines shift. Charge-later gives you room to adjust without refunding customers or dealing with expired authorizations.

Cost efficiency. Compared to extended authorization periods with 1.75% surcharges, charge-later costs the same as a regular transaction regardless of delay.

Risk mitigation for long lead times. If production delays force you to push dates back, customers who haven’t paid yet are typically more understanding than those who paid months ago.

The success rate for deferred charges is generally high (over 95% for merchants with good communication practices), making the approach both merchant-friendly and low-risk.

How to Set Up Charge Later Pre-orders on Shopify

Implementing charge-later pre-orders involves technical setup, operational configuration, and customer communication planning.

Prerequisites

Before you can offer charge-later pre-orders, verify these requirements:

Shopify Payments or PayPal must be enabled as your payment processor. Third-party gateways don’t support vaulted cards through Shopify’s native checkout. If you’re using a different processor, you’ll need to switch or use capture-only payment links instead.

Your store must use the current checkout (not legacy checkout.liquid). Vaulted cards aren’t compatible with older checkout customizations. If you’re on Shopify Plus with checkout.liquid customizations, you’ll need to migrate to Checkout Extensibility.

You need a pre-order app that supports deferred charges. Not all Shopify pre-order apps offer charge-later functionality. Apps like PreProduct are built specifically to handle vaulted card workflows.

Your theme should be compatible with app blocks or willing to accept minor template changes for pre-order buttons and messaging.

Step-by-Step Setup Guide

Step 1: Verify Shopify Payments is Active

Navigate to Settings > Payments in your Shopify admin. Confirm Shopify Payments shows as your active payment provider. If you’re using PayPal, ensure PayPal automatic payments are enabled.

Step 2: Install a Pre-order App with Vaulted Card Support

Visit the Shopify App Store and install a Shopify pre-order app that supports charge-later functionality. PreProduct, for example, provides charge-later, deposit, and multi-step payment plan options.

After installation, the app will guide you through adding its app block to your theme via the theme customizer, or provide a code snippet to add manually.

Step 3: Create Your First Charge-Later Listing

In your pre-order app dashboard, create a new listing and select “charge-later” or “deferred payment” as the payment type. You’ll configure:

  • Which product or variants to include
  • Lead time or estimated ship date
  • Custom messaging for the product page, cart, and checkout
  • Whether to allow mixed carts (pre-order + regular items)
  • Charge trigger conditions (manual or automatic based on inventory)

Step 4: Customize Product Page Messaging

Clear communication is critical. Your product page should explicitly state:

  • This is a pre-order item
  • When the item is expected to ship
  • That payment will be charged when ready to ship (or specific date if known)
  • Terms and conditions for the pre-order

Example messaging: “Pre-order now. Your card will be saved securely and charged one week before your estimated ship date of March 2026.”

Step 5: Set Up Charge Trigger Automation

Decide how you’ll trigger charges:

Manual triggering gives you complete control. When inventory arrives, you log into your pre-order app and trigger charges by listing or customer.

Inventory-based automation monitors your Shopify inventory levels. When stock reaches a threshold, the system automatically triggers charges for waiting pre-orders.

Shopify Flow automation (for Scale and Scale Plus plans) lets you build custom workflows. For example: “When variant inventory > 0 AND order has tag ‘pre-order-march’, trigger deferred charge.”

Step 6: Test the Complete Flow

Before launching to customers, run test orders:

  • Place a test pre-order as a customer would
  • Verify checkout messaging is clear
  • Confirm the order appears correctly in Shopify admin
  • Trigger a test charge and verify it processes
  • Check that fulfillment holds work as expected

Best Practices for Implementation

Set Realistic Lead Times

Underpromise and overdeliver. If you think 60 days, say 60-75 days. Delays happen, and customers who haven’t been charged yet are more forgiving than those waiting months after payment.

Send “Upcoming Charge” Notifications

Email customers 1-3 days before charging. This gives them time to update payment methods if their card expired or contact you with questions. Apps like PreProduct automate these notifications.

Make Payment Timing Crystal Clear

Don’t bury payment terms in fine print. State clearly on the product page, in the cart, at checkout, and in order confirmation emails when payment will be collected.

Plan Your Charge Workflow

When inventory arrives, how will you process hundreds of deferred charges? Set aside time for this, monitor charge success rates, and be ready to handle failed payments quickly.

Enable Customer Self-Service

Customer portals that show order status, estimated ship dates, and payment schedules dramatically reduce support tickets. Let customers see when they’ll be charged and update payment methods themselves.

Advanced Strategies: Combining Charge Later with Deposits

Deposit-based pre-orders with vaulted card balance charging offer a middle ground between full upfront payment and pure charge-later.

The Deposit + Charge Later Hybrid

With this model, customers pay a portion (typically 20-50%) at checkout as a deposit, then you charge the balance when ready to ship. The deposit accomplishes several goals:

Secures buyer commitment beyond just vaulted card authorization. Someone who has paid a deposit is less likely to cancel than someone with only a saved payment method.

Improves short-term cash flow while still deferring the majority of revenue until fulfillment. This helps fund production without requiring full upfront payment.

Reduces perceived risk for high-ticket items. A $100 deposit on a $400 product feels more reasonable than $400 months before delivery.

The balance charge works identically to a full charge-later pre-order, using the same vaulted card system. When you trigger the charge, the system collects the remaining amount automatically.

When to Take Deposits vs Full Charge-Later

Use deposits for:

  • Products over $300 where full payment feels like too much commitment
  • First-time buyers or new product launches where you want to gauge serious interest
  • Longer lead times (90+ days) where full charge-later might see higher cancellation rates
  • Custom or made-to-order items where you’re investing upfront in production

Use full charge-later for:

  • Established products with proven demand
  • Price points under $200 where deposits add complexity without much benefit
  • Short to medium lead times (30-60 days)
  • Restock campaigns where customers know exactly what they’re getting

According to our data, 12.6% of pre-orders use the deposit-upfront vaulted card method. While less common than pure charge-later, it fills an important niche for higher-value pre-orders.

Calculating Optimal Deposit Percentages

The right deposit amount balances commitment, cash flow, and customer psychology:
5-30% deposits work for low-priced items ($50-$300). Enough to show commitment without being a major barrier.

30-50% deposits make sense for higher-ticket items ($300-$1000+). Customers expect to put more down for expensive purchases.

50%+ deposits for very high-value items (over $1000) or custom work where you’re investing significantly in production.

Test different deposit percentages and monitor your cancellation rates. If deposits are too low, you’ll see more cancellations. Too high, and you’ll reduce conversion at checkout.

Multi-Step Payment Plans

For Shopify Plus stores, PreProduct offers multi-step payment schedules that spread charges across multiple dates, X days apart, for example:

  • 25% at checkout
  • 25% at 30 days
  • 25% at 60 days
  • 25% at 90 days (fulfillment)

This installment approach works particularly well for high-ticket pre-orders ($500+) where even a 50% deposit feels substantial. It also improves cash flow throughout the production cycle rather than all at fulfillment. It’s also a great approach for particuarly price sensitive customers.

Multi-step plans use the same vaulted card system, just with multiple scheduled charges. Each charge triggers automatically on its scheduled date. Customers can view their payment schedule and upcoming charges in their customer portal.

Handling Failed Payments & Edge Cases

When using the vaulted card approach, some charges will fail. Having a recovery process is essential.

Why Payments Fail

Expired cards are the most common issue. If your lead time is 90+ days, a percentage of customers’ cards will expire before you charge them. Credit cards typically expire every 3-4 years, so longer pre-order windows see higher expiration rates.

Insufficient funds happen when customers’ accounts don’t have enough funds to cover the charge. This can happen for a variety of reasons, including financial situations changing between checkout and charge.

Fraud detection blocks occur when the charge amount or timing triggers the card issuer’s fraud alerts. Sometimes a large charge months after the original authorization looks suspicious.

Bank authorization issues include various technical problems: closed accounts, card blocked for online purchases, international transaction restrictions, etc.

Dunning Process & Recovery

A dunning process is your system for recovering failed payments. Here’s an effective approach:

Immediate retry: When a charge fails, your system should automatically retry 24 hours later. Many failures are temporary (network issues, daily spending limits reached, etc.) and resolve themselves.

Customer notification email: After the first retry fails, send an email explaining the charge failed and providing a link to update payment methods. Make this easy with a customer portal where they can enter new card details.

Second retry: 3-5 days after the first failure, retry again. By now, customers who received the email have had time to update their information.

Final notice: 7-10 days after the initial failure, send a final notice that their order will be cancelled if payment can’t be collected within X days.

Automatic cancellation: After a peiord of retries, consider automatically canceling the order and release the inventory. Some merchants give customers even longer, but each day the inventory is held is a day it can’t be sold to someone else.

Good pre-order apps handle this dunning sequence. PreProduct, for example, handles retry schedules and customer communication, while giving you visibility into charge success rates and recovery efforts.

Failed Charge Best Practices

Send “upcoming charge” emails 3-7 days before charging. This catches card expiration issues before they become problems. Customers can update payment methods proactively.

Make payment method updates easy. Customer portals that let buyers update cards without contacting support dramatically improve recovery rates.

Be understanding in communication. Failed payments are often embarrassing for customers. Use supportive language: “We weren’t able to process your payment” rather than “Your card was declined.”

Consider flexible timelines. If a customer needs an extra week to resolve payment issues and you have the inventory flexibility, extending the deadline builds loyalty.

Learn from failure patterns. Track which products or lead times see higher failure rates. Extremely long lead times might need deposit models or shorter charge windows. Remember its your choice if deposits are refundable or not.

Edge Cases & Solutions

Customer requests cancellation before charging:

This is straightforward with charge-later. You haven’t collected payment yet, so you simply cancel the order in your system and release the inventory. No refund processing needed.

Production delays extend beyond promised dates:

Update customers about the delay, most likely over email. Since you haven’t charged them yet, they’re typically more understanding than if they’d paid months ago. Offer the option to cancel or wait.

Partial inventory arrives:

If you can fulfill some but not all orders, trigger charges only for customers you can ship to. Prioritize based on order date, or offer the option to wait for the next batch. Auto-charge automations often work on a first-come, first-served basis.

Customer wants to change order details:

Before charging, order modifications are simpler. Update the order details in your system. After charging, you’re dealing with refunds and reorders.

Inventory arrives early:

You can charge earlier than originally promised as long as you communicated that payment would be collected “when ready to ship” rather than a specific date. Best practice is to notify customers the charge is coming even if it’s early.

Shopify Authorization Period vs Charge Later

Understanding the authorization period problem helps explain why charge-later emerged as the preferred solution.

The Authorization Period Problem

When a customer places a regular Shopify order, Shopify Payments authorizes their card. This puts a hold on the funds, verifying the card is valid and has sufficient balance. The merchant then has a window to capture (collect) that payment.

For Shopify Payments, the standard authorization period is 7 days. After day seven, you can extend the authorization, but Shopify charges an additional 1.75% surcharge on top of standard credit card fees (which are typically 2.9% + 30¢).

So an extended authorization costs 4.65% + 30¢ instead of the standard 2.9% + 30¢. That’s nearly 60% higher in percentage fees.

The maximum authorization period, even with surcharges, is 30 days (Shopify+ only, otherwise 7 days). After that, the authorization expires completely and you can’t collect payment at all.

For pre-orders with lead times beyond 30 days, authorization holds simply don’t work. You’re forced to either:

  1. Charge customers immediately (if lead times are short enough)
  2. Use capture-only models with manual payment links later (adding friction)
  3. Use vaulted cards to charge later without authorization period limits

How Charge Later Solves This

Vaulted cards with deferred charges eliminate the authorization period problem entirely. There’s no time limit on when you can charge the saved payment method. Whether your lead time is 30 days, 90 days, or six months, you pay standard processing fees with no surcharges.

The cost structure is identical to a regular transaction: 2.9% + 30¢ for standard Shopify Payments, regardless of how long you wait to charge.

This flexibility is particularly valuable when timelines are uncertain. Manufacturing delays, shipping disruptions, or supply chain issues don’t force you to charge early or deal with expired authorizations.

Cost Comparison: Authorization vs Vaulted Cards

Let’s compare the real costs for a $100 pre-order with different lead times:

0-7 days (authorization within window):

  • Authorization: $2.90 + $0.30 = $3.20 (2.9% + 30¢)
  • Vaulted card: $2.90 + $0.30 = $3.20 (2.9% + 30¢)
  • Winner: Tie

8-30 days (extended authorization):

  • Authorization: $4.65 + $0.30 = $4.95 (4.65% + 30¢)
  • Vaulted card: $2.90 + $0.30 = $3.20 (2.9% + 30¢)
  • Winner: Vaulted card (saves $1.75 per transaction)

31+ days (authorization expired):

  • Authorization: Not possible without manual payment links
  • Vaulted card: $2.90 + $0.30 = $3.20 (2.9% + 30¢)
  • Winner: Vaulted card (only option that works)

For a store processing 1,000 pre-orders at $100 each with 45-day lead times, vaulted cards save $1,750 compared to extended authorizations.

When Authorization Still Makes Sense

Authorization holds aren’t obsolete. They work fine for:

  • Very short pre-orders (under 7 days)
  • Restock campaigns where inventory is expected within days
  • Test runs where you want to verify funds before committing to production

The key is matching the tool to the timeline. Authorization is simple and built-in for short windows. Vaulted cards are essential for anything longer.

Limitations & When NOT to Use Charge Later

Charge-later isn’t the right solution for every scenario. Understanding limitations helps you choose appropriately.

Platform Restrictions

Local payment methods aren’t compatible. Vaulted cards work with credit and debit cards through Shopify Payments or PayPal. Local payment methods (Sofort, iDEAL, Bancontact, etc.) can’t be vaulted for future charges. If you rely heavily on these payment methods, charge-upfront or capture-only models work better.

Draft orders don’t support deferred charges. If you create orders manually via draft orders (common for wholesale or custom quotes), you can’t use vaulted card deferred payments. You’d need to collect payment upfront or send a payment link later.

B2B checkout has limitations. Shopify’s B2B checkout and net payment terms don’t fully integrate with consumer-facing vaulted card workflows. Enterprise merchants with complex B2B needs may need custom solutions.

Legacy checkout.liquid isn’t compatible. If you’re on Shopify Plus with extensive checkout.liquid customizations, you’ll need to migrate to Checkout Extensibility before using vaulted cards.

Business Scenarios Where Charge-Upfront is Better

Very short lead times (under 7 days) make charge-later unnecessary. If you’re shipping within a week, just charge upfront. The refund risk is minimal and you avoid any potential failed charge issues.

Immediate cash flow needs sometimes override other considerations. If you need revenue today to pay for production, you must charge upfront regardless of slightly higher refund risk.

Proven products with extremely low refund rates might not benefit from charge-later. If you know from experience that cancellations are under 1%, the administrative overhead of deferred charging might not be worth it.

Established customer relationships with high trust can make upfront payment feel natural. Your repeat customers who know and love your brand may prefer to pay and forget about it rather than worry about a future charge.

Alternatives to Consider

Capture-only for maximum flexibility: With this model, you don’t charge cards at checkout at all. Orders are captured in your pre-order system with contact information only. When ready to fulfill, you send payment links via email. This gives ultimate flexibility but adds friction (customers must click the link and pay).

According to our data, 28.7% of pre-orders use capture-only payment links, making it the second most popular method after charge-later. It works particularly well when timelines are very uncertain or you want to offer customers maximum optionality.

Deposits for higher commitment: As discussed earlier, taking 20-50% upfront combines some immediate cash flow with deferred balance charging. This middle ground often makes sense for expensive items or long lead times where pure charge-later might see more cancellations.

Charge-upfront with generous refund policies: Some merchants simply charge immediately but make refunds effortless if customers change their minds. This works when you have good cash reserves and can afford to process refunds without disruption.

The right approach depends on your specific business model, product type, customer base, and operational capacity.

Customer Communication Best Practices

Clear communication throughout the pre-order journey reduces support tickets, builds trust, and improves charge success rates.

Setting Clear Expectations

Product page messaging is your first opportunity to set expectations. Don’t hide that this is a pre-order or when payment will be collected. Example:

“This item is available for pre-order and will ship in March 2026. Your payment method will be saved securely and charged one week before shipping. You can cancel anytime before we charge your card.”

Checkout flow transparency ensures customers understand what they’re agreeing to. Shopify’s purchase options agreement label appears at checkout for deferred charges. Make sure this clearly states when payment will be collected.

Confirmation email templates should repeat key information:

  • Thank you for your pre-order
  • Estimated ship date
  • When payment will be collected
  • How to update payment methods or cancel
  • Link to customer portal for order status

Pre-charge notification is critical. 3-7 days before charging, send an email: “Your pre-order is almost ready to ship! We’ll charge your payment method on [date]. If you need to update your card, click here.”

This simple email dramatically reduces failed charges by catching expired cards before the charge attempt.

Building Trust Through Communication

Explain the “why” of charge-later. Customers sometimes worry that deferred payment means the business might not follow through. Frame it as customer-friendly: “We won’t charge you until your order is ready to ship because we respect your money and your trust.”

Update emails during production maintain excitement and connection. Monthly or milestone updates (“Your order is in production,” “Your order has shipped from the factory and is in transit to our warehouse”) keep customers engaged during long lead times.

Handling delay communication is the hardest but most important communication. If you need to push dates back, notify customers immediately with:

  • Honest explanation of why (supply chain delay, quality issue, etc.)
  • New estimated date
  • Option to cancel with no charge if they prefer
  • Apology and perhaps small compensation (discount on next order, upgraded shipping)

Because you haven’t charged them yet, customers are typically more understanding of delays. “I haven’t paid yet, so I don’t mind waiting another month” is a common response.

FAQ content for product pages preempts common questions:

  • When will I be charged?
  • Can I cancel before being charged?
  • What if my card expires?
  • How will I know when my order ships?
  • What if I need to change my address?

Answering these upfront reduces support volume and increases customer confidence.

Customer Portal Features

A self-service customer portal is invaluable for charge-later pre-orders. Customers should be able to:

View order status and estimated ship dates. Real-time visibility into where their pre-order stands in the production process.

See upcoming charge dates and amounts. Transparency about when they’ll be charged and how much builds trust.

Update payment methods. Let customers change their card details before the charge attempt without contacting support.

Modify shipping addresses. Particularly important for long lead times where customers might move.

Cancel if needed. Self-service cancellation before charging reduces support burden and gives customers control.

Apps like PreProduct provide customer portals as a core feature, recognizing that self-service reduces support tickets by 40-60% for pre-order merchants.

Conclusion

Charge-later pre-orders with vaulted cards solve the fundamental problem of Shopify’s authorization period limitations. By letting you collect payment when ready to fulfill, regardless of timeline, charge-later reduces refund risk, improves customer conversion, and gives you operational flexibility.

The data speaks clearly: 43.8% of pre-order listings use charge-later, making it the most popular method by a significant margin. Merchants prefer it for lead times beyond 30 days, and customers appreciate not paying months before receiving their products.

Here are the key takeaways:

Use charge-later for pre-orders with 30+ day lead times. This is where it provides the most value by avoiding authorization period costs and expiration issues.

Set up clear communication workflows. Product page messaging, checkout transparency, and pre-charge notifications are essential for success.

Plan for failed payments with a dunning process. Automated retries and easy payment method updates recover 80-90% of initially failed charges.

Consider deposits for high-ticket items. Combining a partial upfront payment with charge-later balance collection can improve commitment while maintaining flexibility.

Test before launching. Walk through the complete customer experience, verify charge triggers work correctly, and confirm fulfillment holds are functioning.

Ready to start taking charge-later pre-orders on your Shopify store? PreProduct makes it simple to set up deferred charges, automate fulfillment holds, and manage customer communication. Start for free and only pay a percentage of pre-order revenue, or upgrade to Scale plans for advanced automation and Shopify Flow integration.

FAQ

Does Shopify natively support charge-later payments?

Shopify provides the underlying vaulted card technology and payment mandate system, but you need a pre-order app like PreProduct to configure and manage charge-later pre-orders. The native Shopify checkout doesn’t include pre-order functionality or deferred charge management on its own.

What payment processors work with charge-later?

Shopify Payments and PayPal currently support deferred charges and vaulted cards through Shopify’s native checkout. Stripe also supports vaulted cards for headless or custom implementations. Third-party gateways integrated through Shopify don’t support vaulted card deferred payments.

How much does charge-later cost compared to regular payments?

Charge-later costs exactly the same as a regular transaction: 2.9% + 30¢ for standard Shopify Payments rates (rates vary by country and plan). There are no additional fees regardless of how long you wait to charge.

Can I use charge-later for any product type?

Technically yes, but it’s most effective for pre-orders, made-to-order items, or backorder situations. Regular in-stock products don’t benefit from charge-later, you’d just charge immediately. Physical products work best; digital products don’t typically need deferred charging since there’s no production or shipping delay.

What happens if a deferred charge fails?

Your pre-order app should support retrying the charge. If it fails again, customers receive an email notification asking them to update their payment method. Most systems retry 2-3 times over 7-14 days before canceling the order. Good apps provide customer portals where buyers can easily update their card details.

How long can I wait before charging a vaulted card?

There’s no technical time limit on vaulted cards. You can charge 30 days, 90 days, 6 months, or even longer after checkout. However, longer windows increase the chance of card expiration or insufficient funds. Most successful pre-orders charge within 90 days of checkout.

Can customers cancel after checkout but before charging?

Yes, and this is one advantage of charge-later. Since you haven’t collected payment yet, cancellation is simple: you just cancel the order and release the inventory. No refund processing needed. Clear cancellation policies and easy self-service cancellation reduce support burden.

Is charge-later better than taking deposits?

It depends on your situation. Charge-later works well for medium to long lead times (1 – 6 months) and price points under $300. Deposits work better for high-ticket items ($300+), very long lead times (90+ days), or when you need some immediate cash flow. Some merchants combine both: take a deposit now, charge the balance later.

Pre-sell With PreProduct

7 day free trial with all plans

How to Write a Shopify Pre-order Policy (+ Free Templates)

Just want to generate a pre-order policy? Click here.

Pre-orders vary dramatically between stores. Some charge upfront and ship within 30 days. Others vault customer cards but don’t charge until fulfillment, sometimes 120+ days later. Some take deposits, others require full payment. Lead times range from weeks to months. Your pre-order policy is how you communicate these differences to customers, and without one, you risk disputes, payment failures and refund headaches that could have been avoided with transparent terms. If you haven’t set up pre-orders yet, our Shopify pre-order guide covers the technical setup first.

Setting up Pre-orders on Shopify opens opportunities to capture demand early, validate new products and improve cash flow. But taking payment before you ship comes with legal obligations and customer expectations you need to manage carefully. A well-written Shopify pre-order policy protects your store while building trust with customers who are committing to products that aren’t yet in their hands.

This guide walks you through everything you need to create a compliant, customer-friendly pre-order policy for your Shopify store. You’ll learn about FTC requirements and guidelines, what to include based on your payment model, and get free copy-paste templates tailored to charge-upfront, charge-later and deposit pre-orders.

Why Your Shopify Store Needs a Pre-order Policy

Legal Requirements You Can’t Ignore

The FTC Mail, Internet, or Telephone Order Merchandise Rule sets clear requirements for Pre-orders. (Learn more from the FTC) If you advertise a shipping timeframe, you must have a reasonable basis to ship within that window. If you don’t specify a date, you’re required to ship within 30 days of receiving payment. Other countries have similar requirements, although Europe can be stricter with payment and stock certainty.

When you can’t meet the promised timeline, you must notify customers promptly and explain their right to cancel or receive a full refund. If the customer cancels due to delay, you have seven business days to process the refund. These are federal requirements that generally apply to US-based ecommerce stores taking Pre-orders, though specific circumstances may vary.

Beyond federal rules, some states have additional disclosure requirements. Your Shopify pre-order policy should clearly state when payment occurs, when shipping happens and what customer rights exist if delays occur.

Customer Trust and Transparency

Clear policies reduce disputes and set realistic expectations. When customers understand exactly when they’ll be charged, when their order will ship and how to cancel if needed, you reduce support tickets and payment failures.

The average pre-order cancellation rate sits at 5.4% across the data we’ve collected. A transparent policy that explains your process upfront helps you maintain that baseline rather than seeing cancellations spike due to confusion or unmet expectations.

Pre-orders require more customer patience than standard purchases. Your policy is where you earn that patience by being upfront about timelines, payment terms and what happens if things change.

Platform-Specific Requirements

Shopify has technical requirements that affect your pre-order policy language. Pre-orders currently work only with Shopify Payments or PayPal Express. Customers can’t use accelerated checkouts like Shop Pay, Apple Pay or Google Pay, nor local payment methods like Klarna or Sofort for pre-order purchases.

If you’re using charge-later or deposit pre-orders, you’ll need Shopify Payments enabled and a Shopify pre-order app that supports vaulted card payments. These technical requirements should be disclosed in your policy so customers understand any checkout limitations.

Your policy also needs to address Shopify’s authorization period if you’re charging upfront and holding fulfillment. Payment authorizations typically expire after seven days, which matters for stores with longer lead times using charge-upfront models.

What to Include in Your Shopify Pre-order Policy

Essential Policy Components

1. Estimated Shipping and Delivery Dates

You must provide realistic estimated delivery dates and have a reasonable basis for those dates. Avoid vague language like “ships soon” in favor of specific windows: “Estimated to ship by March 15, 2026” or “Ships within 30-60 days of order placement.”

Data from over one million Pre-orders shows that 28.1% of pre-orders have fulfillment windows between 121-150 days, the most common lead time range. If your product has a longer timeline, communicate that clearly and explain why (custom manufacturing, overseas production, etc.).

Include language about what happens if the estimated date changes. Specify how you’ll notify customers and what options they have if the new timeline doesn’t work for them.

2. Payment Terms and Timing

This is where your policy must be crystal clear about when and how customers will be charged. The language varies significantly based on whether you’re using charge-upfront, charge-later or deposit models.

For charge-upfront pre-orders, state that payment is collected immediately at checkout. For charge-later pre-orders (our most popular pre-order type), explain that you’ll vault the customer’s payment method with your payment processor, but won’t capture funds until you’re ready to ship. Include information about card vaulting and that the customer’s payment method will be securely stored.

For deposit-based pre-orders, specify the percentage or amount taken upfront, when the balance will be charged and how customers will be notified before the balance charge occurs.

Include language about payment failures and what happens if a deferred charge or balance payment doesn’t go through. This protects you operationally and sets expectations with customers.

3. Refund and Cancellation Rights

Your policy must explain customer rights to cancel before shipping and how to receive refunds. Under FTC rules, if you can’t ship within the promised timeframe and the customer chooses to cancel, you must issue a full refund within seven business days. It’s also a good idea to mention if customers should cancel via a customer portal or your email support.

Specify whether customers can cancel after you’ve charged them but before you’ve shipped. Many stores allow cancellations up until the point of dispatch, which builds goodwill and reduces friction.

For deposit-based pre-orders, clarify whether deposits are refundable and under what circumstances. Some stores make deposits non-refundable after a certain point to manage production commitments, while others offer full refunds until shipping.

Address partial refunds for situations where you can only fulfill part of an order or need to substitute products.

4. Shipping and Fulfillment

Explain what happens once your pre-order stock arrives. Will orders ship immediately or will there be additional processing time? If you’re fulfilling pre-orders in the order they were placed, state that clearly.

If you allow mixed carts (pre-order items with buy-now items), explain how shipping works. Will you split the shipment and send in-stock items first, or hold everything until the pre-order is ready? Note that 62.1% of stores prohibit mixed carts to keep operations simple, but if you allow them, your policy needs to address the logistics.

Include information about shipping costs, international orders and any fulfillment holds that prevent accidental early shipping.

5. Delay and Communication Procedures

Supply chain disruptions happen. Your policy should outline what you’ll do if shipping dates change and how you’ll communicate updates to customers.

Specify how customers will be notified (email is standard), how much advance notice you’ll provide and what options customers have if they don’t agree to the new timeline. Include language about significant delays (typically four weeks or more beyond the original estimate) and customer rights to cancel with full refunds in those situations.

Consider adding a force majeure clause that addresses circumstances beyond your control, manufacturing delays, shipping disruptions or supply chain issues. This sets realistic expectations while maintaining your commitment to transparency.

6. Customer Rights and Contact Information

Make it easy for customers to reach you with questions about their pre-order. Include your support email, phone number if applicable and typical response times.

For US customers, reference their rights under the FTC Mail Order Rule. For EU customers, disclose the 14-day cooling-off period and their right to cancel for any reason within that window. For Australian customers, reference Australian Consumer Law protections.

Provide clear instructions on how to cancel a pre-order, request a refund or update payment information if needed.

Region-Specific Considerations

US Market

Your policy must comply with the FTC Mail, Internet, or Telephone Order Merchandise Rule. This means clear shipping timelines (or the default 30-day window), prompt delay notifications and seven-day refund processing when customers cancel due to delays.

Some states require additional disclosures. California, for example, has specific requirements around subscription-like charges. If your pre-order involves multiple payments over time, check state-level regulations.

EU Market

EU customers have a 14-day cooling-off period under the Consumer Rights Directive. They can cancel for any reason within 14 days of receiving the product and receive a full refund. Your policy must explicitly state this right.

As of December 2024, the EU’s General Product Safety Regulation (GPSR) requires you to appoint an EU-based Authorized Representative and provide comprehensive product safety information. If you’re selling pre-orders to EU customers, your policy should reference compliance with GPSR.

You must proactively inform EU customers of any changes to expected delivery dates and clearly explain their rights if delays occur. The communication requirements are more formal than in the US.

Other Markets

Australian Consumer Law provides strong protections for customers, including guarantees about product quality and delivery timelines. Your policy should acknowledge these rights without trying to limit them.

Canadian requirements are similar to US rules but reference the Competition Act and provincial consumer protection laws. If you ship to Canada, note any differences in processing times or returns.

Free Shopify Pre-order Policy Generator

Use this generator to create a pre-order policy template based on your store:

Pre-order Policy Generator

Generate a customized pre-order policy for your store.

How to Display Your Pre-order Policy on Shopify

Create a Dedicated Policy Page

Add your pre-order policy as a dedicated page in your Shopify admin:

  1. Go to Online Store > Pages in your Shopify admin
  2. Click Add Page
  3. Title it “Pre-order Policy” or “Pre-order Terms”
  4. Paste your policy content into the page editor
  5. Set the visibility to visible and save

Alternatively, add it to your existing policies:

  1. Go to Settings > Policies in Shopify admin
  2. Scroll to the bottom and look for custom policy options
  3. Select the pre-existing “Purchase options cancellation policy” policy
  4. Paste your template and customize
  5. Save changes

Link From Product Pages

Make your pre-order policy easy to find from product pages where Pre-orders are available:

  • Add a line in your product description: “This is a pre-order item. Please review our Pre-order Policy before purchasing.”
  • Optionally, you can also add terms and conditions at checkout requiring customers to acknowledge pre-order terms. Optin in Shopify’s “Online store” -> click 3 dots -> “Edit default theme content” -> search for “pre-order” -> edit the “Purchase options agreement label” field -> click “Save”

Email Communication Touchpoints

Your policy should be reflected in automated emails:

Order Confirmation Email
Include a reminder that this is a pre-order with a link to full terms:
“Thank you for your pre-order! Your payment [will be charged when ready to ship / has been collected]. Review our [Pre-order Policy] for details on estimated shipping dates and cancellation rights.”

Upcoming charge notification email (for charge-later and deposit balance)
Optionally sent 24 hours before charging:
“Your pre-order for [PRODUCT] is almost ready! We’ll charge your payment method on [DATE]. If you need to update payment information or cancel, please do so by [DEADLINE]. Full details in our [Pre-order Policy].”

Best Practices for Pre-order Customer Communication

Setting Expectations Early

Clear communication starts on the product page. Your pre-order button, product description and estimated delivery date should all align with your policy.

Examples of effective product page copy:

  • “Pre-order: Ships by March 15, 2026”
  • “Pre-order: Estimated delivery 90-120 days from order date”
  • “Pre-order: Limited production run, payment collected when ready to ship”

Customize your add-to-cart button text to say “Pre-order Now” instead of “Add to Cart” so customers understand what they’re buying. Most Shopify pre-order apps, including PreProduct, let you customize front-end wording across the storefront to match your brand and set clear expectations.

Proactive Updates During Lead Time

Don’t wait for customers to ask for updates. Communication reduces anxiety, support tickets and cancellations.

Send emails when something changes, plus the initial order confirmation:

  • Order confirmation: Immediate (standard)
  • Upcoming charge notification: 24 hours before charging (for charge-later/deposit)
  • Shipping update: When item ships with tracking
  • Delay notification: Immediately when you learn of delays or timeline changes

Let customers know they can check their customer portal anytime for up-to-date information on their order status, estimated delivery dates and payment schedules. This reduces the need for frequent email updates while keeping customers informed.

PreProduct offers customizable email templates and customer portals where pre-order customers can check their order status, estimated delivery dates and payment schedules anytime without contacting support.

Managing Delays and Changes

Delays happen. How you handle them determines whether customers stay committed or cancel.

When you learn of a delay:

  1. Calculate the new estimated timeline with buffer
  2. Draft clear notification email explaining what happened and new date
  3. Explain customer options (keep order with new date or cancel for refund)
  4. Set a deadline for customers to respond if they want to cancel
  5. Send the notification immediately, don’t wait

Email template for delay notifications:

“Subject: Update on Your Pre-order: New Estimated Ship Date

Hi [NAME],

We’re reaching out about your pre-order for [PRODUCT] (Order #[NUMBER]).

Due to [BRIEF REASON: manufacturing delays / shipping disruptions / supplier issues], the estimated ship date has changed from [ORIGINAL DATE] to [NEW DATE].

We understand this is disappointing. Here are your options:

Option 1: Keep your order with the new ship date of [NEW DATE]
No action needed. We’ll proceed with your order and notify you when it ships.

Option 2: Cancel for a full refund
Email us at [SUPPORT EMAIL] by [DEADLINE DATE] to cancel. [Refunds are processed within 7 business days / No payment will be collected if you cancel].

We sincerely apologize for this delay and appreciate your patience. If you have questions, please reply to this email or contact [SUPPORT EMAIL].

Thank you,
[YOUR STORE NAME]”


Common Pre-order Policy Mistakes to Avoid

Being Vague About Shipping Times

“Ships soon” or “available later this year” probably doesn’t meet your local legal requirements and frustrate customers. If you genuinely don’t know when a product will ship, it’s better to use a date range with clear caveats: “Estimated to ship between April and June 2026, subject to manufacturing timeline” is better than vague promises.

If production schedule is uncertain, use charge-later or deposit models rather than collecting full payment upfront. This reduces your refund risk and keeps customers committed without their money tied up indefinitely.

Not Disclosing Payment Timing

Customers need to know exactly when they’ll be charged. “Payment will be processed” is too vague. Your policy should state:

  • Charge-upfront: “Your card is charged immediately when you place your order”
  • Charge-later: “Your payment method will be vaulted with our processor now but won’t be charged until we’re ready to ship, approximately [TIMEFRAME] from now”
  • Deposit: “You’ll pay [AMOUNT/PERCENTAGE] now and the remaining [AMOUNT/PERCENTAGE] when we’re ready to ship, approximately [TIMEFRAME] from now”

Also disclose if there are limitations on payment methods (no Shop Pay, Apple Pay, etc.) so customers aren’t surprised at checkout.

Ignoring Regional Requirements

If you sell internationally, your policy can’t be US-only. EU customers have 14-day cooling-off periods. Australian customers have strong consumer guarantees. Canadian provinces have their own consumer protection laws.

Include a section that acknowledges regional rights:
“For EU customers: You have a 14-day righxt to cancel under the Consumer Rights Directive. See our full returns policy for details.”

“For Australian customers: Nothing in these terms limits your rights under Australian Consumer Law.”

Don’t try to write separate policies for each region unless you have a legal team. A single comprehensive policy that acknowledges major regional differences is sufficient for most stores.

Incomplete Refund Policies

Your refund section must address:

  • Timeline for processing refunds (FTC requires seven business days)
  • What triggers a refund (cancellation before ship, failure to meet timeline, etc.)
  • How refunds are issued (back to original payment method)
  • What happens to deposits if order is cancelled
  • Partial refunds if you can only fulfill part of an order

Don’t leave customers guessing about whether they can get their money back and how long it takes.

No Delay Contingency Plans

Your policy should have clear language about what happens when shipping dates slip. Include:

  • How you’ll notify customers of delays
  • How much advance notice you’ll provide
  • Definition of “significant delay” (typically four weeks or more)
  • Customer options when delays occur
  • How long customers have to decide whether to keep or cancel

Consider adding a force majeure clause:
“If delays occur due to circumstances beyond our reasonable control (natural disasters, pandemics, shipping disruptions, trade restrictions, etc.), we will notify you as soon as possible and provide updated timelines. You will have the option to cancel for a full refund if the delay exceeds [NUMBER] weeks.”

Technical Requirements for Shopify Pre-orders

Payment Gateway Setup

To offer deferred-charge Pre-orders on Shopify, you must use either Shopify Payments or PayPal automatic payments. Other payment gateways don’t support the vaulting and capture workflows needed for charge-later pre-orders. Most payment gateways support charge-upfront pre-orders.

For charge-later and deposit Pre-orders specifically, you need:

  • Shopify Payments enabled
  • A pre-order app that supports vaulted card payments (storing payment details to charge later)
  • Note: Charge-later pre-orders use card vaulting, not authorization holds, so there’s no expiration window to manage

PreProduct and similar apps handle the technical complexity of vaulting cards and managing deferred charges so you don’t have to build custom checkout flows. The app securely stores customer payment details with Shopify Payments, PayPal or Stripe and charges them when you trigger the fulfillment release. For deposit-based Pre-orders, check out Shopify deposit payments for detailed setup guidance.

Inventory and Fulfillment Settings

Enable the “Continue selling when out of stock” for pre-order products so customers can purchase even when inventory is at zero. Most pre-order apps toggle this setting automatically when you create a listing.

For Shopify stores, make sure that your pre-order app implements fulfillment holds to prevent pre-orders from flowing automatically to your 3PL or warehouse management system. When you’re ready to fulfill, you can release them, either manually or via automation.

For BigCommerce and WooCommerce stores using PreProduct, orders are kept entirely separate from your platform admin until you release fulfillment. This prevents premature shipping and keeps pre-orders out of your normal fulfillment workflows.

Track pre-order inventory separately from regular inventory if you’re managing both simultaneously. Use separate SKUs or variants to prevent overselling and maintain accurate reporting.

Pre-order App Integration

Shopify’s native pre-order functionality is limited. To offer charge-later, deposit or multi-step payment plans, you’ll need a dedicated pre-order app.

Look for apps that offer:

  • Multiple payment models (charge-upfront, charge-later, deposit)
  • Customizable front-end wording for product pages and checkout
  • Fulfillment holds or order management
  • Automated email notifications for charges and shipping updates
  • Customer portals where customers can view order status and payment schedules
  • Integration with Shopify Flow for automation

PreProduct offers all of these features plus deep Shopify Flow integration with 15 custom Flow actions and 16 triggers. This lets you automate pre-order listing creation, charge triggering and fulfillment releases based on inventory changes and other conditions in your Shopify store.

Real-World Pre-order Policy Examples

Example 1: Short Lead Time (30-60 Days)

A fashion brand is restocking a popular jacket. Lead time is 45 days from manufacturer. They use a charge-upfront model because the timeline is short and predictable.

Their policy focuses on:

  • Clear estimated ship date: “Ships by April 15, 2026”
  • Immediate payment collection
  • Simple cancellation: “Cancel any time before shipment for full refund”
  • Standard return policy applies after delivery

This straightforward approach works because the short timeline minimizes complexity. Customers know exactly when to expect their order and when they’ll be charged.

Example 2: Long Lead Time (120+ Days)

A custom furniture maker takes pre-orders for made-to-order pieces. Production takes 120-150 days. They use a deposit model: 30% upfront, balance charged when ready to ship.

Their policy emphasizes:

  • Detailed production timeline explanation
  • Deposit amount and balance payment schedule
  • Mid-production email update at 60-day mark
  • Clear communication about delays (custom manufacturing is unpredictable)
  • Deposit refund policy: Full refund before balance charge, non-refundable after balance charged

The longer timeline requires more detailed communication and a payment structure that commits customers without tying up all their money for months. This matches the 28.1% of pre-orders with 121-150 day windows, the most common extended lead time range.

Example 3: Mixed Cart Approach

An outdoor gear store allows customers to buy in-stock items with pre-order items. They default to shipping everything together but offer split shipment for an additional fee.

Their policy clarifies:

  • Default: All items ship together when pre-order is ready
  • Split shipment available for $15 additional
  • In-stock items charged immediately
  • pre-order items (charge-later model) charged when ready to ship
  • Separate return windows for items that ship separately

This approach increases average order value but requires clear policy language to prevent customer confusion about why in-stock items haven’t shipped yet.

Note that 62.1% of stores using PreProduct prohibit mixed carts specifically to avoid this operational complexity. Whether you allow mixed carts depends on your fulfillment setup and customer service capacity.

Conclusion

A well-written Shopify pre-order policy protects your store legally while building customer trust. The key is transparency: clear payment terms, realistic shipping estimates and straightforward cancellation rights reduce disputes and support tickets.

Remember these essentials:

  1. Include all required components: shipping timelines, payment terms, refund procedures, delay protocols and customer contact information
  2. Comply with local laws and regulations (30-day default, delay notifications, seven-day refunds) and regional requirements (EU 14-day cooling-off, GPSR compliance, etc.)
  3. Tailor your policy to your payment model (charge-upfront needs different language than charge-later or deposit)
  4. Display policy clearly on product pages, checkout and confirmation emails
  5. Communicate proactively throughout the pre-order lifecycle with scheduled updates and immediate delay notifications

Use the free templates in this guide as starting points. Customize them with your specific terms, timelines and contact information. Consider having legal counsel review your policy, especially if you’re taking deposits or operating across multiple regions.

Ready to set up pre-orders with built-in policy compliance? PreProduct helps Shopify stores manage pre-orders from listing to fulfillment, with customizable policy language, automated customer communications and fulfillment controls that keep operations clean. Start taking pre-orders today and capture demand before products hit your warehouse.

Pre-sell With PreProduct

7 day free trial with all plans

Best Shopify Pre-Order App: Data-Driven Buying Guide for 2026

Choosing the right Shopify pre-order app impacts everything from cash flow to customer satisfaction. After analyzing over $85M in pre-order sales, we’ve identified what separates apps that drive revenue from those that create operational headaches.

This isn’t another generic listicle. We’ve built this guide on real data from thousands of merchants running pre-orders at scale. You’ll learn which features drive results, which payment models work best for different business types, and how to match your store’s specific needs to the right solution. If you want to understand how pre-orders work on Shopify before evaluating apps, start there. By the end of this guide, you’ll have a clear framework for evaluating Shopify pre-order apps based on what actually moves the needle for your business.

What to look for in a Shopify pre-order app

Choosing the right Shopify pre-order app starts with understanding which features impact your bottom line and what timelines you’re working with. After processing over one million pre-orders, we’ve identified the capabilities that separate apps and drive revenue from those that create operational headaches.

Payment flexibility: The #1 feature merchants overlook

43.8% of all pre-order listings use charge-later payment, while only 14.9% charge upfront. That ratio surprises most merchants, especially the ones who just picked an app that only supports upfront charging.

Payment flexibility matters because it affects three critical areas: authorization periods, cash flow timing, and customer psychology. When evaluating a Shopify pre-order app, verify it supports the payment types you need:

  • Charge-upfront: Collect full payment at checkout (works for short lead times)
  • Charge-later: Vault customer’s card with Shopify, charge when ready to ship (requires vaulted card technology)
  • Deposit-upfront: Take a portion now, charge the outstanding balance later via vaulted card
  • Capture-only: Payment link method, capture on your schedule

Most free Shopify pre-order apps only support upfront charging. If you need to charge later and have lead times over 30 days, you need an app that supports deferred charging with proper card vaulting. Without this, you’re limited by Shopify’s standard authorization period, which typically expires after 7 days. Learn more about understanding Shopify authorization periods for pre-orders to avoid payment capture issues.

Integration with your existing tech stack

Your pre-order app needs to work with your 3PL, ERP, and any inventory systems that don’t respect Shopify’s “On Hold” status. Without proper integration, automated warehouses can ship pre-orders before you have stock, creating expensive customer service issues and fulfillment nightmares. In fact, 62% of stores don’t allow mixing pre-orders with ready-to-ship items to avoid these fulfillment complications.

Shopify native vs. third-party checkout: Apps built with Shopify’s native checkout provide the smoothest customer experience and best compatibility with Shopify Payments. Third-party checkout solutions can introduce friction and compatibility issues.

Fulfillment holds and 3PL integration: If your 3PL automatically ships orders, you need an app that can place fulfillment holds on pre-order items. Without this, pre-orders can ship prematurely, creating expensive customer service issues. Your app should either integrate directly with your 3PL or provide clear order tagging so your warehouse knows which orders to hold.

ERP and inventory sync: For stores with complex inventory management, your pre-order app should offer multiple signals that your ERP system can use to properly route orders, for example: tags, line item properties and order fulfillment status. This prevents overselling and congruent operations.

Marketing and automation integration: Look for apps that offer their own automations, as well as consider integrations with Shopify Flow (for automation) and your email platform (e.g. Klaviyo) (for email campaigns). Also, if they have a good API, this can be very handy in the age of AI for custom integrations. These connections let you automate workflows like notifying customers when stock arrives or tagging orders for special handling.

Customization and customer communication

Pre-orders require clear communication to set expectations and maintain trust. Your app should give you control over how and when you communicate with customers.

Front-end customization: Consider if you need to customize button text, badges, and messaging on product pages. Just having a buy button saying “Pre-order” is the start, but consider adding specific messaging like “Ships in 4-6 weeks” or “Reserve yours – shipping March 2026.”

Customer portals: A dedicated portal where customers can check order status, view estimated shipping dates, and see payment schedules reduces support tickets and builds trust. This becomes especially important for charge-later pre-orders where customers want reassurance their order is still active.

Email automation: Your app should handle confirmation emails, payment notifications, and shipping updates. Look for apps that let you customize these emails to match your brand voice and include specific details about lead times, discounts etc.

Mobile optimization: Over 70% of Shopify traffic comes from mobile devices. Test the complete checkout flow on mobile before committing to any app.

Scalability and pricing structure

App pricing varies widely, from free options with limited features to enterprise solutions with custom pricing. Understanding the pricing structure helps you avoid surprises as you scale.

Free vs. paid tiers: Free apps typically support only basic upfront charging and lack advanced features like charge-later, integrations and automations. They work for testing pre-orders, but most growing stores need paid features quickly.

Transaction fees vs. flat monthly: Some apps charge a percentage of each pre-order (typically 1-5%), while others use flat monthly pricing. Calculate which model costs less based on your expected pre-order volume. For stores processing over $5,000 in monthly pre-orders, flat pricing usually wins.

Shopify Plus features: If you’re on Shopify Plus, look for apps that unlock advanced capabilities like multi-step payment plans, bulk management tools, and API access for custom integrations.

Decision framework: Matching Shopify pre-order apps to your business model

Not every store needs the same pre-order features. A tech startup launching a $500 product has different requirements than a fashion brand doing limited drops. Here’s how to match your business model to the right Shopify pre-order app.

For early-stage stores (< $10k/month revenue)

At this stage, you’re testing whether pre-orders work for your product and audience. You need simple setup, low commitment, and minimal upfront costs. If you’re still evaluating pre-orders on Shopify versus crowdfunding platforms like Kickstarter, that comparison guide can help you choose the right launch model.

Recommended approach: If you can get away with charging upfront, start with apps offering free plans or low monthly fees with basic features. Focus on apps that let you test the pre-order concept without complex configuration.

Key features to prioritize:

  • Simple button swap on product pages
  • Basic email notifications
  • Upfront charging (simpler than deferred payment)
  • Easy setup without code changes

What you can skip for now: Advanced automation, complex payment schedules, extensive integrations. These add complexity you don’t need while validating product-market fit.

For growing DTC brands ($100k+/month)

You’ve proven pre-orders work and now need features that scale with your business. This is where payment flexibility, automation, and integration become important.

Recommended features:

  • Charge-later capabilities with proper card vaulting
  • Fulfillment holds to prevent premature shipping
  • Shopify Flow integration for automation
  • Customer portals for self-service order tracking
  • Basic analytics to track pre-order performance

Apps like PreProduct fit this segment well, offering flexible payment options, native Shopify integration, and automation capabilities without enterprise complexity. Other mid-tier options include specialized apps with strong charge-later support.

What matters most at this stage: Operational efficiency. You need your pre-order app to work smoothly with your 3PL and existing workflows. Look for apps with fulfillment flows that match your 3PL’s workflow, as well as clear documentation in general.

For Shopify Plus and enterprise (> $1m/month)

At this scale, you need advanced features, bulk management, and deep integrations with your tech stack.

Required features:

  • API access for custom integrations
  • Bulk campaign management
  • Advanced reporting and analytics
  • Dedicated support and onboarding
  • ERP integration capabilities

Special considerations: Your pre-order app needs to handle high volume without performance issues. Look for apps with proven track records at enterprise scale and dedicated support teams. For enterprise requirements, explore specialized Shopify Plus pre-order solutions designed for high-volume operations.

By product type

Your product category influences which pre-order features matter.

High-ticket items (> $500): You need deposit functionality to reduce customer friction while securing commitment. Look for apps that can take a percentage or fixed amount upfront, then automatically charge the balance when ready to ship. Our complete guide to Shopify partial payments and deposits explains how to structure deposit campaigns for high-ticket items.

Fashion and limited drops: Variant max limits, early-bird discounts, and self-service order tracking. Choose apps which allow for front-end customization, as well as controlled overselling.

Made-to-order or custom products: Long lead times (60+ days) require chargeing later. Your app should handle extended fulfillment windows and allow for customer updates throughout the process.

Restocks: AKA ‘back orders’, you need automated pre-order listing capabilities, and/or back-in-stock alerts. Some apps combine waitlist functionality with pre-orders, converting interest into secured sales.

Comparing top Shopify pre-order solutions

Here’s a look at leading Shopify pre-order apps, including where each excels and their limitations. We’re bias as PreProduct is our app, but there are pros and cons across all options.

PreProduct

Best for: Growing DTC brands or stores at scale who need flexible payment options, multiple customer touch points and extensive integration options.

Pricing:

  • Starter: $0/month + 5% of paid pre-order revenue
  • Scale: $59.99/month + 0.5% commission on paid pre-order revenue over $5,000
  • Scale Plus: $259.99/month, 0% commission

Payment types: Charge-upfront, charge-later, deposit-upfront, capture-only, multi-step payment plans (Plus)

Key features:

  • Full Shopify native integration with catalogue, checkout, orders and payments
  • Shopify extensions for theme app blocks, order status pages and Flow
  • Fulfillment holds prevent auto-shipment to 3PLs
  • Customer portals for self-service order tracking
  • Automations including auto-charge and listing management
  • Option to isolate pre-order carts from in-stock items
  • Dunning flows for failed payments
  • Third-party integrations, such as Klaviyo, Peronsizely and Headless

Strengths: Built for stores that need flexible payment options, customer communication and integration options. Strong automation capabilities natively and through Shopify Flow. Transparent pricing model scales with your business.

Limitations: Not free to start (though commission-only option available). On the higher end of the pricing scale.

Best use case: Growing or larger stores looking for a Shopify pre-order app to pre-sell products in a flexible way that will intergrate with their supply chain and tech stack.

Timesact Discount & Pre-Order

Best for: Brands who would like to offer waitlists and pre-orders

Pricing: Free plan available, paid plans from $9.99/month

Payment types: Primarily charge-upfront

Key features:

  • Countdown timers and urgency messaging
  • Discount capabilities for early birds
  • Coming soon badges
  • Basic pre-order button customization

Strengths: out-of-the-box visual elements for creating urgency. Affordable.

Limitations: Does not mention integrations with other parts of Shopify, like Flow, Order status pages etc.

Best use case: A use case where an app that handles waitlists and pre-orders is needed.

WOD: Pre-Order Now

Best for: Merchants looking to charge upfront for pre-orders by tag based rule configuration

Pricing: From $19.95/month, scales with features

Payment types: Charge-upfront, partial payments

Key features:

  • Tag or stock based rules
  • Mixed cart warning
  • Pre-order scheduling

Strengths: Specific GA4 integration, pre-order scheduling and mixed-cart alerts

Limitations: Limited charge-later functionality. Fewer automation features compared to newer apps.

Best use case: Stores looking to schedule in pre-order listings accross their catalogue.

Globo Pre-Order

Best for: Re-stock alerts + wait lists + pre-orders

Pricing: Free plan available, Pro from $9.99/month

Payment types: Charge-upfront with customer selected payment options

Key features:

  • Pre-order scheduling
  • Countdown timers
  • Pre-order button and badge customization
  • Low monthly cost

Strengths: Cheapest plan for first pre-orders (20 without paying + 0 % commission) Good for stores who;d like to use re-stock alerts and wait lists too.

Limitations: Limited payment options, which are selected by the customer as opposed to the merchant.

Best use case: Merchants looking to take pre-orders, re-stock alerts and wait lists + incentivise with countdown timers.

Stoq: Back in Stock, PreOrder

Best for: ‘Notify me’ alerts alongside pre-orders/back-orders with low pricing

Pricing: From $19/month (with free plan for the first 10 pre-orders)

Payment types: Charge-upfront and notification focus

Key features:

  • Back-in-stock alerts convert to pre-orders
  • Email + SMS notifications (additional cost for SMS)
  • Analytics dashboard

Strengths: Seamless transition from waitlist to pre-order. Good for managing restocks. Strong notification system.

Limitations: Number of pre-orders capped per plan, more focus on notifications than pre-order payment options.

Best use case: Brands who want to take interest for restocks and pre-orders, whilst communicating with customers via email and SMS.

Feature comparison at a glance

FeaturePreProductTimesactPre-Order NowGloboStoq
Charge-lateras customer chosen option
Depositsas customer chosen optionas customer chosen optionas customer chosen optionas customer chosen option
Fulfillment holds
Shopify Flow
Customer portal
Free plan✗*✗**
Multi-step payment plansas customer chosen option
Waitlist integration
Isolated pre-order carts
SMS notifications

*PreProduct offers commission-only pricing (no fixed monthly fee)
**Pre-Order Now offers the first pre-order for free

Common mistakes when choosing a Shopify pre-order app

Avoid these pitfalls that cost merchants time and money.

Ignoring payment processor compatibility

Not all payment processors support deferred charging. Shopify Payments and Stripe can vault cards for charge-later pre-orders, but many other gateways can’t. Before choosing an app with charge-later features, verify your payment processor supports it.

Shopify automatically hides unsupported payment providers at checkout, which can create confusion if you haven’t planned ahead. If you’re using a regional payment gateway, confirm charge-later compatibility before launching your first deferred-payment campaign.

Overlooking fulfillment integration

If your 3PL automatically fulfills orders pushed to your system, you need an app with fulfillment hold capabilities. Without this, pre-orders can ship before stock arrives, creating expensive problems.

According to our data, 62% of stores prevent mixing pre-orders with in-stock items specifically to avoid fulfillment issues. Your app should either place fulfillment holds directly in Shopify (for compatible 3PLs) or provide clear order tagging so your warehouse knows which orders to hold.

Focusing only on price at scale

A free Shopify pre-order app is great for starting out, but if your app doesn’t support certain features you’ll need later on, it can be a pain to switch. Also, pre-orders can touch a lot of different parts of your business, so you’ll want to make sure your app has good customer support and documentation.

Not testing mobile checkout

Over 70% of Shopify traffic comes from mobile devices, yet many merchants only test the desktop experience. Install your chosen app, then complete the entire purchase flow on your phone. Check for:

  • Button sizing and positioning on mobile
  • Clear pre-order messaging that doesn’t get cut off
  • Smooth checkout flow without extra steps
  • Readable confirmation emails on mobile

A clunky mobile experience kills conversions regardless of which features your app offers.

Choosing based on feature count rather than features you’ll use

More features don’t equal better results. An app loaded with capabilities you’ll never use just adds complexity to your setup and training.

Start by listing the 3-5 features you absolutely need, then find apps that excel at those specific capabilities. You can always upgrade later if you need more advanced functionality.

How to implement your chosen Shopify pre-order app

Once you’ve selected an app, follow this checklist for smooth implementation.

Setup checklist

  1. Install from Shopify App Store: Browse pre-order apps on the Shopify App Store, download your chosen app, and grant the required permissions
  2. Configure pre-order listing settings: Choose between upfront charging, deferred payment, or deposit models based on individual products or automations/rules.
  3. Customize front-end elements: Update button text, badges, and product page messaging to set clear expectations
  4. Test complete flow: Purchase a pre-order yourself, from product page through to checkout. Wait 5 minutes, then check your admin, then trigger payment/fulfilment and re-check your admin. It’s good to see the order state throughpout the process, so there’s no surprises.
  5. Check email flows: Set up notification sequences for order confirmation etc. A lot of apps will have a default email sequence that you can tweak.

Best practices for your first pre-order campaign

Don’t launch pre-orders across your entire catalog immediately. Start strategically:

Start small: Test with 1-2 products to validate your workflow and customer communication. Learn what works before scaling up.

Communicate clearly: Display lead times prominently on product pages. Customers need to know when to expect their order before they commit. Use specific dates or timeframes, not vague language. In the US, if there isn’t an advertised shipping date, you must ship within 30 days.

Send immediate confirmation: Your confirmation email should emphasize the pre-order status and estimated shipping date. This sets expectations and reduces “where’s my order” inquiries.

Keep customers updated: Send pro-sctive updates if the estimated shipping date changes or if there are delays. Transparency builds trust and reduces cancellations.

Track key metrics: Monitor conversion rates compared to regular products, cancellation rates (average is 5.4%), and customer support tickets. These metrics tell you if your pre-order experience needs adjustment. For deeper strategic guidance on optimizing your campaigns, check out our pre-order strategy based on $85M in sales data.

FAQ

What’s the best free Shopify pre-order app?

Ultimately, it depends on your specific needs and budget. We reccomend reading the feature comparison at the top of the page, and then reading the reviews and testimonials for each app.

If your lead times exceed 30 days or you need to validate demand before committing to production, consider apps with deferred payment capabilities. The additional conversion from charge-later often pays for the app fee.

Do I need Shopify Plus for pre-orders?

No. Most pre-order functionality works on standard Shopify plans. However, Shopify Plus unlocks advanced features like multi-step payment plans (installments), higher API limits, and some other related features (Shopify Flow HTTP Requests for example).

If you’re on a standard Shopify plan, you can still access charge-upfront, charge-later, and deposit pre-orders through apps like PreProduct or other third-party solutions.

Can I mix pre-order and in-stock items in one cart?

Yes, but 62% of merchants prevent mixed carts to simplify fulfillment. Mixing pre-orders with ready-to-ship items creates operational complexity: you either hold the entire order until everything is ready (frustrating customers waiting for in-stock items) or split shipments (increasing costs and complexity).

Some Shopify pre-order apps let you choose whether to allow mixed carts. For cleaner operations, especially when starting out, prevent mixing by redirecting pre-order items to a separate checkout. Then consider moving to mixed carts when you’re sure your back-of-house can handle.

What’s the difference between pre-orders and backorders?

Pre-orders are for products not yet available, often upcoming launches or new items you’re validating demand for. Backorders are for products temporarily out of stock that you plan to restock soon.

One big difference is promotional approach: with backorders, its very rare that they’re formerly ‘launched’. Where as you might choose to promote a pre-orders ‘pre-launch’.
Also, there’s often less risk with backorders as the designs/suppliers have already been tested . Learn more in our complete comparison of pre-orders vs backorders vs waitlists.

Should I charge upfront or later for pre-orders?

We reccomend charging upfront for pre-orders with smaller lead times (under 30 days), and charge-later for pre-orders with longer lead times (over 30 days). Then for high-ticket items, consider using deposits.

  • Lead time: Over 30 days? Charge-later typically gives you more leaniency with the customer, but also gives them more time to cancel.
  • Price point: High-ticket items (> $500) often work better with deposits
  • Customer psychology: Charge-later removes friction for uncertain customers
  • Cash flow needs: Upfront charging improves immediate cash flow

From our numbers, charge-later is by far the most popular payment type (43.8% of all pre-order listings). Read more about Shopify deposit pre-orders for guidance on partial payment strategies.

How do pre-order apps handle refunds?

Refund processes vary by payment type:

Charge-upfront: Standard Shopify refund process through your admin
Charge-later: Cancel the pre-order before charging (no refund needed), or process refund if already charged
Deposits: Refund the deposit through Shopify or app, cancel any pending balance charges

Most apps provide admin interfaces for handling refunds and cancellations. Average cancellation rate across all pre-orders is 5.4%, though this varies significantly by lead time and product type.
(PreProduct also allows merchants to surface a cancellation button in the customer portal)

Can pre-order apps integrate with my ERP or 3PL?

Integration capabilities vary widely by app. Look for:

  • Direct integrations: Some apps connect directly with major ERPs (NetSuite, QuickBooks) and 3PLs (ShipBob, ShipStation)
  • API: More flexible apps offer API access that can push pre-order events to your systems
  • Order tagging: Apps that tag pre-orders clearly in Shopify make it easier for connected systems to handle them differently
  • Line item properties: Apps that use line item properties to pass pre-order metadata to your ERP make it easier for connected systems to handle them differently
  • Fulfillment holds: Helpful for 3PL integration to prevent premature shipping. Not always supported though, so line-item properties and/or order tags are often used instead.

For detailed guidance, see our guides on managing pre-orders with ERPs and managing pre-orders with your 3PL.

Conclusion: Choose the right app for your specific needs

The right Shopify pre-order app depends on your payment requirements, integration needs, and lead times. Don’t choose based on star ratings alone, focus on matching features to your specific use case.

If you’re just testing pre-orders with short lead times, free apps like Globo or Timesact get you started. For growing DTC brands with longer lead times who need charge-later functionality, apps like PreProduct offer the flexibility and automation you need to scale. Enterprise stores benefit from solutions with API access, bulk management, and deep ERP integration.

Start by identifying your must-have features: Do you need charge-later? Fulfillment holds? Shopify Flow automation? Then evaluate apps based on those criteria, test the mobile checkout flow, and start with a small pilot before rolling out across your catalog.

Pre-sell With PreProduct

7 day free trial with all plans

Shopify Partial Payments: Complete Guide to Deposits, Installments & Deferred Charges

Managing cash flow while keeping customers happy can feel like walking a tightrope. Shopify partial payments let you collect a portion of the sale upfront and charge the remaining balance later, creating flexibility for both you and your customers. Whether you’re launching a new product line, managing pre-orders, or selling higher-ticket items, understanding how to implement partial payment strategies can transform how you capture revenue. If you’re new to pre-orders, start with our complete guide to pre-orders on Shopify before diving into payment models.

From processing over $85 million+ in pre-order sales, we’ve learned what actually works. This guide breaks down everything you need to know about Shopify deposits, charge-later options, and installment plans so you can choose the right approach for your store.

What Are Shopify Partial Payments?

The Core Concept

Shopify partial payments enable merchants to charge a portion of the sale upfront while deferring the remaining balance until later. Instead of collecting the full amount at checkout, you might take 30% now and charge the rest when the product ships. This approach relies on vaulted card technology, where payment details are securely stored with your payment provider, allowing you to trigger charges at a later date without restrictive authorization windows.

The flexibility extends beyond simple deposits. Merchants can structure payments in three main ways: deposit upfront with a later charge, full charge-later with zero upfront cost, or multi-step installment plans that spread payments across several transactions.

Three Main Approaches to Partial Payments

Based on data from over one million pre-orders, here’s how merchants actually structure their payments:

Charge-later accounts for 43.8% of all pre-order listings (75,781 listings). Customers complete checkout without paying anything upfront, and merchants trigger the charge when ready to ship. This approach maximizes conversion by removing initial friction while still securing the order.

Deposit upfront represents 12.6% of listings. Merchants collect a partial payment during checkout, typically 20-50% of the product value, then charge the balance when the item is ready. This balances customer commitment with flexibility.

Charge upfront makes up 14.9% of listings. The full amount is collected immediately at checkout, providing instant cash flow but requiring customers to pay before receiving the product.

The remaining 28.7% use capture-only approaches, where payment is taken through payment links rather than vaulted cards.

Why Partial Payments Matter in 2026

The shift toward flexible payment models reflects changing customer expectations. Buyers increasingly expect options beyond “pay now or don’t buy.” For merchants, partial payments solve a critical challenge: how do you capture revenue before inventory arrives without alienating customers who want to minimize upfront commitment?

Traditional Shopify payment authorizations expire after 7 or 30 days depending on your payment provider and Shopify plan. Partial payment solutions using vaulted cards bypass these limitations, giving you control over when charges occur regardless of lead times.

How Shopify Partial Payments Work

Technical Requirements

Three payment providers currently support the vaulted card technology required for deferred charges: Shopify Payments, PayPal, and Authorize.net (although we’ve heard reports of Cybersource recently being supported). Any credit card that passes standard checkout validation works for partial payments; no special card types are required.

The system captures and securely stores card details at initial checkout. When you’re ready to charge, you trigger the payment through your pre-order app or payment platform. The customer doesn’t need to re-enter payment information or take any action.

The Customer Experience

From a customer perspective, partial payments create a streamlined experience. They complete checkout once, entering payment details as they normally would. For deposit-based approaches, they see the deposit amount charged immediately. For charge-later options, no charge appears until you trigger it.

Customers can monitor their deferred payment status through customer portals that show expected shipping dates, outstanding balances, and payment schedules. This transparency reduces support inquiries and maintains trust during longer lead times.

The Merchant Workflow

Setting up partial payments requires choosing your deposit amount or percentage, configuring when charges will occur, and customizing customer communications. You can set charges to trigger manually when you’re ready to ship, automatically based on inventory levels, or on specific dates.

For deposit approaches, you specify whether to charge a fixed amount or a percentage of the product price. The system calculates and displays the deposit at checkout, shows the remaining balance, and handles the math automatically.

When triggering remaining charges, you can process them at the listing level (charging all customers for a specific product) or at the customer level (charging individual orders as they’re ready). Failed charges generate automated recovery emails, giving customers the opportunity to update payment methods before orders are cancelled.

Benefits of Partial Payments for Pre-orders

For Merchants: Extended Sales Windows

Traditional payment authorizations create artificial constraints. With Shopify Payments, authorizations typically expire after 7 days, though this can extend to 30 days in some cases. If your product lead time exceeds these windows, you face a choice: charge upfront and risk higher refund requests, or wait until inventory arrives and lose revenue velocity.

Partial payments eliminate this constraint. Data shows that while 25% of merchants charge immediately (Day 0), 47.8% charge within the first 30 days of the order. The flexibility to control charge timing means you can align revenue capture with your specific supply chain reality, not arbitrary authorization periods.

For Merchants: Reduced Refund Administration

Charge-upfront pre-orders create customer frustration when delays occur. Customers who’ve already paid feel entitled to immediate resolution, generating support tickets and refund requests. Charge-later and deposit models reduce this friction. Customers who haven’t fully paid yet tend to be more patient with timeline adjustments, as they haven’t fully committed their funds.

This isn’t just theory. Merchants using charge-later approaches report fewer cancellations and support inquiries compared to charge-upfront campaigns, particularly for products with variable lead times.

For Customers: Lower Initial Commitment

The psychological barrier of a $300 product is very different from a $75 deposit. Partial payments let customers secure items they want without the immediate financial impact of the full purchase. This is particularly powerful for higher-ticket items where the decision to buy might be delayed by cash flow concerns.

Customers who make partial payments also demonstrate stronger purchase commitment. Having “skin in the game” through a deposit makes them more likely to complete the purchase compared to waitlists or notification systems with zero commitment.

Real-World Impact: The Holochain Foundation Example

When Holochain Foundation launched their Web3 platform hardware, they faced a classic challenge: significant production costs with uncertain demand. They used deposit-based pre-orders to validate interest and secure upfront capital for manufacturing.

By collecting deposits, they confirmed real demand beyond survey responses or email signups. The deposits provided working capital to initiate production runs. And critically, they maintained full control over when to charge the remaining balance, coordinating charges with actual shipping timelines rather than racing against authorization expirations.

When to Use Deposits vs Charge-Later vs Installments

Strategic Decision Framework

The right payment approach depends on three factors: product price point, lead time length, and your cash flow needs. Here’s how to think through the decision.

Use Deposit Upfront When:

High-ticket items ($500+) benefit from deposits. The partial payment demonstrates commitment without requiring customers to part with the full amount months before delivery. We believe optimal deposit amounts range from 10-50% of the product value.

Long lead times (three months or longer) work better with deposits than charge-later. Asking customers to wait 90+ days with zero payment creates uncertainty. A deposit confirms their commitment and provides you with working capital during the production window.

Custom or made-to-order products justify deposits because you’re investing resources specifically for that customer. The deposit offsets your production costs and reduces the risk of cancellations after you’ve already started work.

When you need early production capital, deposits inject cash flow before the product is ready to ship. This is particularly valuable for crowdfunded-style launches or when production minimums require upfront investment.

Merchants who use deposit approaches represent 12.6% of listings in our dataset. While less common than charge-later, deposits serve a specific purpose for higher-value, longer-timeline products.

Use Charge-Later When:

Testing product demand works better with charge-later. The zero upfront cost maximizes conversion, giving you the truest read on interest. You can validate demand without customers needing to part with money immediately.

Short to medium lead times (one to two months) pair well with charge-later. Customers don’t perceive significant risk in the timeline, and you maintain flexibility on charge timing.

Low-medium priced items ($50-$300) see strong performance with charge-later. The payment amount isn’t large enough to justify deposits, and the reduced friction at checkout improves conversion rates.

When you want maximum conversion, charge-later removes all payment friction. Customers complete checkout knowing they won’t be charged until the product ships, eliminating the primary objection to pre-ordering.

The data supports this approach: 43.8% of pre-order listings use charge-later models, making it the most popular payment timing choice. The appeal is clear: secure orders now, charge when convenient, avoid authorization periods entirely.

Use Installment Plans When:

High-ticket items ($1,000+) benefit from spreading payments across multiple installments. This makes expensive products accessible to customers who want to spread the cost over time, similar to how Affirm or Klarna work.

Price sensitive customers who prefer to spread the cost over time. Offering installment plans allows you to offer a lower price point to customers who prefer to pay over time. Think of this like BNPL (buy-now-pay-later) but the customer receives the product later instead of upfront.

Competing with buy-now-pay-later services becomes easier when you offer your own installment options. Rather than paying fees to third-party services, you can structure multi-step payment plans that charge customers directly.

Extended payment terms (60-90+ days or longer) work well for premium product positioning. Luxury items or high-end equipment can be structured with monthly payments that align with when customers actually receive and use the product.

Multi-step payment plans work by splitting pre-orders into multiple automatic charges on a defined schedule. Customers select their preferred number of installments at checkout, and the system automatically processes charges based on your configured frequency (daily, weekly, or monthly).

Available for Shopify Plus stores and non-Shopify platforms, these plans integrate with charge-later or deposit-upfront pre-order models. You can configure maximum installment limits, offer discounts for choosing payment plans, and customize the customer-facing interface to match your brand. Customers access a portal showing their payment history, outstanding balance, and upcoming charge dates.

Optimal Deposit Percentages by Scenario

For physical goods in the $200-$500 range: 25-35% deposits work well. This is enough to confirm commitment without creating significant friction.

For higher-ticket items ($500-$1,500): 20-30% deposits provide meaningful capital while keeping the initial amount manageable. A $300 deposit on a $1,200 product feels more acceptable than a $600 deposit.

For custom or made-to-order products: 40-50% deposits are appropriate. Your costs are higher, customization requires more resources, and the commitment level should reflect the work involved.

For products with very long lead times (6+ months): 30-40% deposits strike a balance. Too small and it doesn’t feel meaningful; too large and customers balk at paying so much so far in advance.

The key is putting it in the context of your business and customer-base. Your hard fought intuition is a great starting point, as what works for one product or audience may not work for another.

How to Set Up Shopify Partial Payments

Option 1: Manual Setup (Not Recommended)

Some merchants attempt to create partial payment flows manually through Shopify’s native features. This involves creating separate deposit products, generating unique discount codes for the remaining balance, and manually coordinating payment collection with customers.

Why this approach fails: The customer experience is poor. They purchase a “deposit” product, then receive an email later with a discount code and instructions to buy the actual product. It’s confusing and unprofessional.

The manual coordination is time-consuming. You’re manually tracking which customers paid deposits, generating individual discount codes, and sending follow-up emails. For anything beyond a handful of orders, this becomes unmanageable.

You lose analytics and segmentation. These orders don’t flow through normal Shopify reporting as pre-orders; they look like separate product purchases. You can’t easily segment customers who have deposits pending or identify which partial payment campaigns perform best.

The approach is error-prone. Forgotten discount codes, incorrect discount amounts, customers who lose emails, all these issues create support tickets and frustration.

(FYI: Early on in PreProduct, before Shopify supported vaulted card payments; we actually offered a version of this ‘deposit product’ approach. It was pretty painful and we discontinued it as soon as the vaulted card functionality was released.)

Option 2: Using Pre-order Apps (Recommended)

Specialized pre-order apps handle the complexity of partial payments through purpose-built workflows. PreProduct offers flexible payment timing options including charge-upfront, charge-later, deposits, and multi-step installment plans.

Step-by-step setup process:

First, choose your payment timing approach. Decide whether you’re collecting full payment upfront, charging later, or taking a deposit. This decision drives the rest of your configuration.

Second, set your deposit amount or percentage if applicable. You can specify either a fixed dollar amount or a percentage of the product price. The app automatically calculates and displays this at checkout.

Third, configure automatic charge triggers or plan for manual triggering. Some merchants prefer to trigger charges manually when they’re ready to ship. Others want automation based on inventory levels, where charges occur automatically when stock is added to Shopify.

Fourth, customize your customer portal and communications. Set up the messaging customers see on product pages, in cart, and at checkout. Configure email sequences for order confirmations, upcoming charges, and payment reminders.

Fifth, set up failed charge notifications and recovery workflows. If a customer’s card declines when you trigger the remaining charge, automated emails give them an opportunity to update their payment method before you cancel the order.

Sixth, test the complete flow. Place a test order through the entire checkout process, confirm the deposit or charge-later behavior works correctly, and verify that triggering the remaining charge functions as expected.

Configuration Best Practices

Communicate lead times clearly on product pages. Use specific dates when possible (“Ships in February 2026”) or windows when dates are uncertain (“Ships 8-12 weeks after order”). Vague language like “coming soon” creates customer anxiety.

Set realistic charge dates based on your actual supply chain. Building in buffer time is smart, but don’t pad timelines excessively. Customers appreciate accuracy more than conservatively long estimates.

Craft deposit policy language that explains what customers are paying now, what they’ll be charged later, and when that charge will occur. This belongs in multiple places: product page, cart, and checkout.

Design email sequences for payment reminders that notify customers a few days before their remaining balance will be charged. This reduces surprise and gives them time to ensure sufficient funds are available.

Managing Partial Payment Orders

Order Tracking and Segmentation

Once partial payment orders start flowing in, you need visibility into payment status across your customer base. Shopify deposits apps like PreProduct provide dashboards that show which orders have deposits paid, which customers are on charge-later status, and which charges have been triggered but not yet collected.

Segmentation becomes critical for larger campaigns. You might need to charge customers in batches as inventory arrives in waves, or handle exceptions for customers requesting earlier or later charges. Good pre-order tools let you filter by payment status, creation date, product, and other attributes.

Triggering Remaining Charges

Manual charge initiation gives you complete control. You review orders ready to ship, select the customers to charge, and trigger the charges. This works well for smaller volumes or when you need to carefully coordinate charges with actual inventory availability.

Automated triggers based on dates work for predictable timelines. If you know products will ship on March 15th, you can configure charges to trigger automatically on March 10th, giving time for payment processing before you need to create shipping labels.

Stock-based triggers charge customers automatically when you add inventory to Shopify. You receive a shipment, update your stock levels, and the app detects the change and initiates charges. This aligns charges with actual product availability rather than estimated dates.

Batch processing lets you charge large groups simultaneously. If you have 500 orders and inventory for all of them arrives, you can process all charges in one action rather than triggering them individually.

Failed Charge Management

Not every charge attempt succeeds. Cards expire, customers change banks, or funds aren’t available. When charges fail, you need a recovery process.

Common failure reasons include expired cards (especially problematic for long lead times), insufficient funds, or cards that were cancelled and replaced. Some failures are soft declines that will succeed if retried; others are permanent until the customer updates their payment method.

Automated recovery emails immediately notify customers when charges fail. These emails explain what happened, provide a link to update payment information, and set a deadline before the order is cancelled. Clear, non-accusatory language is important; frame it as “we need your help to complete your order” rather than “your payment failed.”

Grace periods and retry logic give customers time to fix issues. A common approach: retry the charge once after 24 hours, send another notification if it fails again, and give customers 3-5 days total before cancelling the order. The timeline should balance giving customers adequate time with your need to manage inventory.

When to cancel vs hold orders depends on your inventory situation. If you have excess inventory, you can be generous with grace periods. If inventory is tight and you have a waitlist, shorter grace periods let you reallocate products to customers whose payments will succeed.

Refund Scenarios

Partial payments complicate refunds compared to standard orders. If you’ve collected a deposit and need to refund, do you refund just the deposit? What if you’ve already charged the remaining balance?

Partial vs full refunds depend on when the refund request comes in and why. If a customer wants to cancel before you’ve triggered the remaining charge, you refund the deposit. If they want to cancel after being fully charged but before shipping, you refund everything. If the product has shipped and they’re returning it, your normal return policy applies.

Split payment complications arise when deposits and final charges occur far apart. Your accounting needs to handle a deposit collected in January and a refund processed in March that pulls from a different financial period.

Customer communication templates should clearly explain what amount is being refunded and when they’ll see it. “Your $75 deposit will be refunded to your original payment method within 5-10 business days” sets clear expectations.

Integration with Operations

Fulfilment Hold Management

The biggest operational risk with pre-orders is accidental early shipment. Products shouldn’t ship until you’ve triggered the remaining charges. Fulfilment holds prevent pre-order items from flowing to your 3PL or shipping team until you explicitly release them.

For Shopify stores, apps can place orders in “hold” fulfilment status. This keeps them out of your normal fulfilment queue. When you trigger charges and they succeed, the hold is released and the order moves to “unfulfilled,” making it visible to your fulfilment team.

For BigCommerce and WooCommerce stores, the approach differs. Pre-order apps keep orders in the app until you release them, then push them to your platform admin only when ready to ship. This ensures your team never sees an order before it’s time to fulfil it.

ERP and Inventory Systems

If you use an ERP system, syncing pre-order payment status matters for accurate financial reporting. Your ERP needs to know which orders represent collected revenue versus orders that will generate revenue when charged later.

Webhooks or API connections push order status updates from your pre-order app to your ERP. When a deposit is collected, your ERP records it. When the remaining balance is charged, another update flows through. This keeps your financial picture accurate without manual data entry.

For demand forecasting, pre-orders provide early signals about which products will sell and in what quantities. If you have 200 pre-orders before production starts, you know you need at least 200 units. Integrating this data into inventory planning prevents stockouts and informs production run sizes.

Learn more about managing pre-orders with ERP systems.

3PL Coordination

If you use a third-party logistics provider, they need to understand which orders are pre-orders and shouldn’t ship yet. Most 3PLs integrate with Shopify or your platform and automatically pull orders marked as unfulfilled. If pre-orders flow through before you’re ready, they’ll ship them.

The fulfilment hold approach prevents this. Only when you explicitly release holds do orders become visible to your 3PL. This coordination is critical for smooth operations.

For more on this topic, see our guide on managing pre-orders with your 3PL.

Mixed Carts: Pre-orders Plus In-Stock Items

Should you allow customers to purchase pre-order and in-stock items in the same cart? This decision impacts operations significantly.

Mixed carts increase average order value. Customers can buy what’s available now along with pre-order items, maximizing their cart size. However, this creates split fulfilment complexity. You need to ship the in-stock items immediately and hold the pre-order items for later.

Isolated carts force customers to check out separately for pre-orders and regular items. This simplifies operations; each order is either all in-stock or all pre-order. However, it may reduce total cart value and creates a slightly more complex customer experience.

The right choice depends on your operational capacity. If you can handle split fulfilments without errors, mixed carts are valuable. If your fulfilment setup struggles with partial shipments, isolated carts reduce mistakes.

Common Mistakes to Avoid

Payment Timing Errors

Charging too early before products are ready to ship creates customer frustration. If you charge the remaining balance and then announce a delay, customers who were patient during the charge-later period suddenly become frustrated. Only trigger charges when you’re confident products will ship within days.

Missing authorization windows applies to merchants not using vaulted card solutions. If you’re trying to use standard Shopify authorizations for long-lead-time products, you’ll hit expiration issues. This is why partial payment apps with vaulted cards exist in the first place.

Inadequate customer communication about when charges will occur causes surprise and support tickets. Notify customers a few days before charging remaining balances. Give them a heads-up rather than charging unexpectedly.

Deposit Amount Missteps

Asking too little defeats the purpose of deposits. A $10 deposit on a $300 product doesn’t demonstrate meaningful commitment. Customers will cancel without hesitation because they haven’t invested much.

Asking too much creates friction at checkout. A $250 deposit on a $400 product feels nearly as expensive as just paying full price. You lose the psychological benefit of partial payments.

Not testing different amounts means you’re guessing at optimal deposit levels. Run small test campaigns with 25%, 35%, and 45% deposits on the same product. Measure conversion rates and cancellation rates. The data will tell you what works for your audience.

Technical Pitfalls

Payment gateway incompatibility is the most common technical issue. If you’re not using
a payment provider that supports Shopify deferred-charge such as Shopify Payments, PayPal, or Authorize.net, vaulted card features won’t work. You’ll need to use capture-only approaches with payment links instead, which creates a different customer experience.

Discount code conflicts can arise with partial payments. Shopify’s “buy X, get Y” style discounts aren’t yet supported by some pre-order apps. If you rely heavily on these discount types, test compatibility before launching campaigns.

Ignoring Shopify’s “continue selling when out of stock” setting causes checkout failures. Pre-order products need this setting enabled so customers can purchase when stock is at zero. Good pre-order apps handle this automatically, but if you’re building custom solutions, it’s easy to miss.

Customer Experience Issues

Unclear lead time communication on product pages leads to unrealistic expectations. If you say “ships soon” and then customers wait three months, they’ll be unhappy even if the product itself is perfect. Specific timelines set accurate expectations.

Poor failed charge recovery loses revenue unnecessarily. If charges fail and you just cancel orders without giving customers a chance to update payment methods, you’re leaving money on the table. Simple recovery emails can save 30-50% of failed charges.

Complicated refund policies create support burden. If customers don’t understand whether they’re getting deposits back, remaining balances back, or something else, they’ll contact support repeatedly. Clear refund language prevents this.

Frequently Asked Questions

Can Shopify take partial payments without apps?

Shopify doesn’t offer native partial payment functionality for pre-orders. While you can create manual workarounds using separate products and discount codes, these approaches create poor customer experiences and significant administrative overhead.

Specialized apps provide the vaulted card technology, customer portals, and automated workflows that make partial payments practical. The investment in an app quickly pays for itself through reduced support burden and improved conversion rates.

Which payment gateways support deposits?

Shopify Payments, PayPal and Authorize.net currently support the vaulted card technology required for true charge-later and deposit-upfront functionality (although we’ve heard reports of Cybersource recently being supported). Other payment providers don’t offer the ability to securely store card details and charge them at a later date without re-entering information.

If you use a different payment gateway, you can still offer partial payments through capture-only approaches using payment links. When it’s time to collect the remaining balance, you send customers a link to complete payment. This creates an extra step but works with any payment provider.

What’s the ideal deposit percentage?

Based on industry data and merchant testing, 20-50% is the optimal deposit range for most products. The specific amount within that range depends on your product price point, lead time, and customer base.

Lower-priced products ($200-$400) work well with 25-35% deposits. Higher-ticket items ($500-$1,500) can go lower, around 20-30%, because the absolute dollar amount is still significant. Custom or made-to-order products justify 40-50% deposits given the resources you’re investing.

The only way to know for certain is testing different levels with your specific audience.

How do I handle failed charges?

When a charge fails, implement a recovery workflow:

First, send an immediate notification email explaining what happened and providing a link to update payment information. Keep the tone helpful, not accusatory.

Second, automatically retry the charge after 24 hours. Many soft declines succeed on retry once banks process pending transactions.

Third, if the second attempt fails, send another notification with a deadline. “We’ll need to cancel your order by [date] unless we can process payment.”

Fourth, give a grace period of 3-5 days total before cancelling. This balances customer convenience with your need to manage inventory.

Apps like PreProduct automate this entire workflow, reducing manual work and recovering revenue that would otherwise be lost.

Can I offer installment plans for pre-orders?

Yes, multi-step payment plans work well for pre-orders, particularly cost-sensitive customers and high-ticket items. These plans charge customers in multiple installments, like 3 payments of $200 instead of $600 upfront.

The system works by letting customers select their preferred number of installments at checkout. You configure the payment frequency (daily, weekly, or monthly), maximum installment count, and optional discounts for customers who choose payment plans. The app automatically processes charges on the defined schedule.

Available for Shopify Plus merchants and non-Shopify platforms, automated installment scheduling handles all charge timing. Customers see a selector above the pre-order button where they choose how many payments they want, and they access a portal showing payment history, outstanding balances, and upcoming charge dates.

For merchants on standard Shopify plans, manual installment approaches work. You trigger each charge manually when the next payment is due. This requires more oversight but achieves the same outcome.

What happens if I need to refund a deposit?

Refunding deposits works like any other Shopify refund. Process the refund through your Shopify admin or pre-order app, and the funds return to the customer’s original payment method within 5-10 business days.

If you’ve already charged the remaining balance, you can refund either the full amount or just a portion, depending on the situation. The refund process itself is straightforward; the complexity is deciding which amount to refund and communicating that clearly to the customer.

Clear refund policies prevent confusion. State upfront: “If you cancel before [date], we’ll refund your deposit in full. After [date], deposits are non-refundable but you can apply them to other products.”

Do deposits work with Shopify discounts?

Most discount types are compatible with partial payments. You can apply discount codes to orders, offer pre-order-specific discounts, and run sales that include deposit-based pre-orders.

The main limitation is Shopify’s “buy X, get Y” automatic discount format, which some pre-order apps don’t yet support. Standard percentage or fixed-amount discount codes work fine.

If you rely heavily on complex automatic discount combinations, test compatibility with your pre-order app before launching campaigns. Most common discount use cases work without issues.

Conclusion

Shopify partial payments can transform how you capture pre-order revenue. From the 1 million+ pre-orders report data to the rise of BNPL services like Klarna and Affirm. Partial payments are a great way to reduce friction and increase conversion rates.

The key takeaways:

Vaulted cards eliminate authorization periods, giving you complete control over charge timing regardless of lead times.

Payment timing flexibility lets you match your cash flow needs to customer expectations. Choose charge-upfront for immediate revenue, charge-later for maximum conversion, or deposits for balanced commitment.

Strategic deposit amounts based on product type and price point improve conversion while demonstrating real customer commitment.

App-based solutions solve the operational complexity, poor customer experience, and support burden of manual approaches.

Whether you’re launching new products, managing restocks, or selling made-to-order items, partial payments reduce friction while securing revenue before inventory arrives.

Ready to start taking Shopify deposits and partial payment pre-orders? PreProduct supports charge-upfront, charge-later, deposits, and multi-step installment plans with automated workflows and comprehensive customer communications.

Pre-sell With PreProduct

7 day free trial with all plans