🟣 Purple Dot winding down your plan? See our Migration Guide →

How to Run a Pre-order Campaign: Complete Guide for Ecommerce Brands

A pre-order campaign is more than just flipping a switch and hoping customers find your product. It’s a coordinated effort to build anticipation, capture demand, and generate revenue before your inventory even arrives. Yet most merchants treat pre-orders as an afterthought, missing out on the strategic advantages that come from proper campaign planning.

The difference between “having pre-orders enabled” and “running a pre-order campaign” can be significant. A coordinated launch concentrates demand into a defined window, creating momentum that builds on itself. That kind of energy doesn’t happen by accident. It comes from deliberate marketing, clear communication, and a phased approach that builds excitement before launch day.

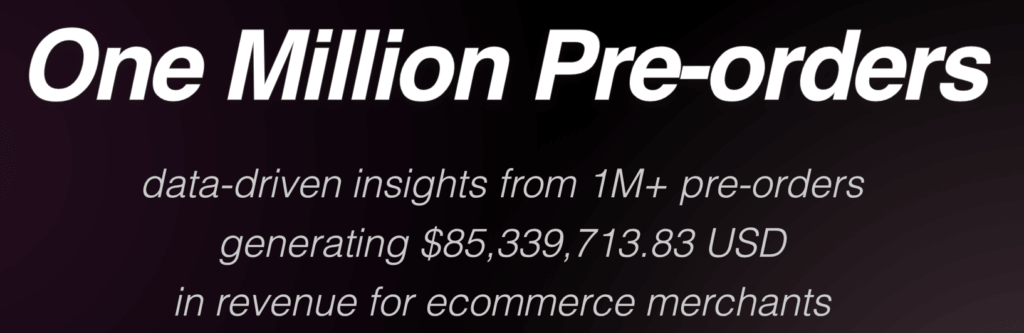
This guide breaks down exactly how to plan and execute a pre-order campaign from start to finish. We’ll cover everything from choosing the right payment model to post-campaign analysis, backed by insights from over $85 million in pre-order sales.

What Is a Pre-order Campaign?

A pre-order campaign is a structured marketing effort designed to sell products before they’re available to ship. Unlike simply enabling pre-orders on your store, a campaign involves deliberate phases: building anticipation, launching with momentum, sustaining interest through the pre-order window, and following through with clear communication until fulfillment.

Pre-order campaigns make sense in several scenarios:

  • New product launches where you want to validate demand before committing to large inventory orders
  • Restocks of popular items where you know demand exists but need time to replenish
  • Limited edition releases where scarcity and exclusivity drive urgency
  • Seasonal products where timing matters and you need to capture intent early
  • Made-to-order items where production only begins after orders come in

The key distinction is intentionality. A campaign has a beginning, middle, and end. It has marketing assets, email sequences, and clear timelines. It treats the pre-order period as an opportunity rather than an inconvenience.

Why Run a Pre-order Campaign Instead of Just Enabling Pre-orders?

Merchants who treat pre-orders as campaigns rather than features see better results across multiple dimensions.

Revenue concentration matters. When you launch with coordinated marketing, you compress demand into a shorter window. This creates visible momentum that feeds on itself. Customers see other people buying, which validates their decision to purchase. Social proof builds naturally when you have a defined launch moment.

Demand forecasting becomes more accurate. A campaign gives you a cleaner signal of actual demand. Instead of trickling orders over weeks or months, you get a concentrated burst that helps you understand how many units you’ll actually sell. This informs production decisions, inventory planning, and future marketing spend.

Customer acquisition costs can decrease. When you build anticipation before launch, your audience is primed to convert. Email subscribers who’ve been warmed up convert at higher rates than cold traffic. Influencer partnerships generate more impact when coordinated around a specific launch date rather than an evergreen availability.

Brand building compounds. Successful pre-order campaigns become part of your brand story. Customers remember being part of a launch. They share their excitement on social media. They become advocates who bring others into your next campaign.

The data supports treating pre-orders as strategic opportunities. Our analysis of 1 million+ pre-orders reveals patterns in payment models, pricing, and timelines that successful merchants use to optimize their approach.

Phase 1: Pre-Campaign Preparation (4-6 Weeks Before Launch)

The work you do before opening pre-orders determines how successful your campaign will be. This preparation phase covers three critical areas: payment model selection, timeline setting, and asset creation.

Choose Your Payment Model

Your payment model affects customer psychology, cash flow, and operational complexity. There’s no universally right answer; the best choice depends on your specific situation.

Charge upfront works best when:

  • Your lead time is relatively short (under 30 days)
  • You have established trust with your audience
  • You need cash flow immediately to fund production
  • You’re offering limited quantities where demand certainty matters

Charge later (collecting payment at shipping) works best when:

  • Your lead time is longer or uncertain
  • You’re launching a new product where customers may be hesitant
  • You want to maximize pre-order volume by reducing purchase friction
  • You’re comfortable with the operational complexity of deferred charging

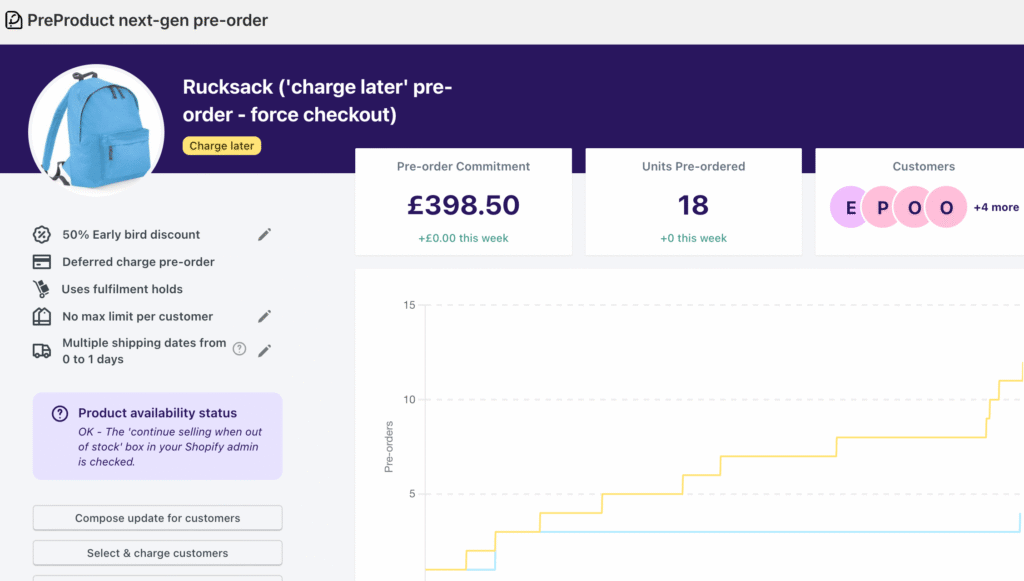
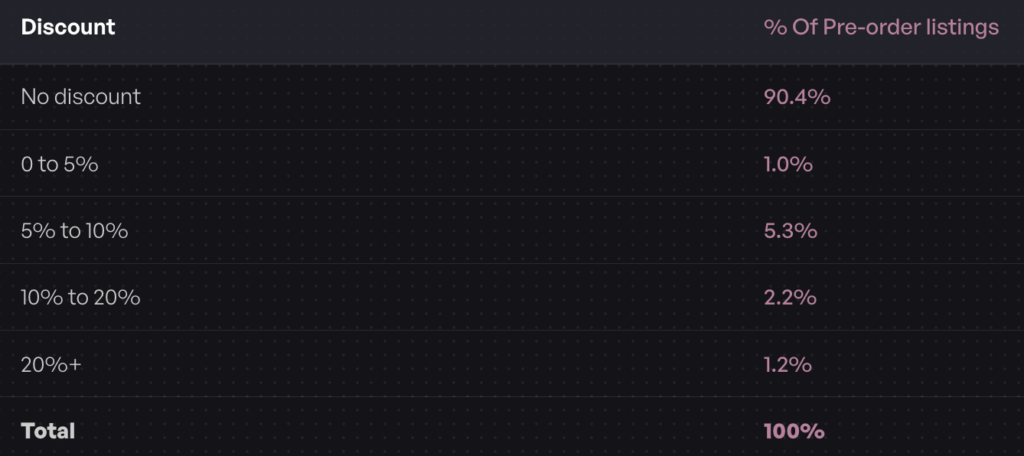
According to our data, 43.8% of pre-order listings use charge-later payment models. This suggests many merchants find that reducing upfront commitment increases total pre-order volume.

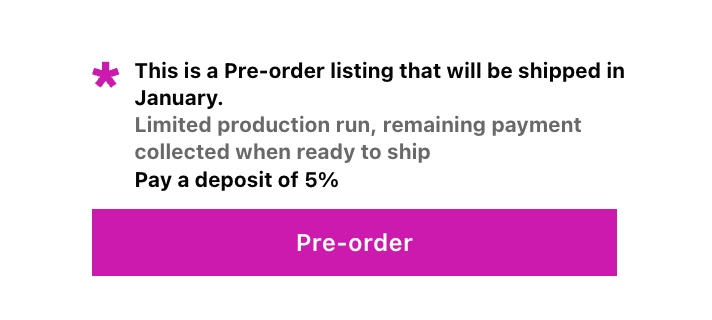
Deposits (partial payment now, balance at shipping) work best when:

  • You’re selling higher-ticket items where full payment feels risky
  • You want some commitment without the full friction of charge-upfront
  • You need partial cash flow now but don’t want to charge the full amount

For a deeper comparison of these approaches, see our complete guide to pre-order payment models.

Set Realistic Timelines

Nothing damages a pre-order campaign like missed shipping dates. Customers are surprisingly patient when expectations are set correctly from the start. They become frustrated when promises are broken.

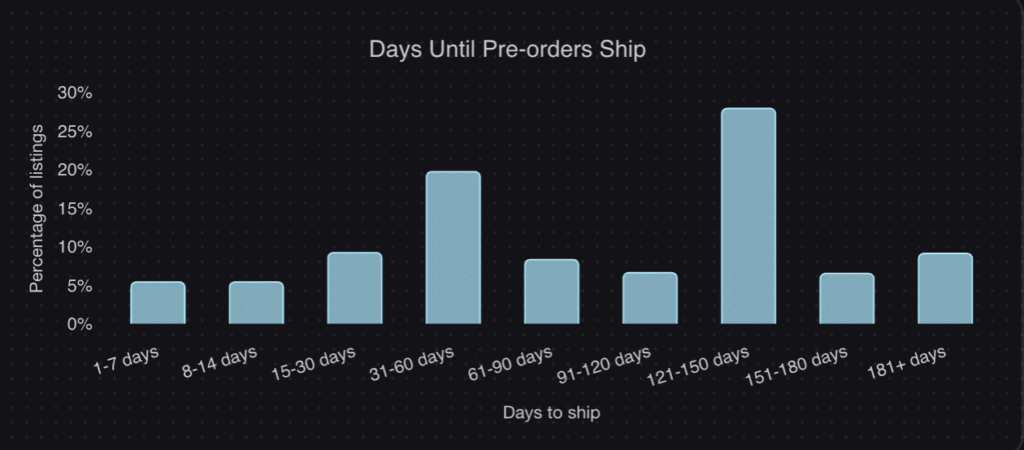
Our data shows that the most common shipping timeframe for pre-orders is 121-150 days, representing 28.1% of all pre-orders. This tells us that customers are willing to wait several months for products they want, as long as they know what to expect.

Best practices for timeline setting:

  • Add buffer to your estimates. If your manufacturer says 8 weeks, tell customers 10-12 weeks. Under-promising and over-delivering builds trust.
  • Plan for delays. Manufacturing issues happen. Have a communication plan ready for if (when) timelines slip.
  • Be specific when possible. “Ships in Q2” is less compelling than “Ships week of May 15th.” Specificity signals confidence (although this needs to be balanced with the need for the last point!)
  • Account for shipping transit time. Your timeline should reflect when customers receive products, not when you ship them.

The gap between pre-order open and delivery should be reflected in your pre-order policy. For example, a pre-order with a 6 month ETA should probably be a charge-later or deposit listing. Where as charging upfront for a pre-order shipping in two weeks is absolutely fine.

Build Your Marketing Assets

Before launch day, you need everything ready to go:

Product photography and video. Even if your final product isn’t ready, you need compelling visuals. Factory samples, 3D renders, or prototype images work fine as long as you’re transparent that final products may vary slightly.

Landing page or product page. Your pre-order product page needs to clearly communicate that this is a pre-order, when customers can expect delivery, and how payment works. Ambiguity creates support tickets and cancellations.

Email sequences. Draft your launch announcement, reminder emails, and post-purchase communication before you go live. You’ll want:

  • Teaser emails for the weeks before launch
  • Launch day announcement
  • Mid-campaign reminders for those who haven’t purchased
  • Order confirmation with clear pre-order terms
  • Shipping updates as you approach fulfillment

For detailed guidance, see our pre-order email sequence guide.

Social content calendar. Plan your posts for each day of the campaign. Behind-the-scenes content, customer quotes, progress updates, and deadline reminders all keep momentum going.

Phase 2: Building Anticipation (2-4 Weeks Before Launch)

The pre-launch period is about priming your audience so they’re ready to buy the moment pre-orders open.

Email List Warm-up

Your existing subscribers are your most likely customers. Start warming them up:

  • Tease the product. Share glimpses without revealing everything. Create curiosity.
  • Offer early access. Let subscribers know they’ll get first dibs on pre-orders.
  • Build a VIP list. Create a separate signup for people who want launch notifications. This segment is your highest-intent audience.

Social Media Seeding

Use social platforms to build buzz:

  • Behind-the-scenes content showing product development, manufacturing visits, or design decisions
  • Countdown posts as launch day approaches
  • Influencer seeding by sending samples to creators who will share their honest reactions on launch day

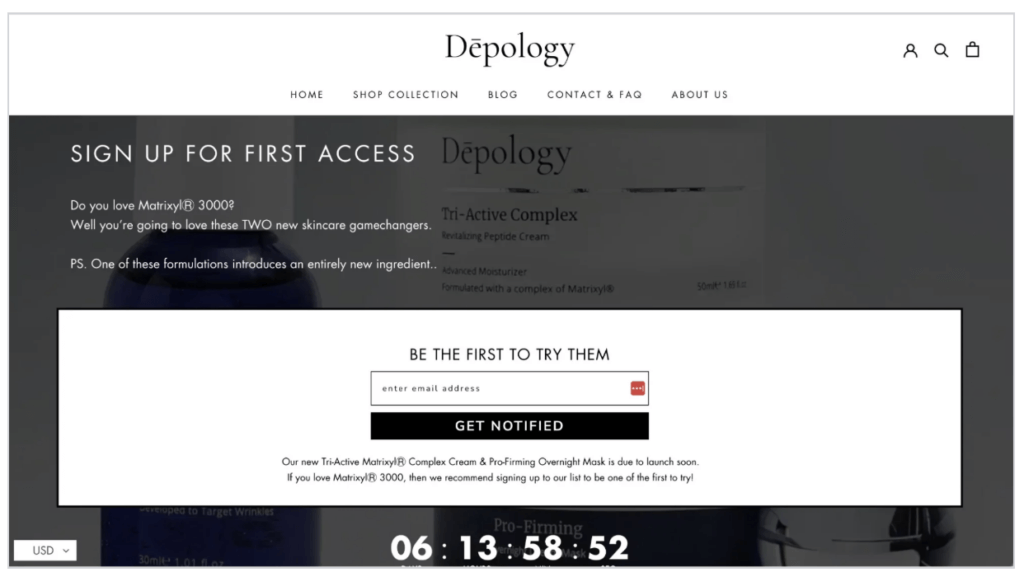
Pre-launch Landing Page

If you’re not ready to take pre-orders yet, create a coming soon page that captures email addresses. This builds your launch list while creating a sense of anticipation. Include:

  • Product imagery
  • Brief description of what’s coming
  • Expected launch date
  • Email signup form
  • Social proof if available (press mentions, early reviews, etc.)
https://shop.mattel.com.au/collections/coming-soon

Phase 3: Campaign Launch (Days 1-7)

Launch day is your biggest opportunity for momentum. Concentrate your efforts here.

Launch Day Execution

Everything should fire simultaneously:

  • Email blast to your full list, with VIP early access going out slightly earlier if you offered it
  • Social media announcement across all platforms
  • Influencer activation with coordinated posts from creators who received samples
  • Paid advertising launch if you’re running ads, start them now to capture the launch momentum

The goal is creating the feeling that something is happening. When customers see activity across multiple channels, social proof kicks in.

First Week Momentum

Keep the energy going through week one:

  • Daily social updates showing order counts, customer reactions, or production progress
  • User-generated content requests asking customers to share their purchase excitement
  • Progress tracking like “500 units claimed, only 200 remaining” creates urgency without being manipulative (as long as numbers are real)

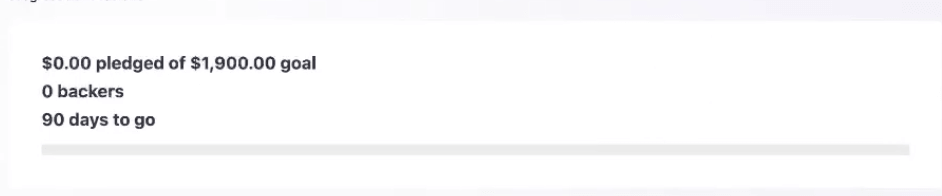
Consider adding a crowdfunding-style progress bar to your product page. Visual progress indicators tap into the same psychology that makes Kickstarter campaigns compelling.

Phase 4: Mid-Campaign Management (Week 2+)

After the initial launch burst, maintaining momentum requires consistent effort.

Maintaining Momentum

  • Weekly email updates to your list highlighting progress, new testimonials, or behind-the-scenes content
  • New angles and content that give you fresh reasons to reach out to your audience
  • Genuine scarcity messaging if you have limited quantities or a deadline approaching

The key is providing value with each touchpoint, not just asking for the sale repeatedly.

Customer Communication

For customers who have already pre-ordered:

  • Order confirmation with crystal clear terms on when they’ll be charged (if charge-later) and when they’ll receive products
  • Shipping timeline reminders as you approach the estimated date
  • Production updates if you have interesting progress to share

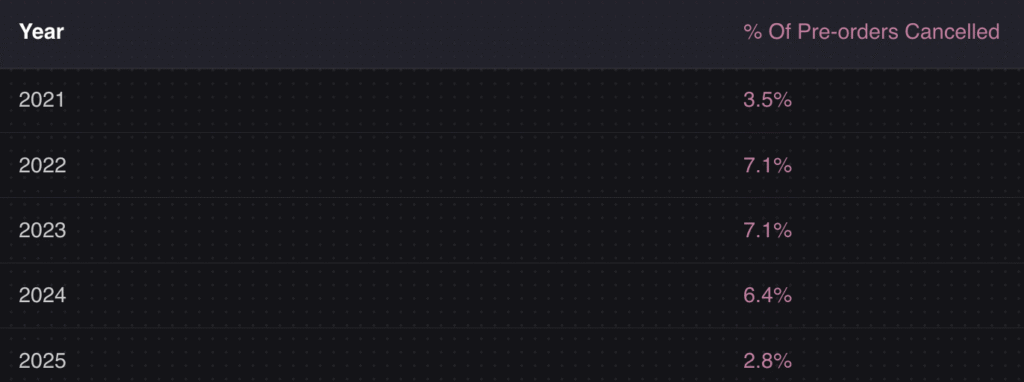
Good communication during the pre-order period reduces cancellations. Our data shows an average cancellation rate of 5.4%. Merchants who communicate proactively typically see rates below this average.

Phase 5: Campaign Close and Post-Launch

Closing the Campaign

If your pre-order has a deadline:

  • Last chance messaging in the final 48-72 hours creates urgency
  • Deadline reminders via email and social media
  • Final conversion push with any remaining incentives you’re offering

Be specific about what happens when the deadline passes. “Pre-orders close Sunday at midnight” is more compelling than “pre-orders ending soon.”

Post-Campaign Analysis

After your campaign closes (or after you fulfill and ship), review your performance:

  • Pre-order conversion rate: What percentage of product page visitors placed pre-orders?
  • Email signup to pre-order conversion: How many of your launch list actually bought?
  • Average order value: Did bundling or upsells work?
  • Cancellation rate: How does yours compare to the 5.4% average?
  • Time to charge (if charge-later): How long between order and payment collection?
  • Payment success rate: Did deferred charges go through smoothly?

If you experience failed charges during collection, our guide on recovering failed Shopify payments covers dunning strategies and best practices (for example, PreProduct has a failed charge flow that can be initiated).

Pre-order Campaign Metrics That Matter

Track these KPIs to optimize future campaigns:

Conversion metrics:

  • Pre-order page conversion rate
  • Email click-to-purchase rate
  • Ad ROAS for pre-order campaigns

Financial metrics:

  • Average order value
  • Revenue per email subscriber
  • Cost per pre-order acquisition

Operational metrics:

  • Cancellation rate
  • Support ticket volume
  • Charge success rate (for deferred payment models)

Engagement metrics:

  • Email open and click rates throughout campaign
  • Social engagement on pre-order announcements
  • Referral/share rates

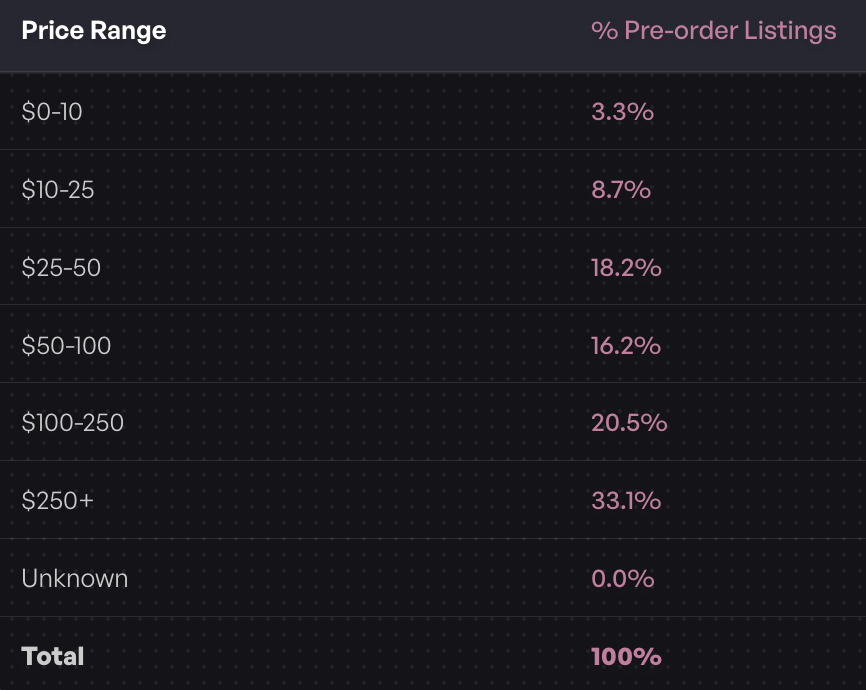
For benchmarks on pricing and other factors, our 1M pre-orders report shows that the most common price range for pre-order products is over $250, representing 26.8% of listings. This suggests pre-orders work particularly well for higher-ticket items where customers are willing to wait for quality.

Common Pre-order Campaign Mistakes to Avoid

1. Not communicating delivery timelines clearly. Vague shipping estimates create customer anxiety and support burden. Be as specific as possible, and if anything changes, communicate immediately.

2. Overpromising and under-delivering. Whether it’s product features, quality, or timing, broken promises destroy trust. It’s better to launch with realistic expectations than to set yourself up for disappointment.

3. Missing early-bird incentives. Give customers a reason to buy now rather than later. Limited-time pricing, exclusive bonuses, or early access to future products can compress your sales into the launch window.

4. Ignoring post-purchase communication. The sale isn’t over when someone pre-orders. Keep customers engaged and informed throughout the waiting period. Silence breeds anxiety and cancellation requests.

5. Not having a cancellation recovery plan. Some cancellations are inevitable. Have a process for handling them gracefully, and consider whether you can win back cancelled customers with future offers.

Pre-order Campaign Ideas by Industry

Different product categories call for different approaches.

Fashion and Apparel

  • Seasonal collection drops where the entire collection launches on pre-order before production
  • Limited colorways available only through pre-order
  • Collaboration pieces with designers or influencers
  • Made-to-order models that reduce waste and overproduction

Consumer Electronics and Gadgets

  • New product launches where pre-orders fund production runs
  • Next-gen product releases before current inventory is depleted
  • Founder’s edition packaging or features exclusive to pre-order customers

Food and Beverage

  • Seasonal products (holiday items, limited flavors)
  • New flavor launches with exclusive early access
  • Subscription box previews where subscribers get first access to new products

Home Goods and Furniture

  • Custom/made-to-order pieces where production begins after order
  • New collection launches before warehouse stock arrives
  • Exclusive finishes or materials available only through pre-order

For more pre-order best practices across industries, we’ve compiled data-driven strategies from merchants running successful campaigns.

Conclusion

Running a successful pre-order campaign is where you do more than just enable ‘pre-order’ on your store. It’s where you put in intentional planning across five phases: preparation, anticipation-building, launch, mid-campaign management, and post-campaign analysis.

The merchants who see the best results treat pre-orders as strategic marketing events rather than operational necessities. They choose payment models that match their business needs, set realistic timelines with built-in buffer, and communicate consistently throughout the customer journey.

Key takeaways:

  • Start preparing 4-6 weeks before you want to open pre-orders
  • Choose a payment model based on your lead time and customer trust level
  • Build anticipation through email warm-up and social seeding before launch
  • Concentrate marketing efforts on launch day for maximum momentum
  • Communicate proactively with customers throughout the waiting period
  • Analyze results to improve future campaigns

If you’re running pre-orders on Shopify, tools like PreProduct can help you manage payment collection, customer communication, and fulfillment holds. But regardless of what tools you use, the principles remain the same: plan deliberately, launch with momentum, and communicate clearly.

Your next product launch deserves more than a passive pre-order button. Give it a campaign!

Pre-sell With PreProduct

7 day free trial with all plans

Shopify Split Payments: How to Let Customers Pay in Parts

Payment flexibility matters more than most merchants realize. According to Baymard Institute, 10% of shoppers abandon their carts because there aren’t enough payment methods. For merchants selling higher-ticket items or running pre-orders with long lead times, that’s revenue walking out the door. Split payments can be the difference between a completed order and an abandoned cart.

But here’s the catch: Shopify doesn’t natively support split payments for online checkout. You can’t split a transaction across two credit cards or let a customer pay half now and half later without some workarounds. The good news is there are several ways to make split payments work on your store. This guide breaks down your options so you can pick the right approach for your business.

What Are Split Payments on Shopify?

Split payments let customers divide a purchase into multiple transactions. This can mean:

  • Splitting across payment methods (two credit cards, card + gift card)
  • Partial payments (deposit now, balance later)
  • Installments (pay over several weeks or months)

These terms often get used interchangeably, but they work differently on Shopify. For a deeper dive into partial payments, deposits and deferred charges, see our Shopify partial payments guide.

Why Split Payments Matter for Your Store

The data makes a strong case. Shopify reports that Shop Pay Installments reduces abandoned carts by 28%, with one in four merchants seeing a 50% increase in AOV after enabling it. For pre-orders specifically, payment flexibility plays an even bigger role. According to data from over 1 million pre-orders, 43.8% of pre-order listings use charge-later models where customers pay nothing upfront. Removing that upfront friction helps validate demand before you commit to inventory.

The Shopify Split Payment Limitation

Let’s be clear about what Shopify can and cannot do natively.

What Shopify does NOT support:

  • Splitting an online checkout across two credit cards
  • Letting customers pay a portion now and the rest later (without apps)
  • Multiple payment methods in a single online transaction

What Shopify DOES support:

  • Split payments at point of sale (POS) for in-person transactions
  • Draft orders with manual partial payments
  • Shop Pay Installments (BNPL through Affirm)
  • Shopify Plus B2B partial payments

The limitation comes down to how payment gateways work. Security requirements make it difficult to hold multiple payment methods in a single checkout session. This is why most split payment solutions for online stores require either manual processes or third-party apps.

Technical note: Only certain payment gateways support storing card details for later charges. Shopify Payments and PayPal support vaulted cards, which means they can securely save a customer’s payment method to charge later without the customer taking any additional action. This distinction matters when choosing how to handle split payments, and we’ll cover it more in the third-party apps section.

5 Ways to Accept Split Payments on Shopify

1. Shopify POS (In-Person Sales)

If you sell in person, Shopify POS supports split payments natively. Customers can pay using any combination of:

  • Multiple credit cards
  • Cash and card
  • Gift cards and card
  • Store credit and other methods

This works well for retail stores, markets and pop-ups. The catch is obvious: it only works for in-person sales. If your business is primarily online, you’ll need one of the other options below.

2. Draft Orders (Manual B2B Method)

Draft orders let you create custom invoices with partial payment requirements. Here’s how it works:

  1. Create a draft order in Shopify admin
  2. Set a deposit amount or percentage
  3. Send the invoice to your customer
  4. Manually record additional payments as they come in

Best for: B2B transactions, custom quotes, one-off large orders where you’re already in direct contact with the customer.

Limitations:

  • Manual process that doesn’t scale
  • No automation for balance collection
  • Requires hands-on management of each transaction

For low-volume, high-touch situations, draft orders work fine. For anything at scale, you’ll want a more automated solution.

3. Shop Pay Installments (Native BNPL)

Shop Pay Installments is Shopify’s built-in buy now, pay later option, powered by Affirm. Customers can split purchases into 2-4 interest-free payments.

How it works:

  • Customer selects Shop Pay Installments at checkout
  • Affirm runs a soft credit check
  • If approved, customer pays in bi-weekly installments
  • You receive the full payment upfront (minus fees)

Eligibility requirements:

  • Store must be in the US, Canada or UK
  • Must use Shopify Payments as your gateway
  • Orders typically between $50-$3,000

Best for: In-stock items with immediate shipping. Shop Pay Installments charges the customer right away and you ship the product. It’s not designed for pre-orders or products with long lead times.

For more on installment options, see our Shopify payment plans guide.

4. Shopify Plus B2B Partial Payments

If you’re on Shopify Plus with B2B customers, you can now set deposit requirements directly on payment terms. This is a relatively new feature that lets you:

  • Require a percentage upfront on wholesale orders
  • Record partial payments in the Shopify admin
  • Manage payment schedules for net terms

Best for: Wholesale accounts, B2B customers on net-30/60/90 terms, enterprise clients who expect deposit and balance payment structures.

This feature is limited to Plus merchants with the B2B channel enabled.

5. Third-Party Apps

For most online stores, third-party apps are the practical solution for split payments. But not all apps work the same way. There are two fundamentally different approaches:

Invoice-based apps (Split Partial Deposit, SpurIT, etc.):

  • Send payment links via email for the balance
  • Customer must click a link and complete payment manually
  • Works with any payment gateway
  • Requires customer action for each subsequent payment

Vaulted card apps (PreProduct):

  • Customer completes checkout once, card stored securely
  • Balance charges happen automatically, no customer action needed
  • Requires Shopify Payments or PayPal
  • Single checkout experience, multiple charges
  • Supports multi-step payment plans where customers choose their installment count

This isn’t just a feature difference. It’s an architectural distinction that affects customer experience and conversion rates. With invoice-based apps, every balance payment is a potential drop-off point. The customer has to open an email, click a link, and re-enter payment details. With vaulted card apps, the customer goes through the buying flow once and you handle the rest.

App TypeCustomer ExperienceGateway RequirementBest For
Invoice-basedMultiple touchpoints, customer action requiredAny gatewayNon-Shopify Payments stores
Vaulted cardSingle checkout, automatic chargesShopify Payments or PayPalStores wanting seamless experience

For stores using Shopify Payments, vaulted card apps provide a better customer experience. For stores on other gateways, invoice-based apps are your only option.

When to Use Each Split Payment Method

Choosing the right method depends on your situation. Here’s a quick framework:

Use Shopify POS if:

  • You sell in person (retail, markets, events)
  • Customers want to split across cards or payment types at the register

Use draft orders if:

  • You handle low-volume, high-value B2B transactions
  • You’re already in direct contact with each customer
  • You need complete flexibility on payment terms

Use Shop Pay Installments if:

  • You sell in-stock products that ship immediately
  • Your orders are typically $50-$3,000
  • You use Shopify Payments and are in the US, Canada or UK

Use Shopify Plus B2B if:

  • You’re on Plus with B2B customers
  • You need deposits on wholesale orders
  • Your customers expect net terms with partial payments

Use third-party apps if:

  • You sell pre-orders or products with lead times
  • You want deposits or charge-later models
  • You need automated balance collection
Use CaseBest MethodWhy
In-person retailShopify POSNative support, no setup needed
B2B wholesale (Plus)Shopify Plus B2BBuilt-in, no extra apps
Low-volume custom ordersDraft ordersFlexible, manual control
In-stock BNPLShop Pay InstallmentsNative, customer-friendly
Pre-orders and depositsThird-party appsAutomation, payment flexibility

Split Payments for Pre-orders

Pre-orders need a different approach because you’re selling products that don’t exist yet, or haven’t arrived. The timing between order and fulfillment changes everything.

The most popular pre-order payment models:

  • Charge-later: $0 upfront, charge when ready to ship. This is the most common approach, with 43.8% of pre-order listings using it according to PreProduct data. It removes upfront friction and lets you validate demand before inventory investment.
  • Deposits: 20-50% upfront, balance when ready. Works well for higher-priced items where you want customer commitment.
  • Multi-step plans: Spread payments across the production timeline with multi-step payment plans. Customers choose how many installments they want, and charges happen automatically on a schedule you define. Common for crowdfunding-style launches or higher-ticket pre-orders.

For a complete breakdown of payment models and when to use each, see our pre-order payment models guide.

The key for pre-orders is that vaulted card technology makes a significant difference. Customers only go through checkout once. No invoices, no payment links, no additional friction when it’s time to collect the balance.

Common Questions About Shopify Split Payments

Can I split a Shopify checkout between two credit cards?

Not natively. Shopify’s online checkout only supports one payment method per transaction. To split across cards, you’d need to use draft orders (manually) or a third-party app that supports multiple payment captures.

What if the second payment fails?

This is where dunning workflows matter. Good split payment apps will automatically retry failed charges and notify customers. For a deep dive on recovering failed payments, see our failed Shopify payments guide.

Which payment gateways support vaulted cards?

Shopify Payments, PayPal and Cybersource can securely store card details for deferred charging. Other gateways don’t support this, so you’ll need invoice-based solutions instead.

What’s the ideal deposit percentage?

Most merchants find 20-50% works well. Lower deposits reduce friction; higher deposits secure more commitment. It depends on your product price point and lead times.

Can I use Shop Pay Installments for pre-orders?

Shop Pay Installments charges customers immediately, so it’s designed for in-stock products. For pre-orders where you want to charge later, you’ll need a different approach like charge-later or deposit pre-orders.

Making Split Payments Work for Your Store

Split payments aren’t one-size-fits-all. The right approach depends on whether you’re selling in person or online, whether you use Shopify Payments, and whether you need deposits for pre-orders or installments for in-stock products.

Here’s the quick version:

  • In-person? Shopify POS handles it natively
  • B2B on Plus? Use the built-in partial payments feature
  • In-stock products via buy-now-pay-later (ship now)? Shop Pay Installments (powered by Affirm)
  • In-stock products via vaulted card (ship later)? Watch this space, we have a new ‘Payment Plans’ app coming out shortly.
  • Pre-orders or custom orders? Third-party apps with vaulted card support give you the best experience

The distinction between invoice-based and vaulted card apps is worth understanding. For pre-orders especially, having customers complete checkout once and handling subsequent charges automatically makes a real difference in completion rates.

If you’re running pre-orders and want to explore deposit or charge-later options, PreProduct can help you set up split payment models that keep everything within Shopify’s native checkout.

Pre-sell With PreProduct

7 day free trial with all plans

Shopify Coming Soon Pages: Complete Guide to Pre-Launch Success

Coming soon pages are not just placeholders. They are the first step in a two-phase launch strategy that can generate revenue before your product even ships. Whether you are launching a new Shopify store or preparing to release a product line, well-built coming soon pages capture attention, build your audience and set the stage for what comes next.

https://www.fashionnova.com/collections/coming-soon

Most merchants face a frustrating choice: wait until everything is perfect to start marketing, or launch early and risk looking unprepared. Coming soon pages solve this problem by letting you build momentum while you finalize the details. But the real opportunity that most merchants miss is converting that momentum into actual sales through pre-orders.

This guide covers how to create a coming soon page on Shopify, what elements drive the highest conversions, and when to transition from email capture to revenue capture with pre-orders.

What Are Shopify Coming Soon Pages?

Coming soon pages are temporary landing pages that appear before your store or product officially launches. They serve as a preview of what customers can expect while giving you a way to start building your audience immediately.

There are two main types of coming soon pages on Shopify:

Brand launch pages use Shopify’s built-in password protection to show visitors a teaser while you build out your full store. This is ideal when you are launching a new brand and want to capture email addresses before opening for business.

https://www.shopify.com/au/blog/coming-soon-page

Product launch pages are dedicated landing pages for an upcoming product within an existing store. These work well for new collections, collaborations, or seasonal launches where you want to generate buzz without revealing the full details yet.

https://shop.mattel.com.au/collections/coming-soon

The purpose of both is the same: build your audience, capture email leads and create anticipation before the official launch. The difference lies in scope and implementation.

When Do You Need Coming Soon Pages?

Coming soon pages make sense in several situations:

Launching a new Shopify store. If you are building your first store or rebranding an existing business, a coming soon page lets you start marketing before the site is ready. You can begin collecting email addresses and building social proof while you finalize products, photography and checkout flows.

Releasing a new product line. A coming soon website landing page for a new collection builds anticipation and gives you a single URL to share across all marketing channels. This works especially well for seasonal drops or collaborations where timing matters.

https://designstuff.com.au/collections/coming-soon

Testing market demand. Before committing to inventory or production, a coming soon page lets you gauge interest. If you collect 500 email signups in a week, you have a signal that demand exists. If you collect five, you might want to rethink your approach. Many merchants use this validation step before transitioning to pre-orders, which provide an even stronger demand signal since customers are putting money down. If you are new to the concept, see our guide on how pre-orders work.

Building a pre-launch email list. The merchants who have the strongest launch days are the ones who spent weeks or months building an audience beforehand. A pre-launch landing page is the simplest way to capture those leads.

https://www.shopify.com/au/blog/coming-soon-page

Benefits of Shopify Coming Soon Pages

Beyond the obvious audience-building function, coming soon pages offer several strategic advantages.

Get a head start on SEO. Your domain starts getting indexed as soon as it goes live, even with just a coming soon page. This gives search engines time to discover your site before your full launch, which can help your product pages rank faster once they are published.

Capture qualified leads. Someone who signs up for a “notify me” list has already shown interest in what you are building. These leads are more likely to convert than cold traffic, making your launch day marketing significantly more effective.

Test messaging and positioning. The headlines, imagery and copy you use on a coming soon page can inform your broader marketing strategy. Pay attention to what resonates and refine your positioning before you invest in paid advertising.

Create exclusivity and urgency. Limited access and early-bird positioning make people feel like insiders. This psychological trigger increases signups and builds word-of-mouth before you have a product to sell.

Validate demand before inventory investment. If you are considering a pre-order strategy but are not ready to commit, a coming soon page gives you demand data without financial risk.

How to Create a Coming Soon Page on Shopify

There are three main approaches to building coming soon pages on Shopify, each with different tradeoffs.

Method 1: Shopify’s Built-in Password Page

The simplest option is Shopify’s native password protection. This works best for brand launches where you want to hide your entire store.

Step 1: Go to Online Store > Preferences in your Shopify admin.

Step 2: Scroll to Password protection and check “Enable password.”

Step 3: Add a message for visitors explaining what is coming.

Step 4: Customize the page via Online Store > Themes > Customize > Password page.

From the theme editor, you can modify the headline, add your logo, change colors and add an email capture form. Most modern Shopify themes include a password page template that you can customize without code.

Pros: Free, native to Shopify, no apps required.

Cons: Limited design flexibility, applies to the entire store.

Method 2: Create a Dedicated Landing Page

If you want more control or need a coming soon page for a specific product rather than your whole store, you can create a standalone page.

Option A: Duplicate your theme. Create a copy of your current theme, remove everything except a minimal landing page layout, and publish it temporarily. When you are ready to launch, switch back to your full theme.

Option B: Use the page editor. Create a new page in Online Store > Pages, then build your coming soon content using Shopify’s native editor or a page builder app.

Pros: More design flexibility, can target specific products.

Cons: Requires more setup, may need third-party apps.

Method 3: Shopify Coming Soon Template Apps

Several Shopify apps specialize in coming soon pages, countdown timers and pre-launch functionality:

  • PageFly, Shogun, GemPages: Full page builders that can create custom coming soon layouts
  • Countdown Timer apps: Add urgency with real-time countdowns
  • Email capture apps: Integrate directly with Klaviyo, Mailchimp or other email platforms

Apps make sense when you need features beyond what Shopify’s native tools offer, such as animated elements, A/B testing, or complex integrations.

Pros: More features, easier customization.

Cons: Additional cost, potential performance impact.

Key Elements Every Coming Soon Page Needs

The difference between a coming soon page that collects dust and one that builds a launch-ready audience comes down to a few critical elements.

A clear headline explaining what is coming. Vague teasers like “Something exciting is coming” underperform compared to specific promises like “Premium wireless earbuds for runners, arriving March 2026.” Be direct about what you are launching.

An email capture form. This is the primary purpose of the page. Keep it simple: one field for email is often enough. Research shows that reducing form fields from four to three increases conversions by 50%.

An estimated launch date or countdown timer. Give people a reason to anticipate. A countdown timer creates urgency and gives visitors a sense of when they should expect to hear from you.

Visual content. Product images, renders or lifestyle photography help visitors understand what they are signing up for. Even work-in-progress photos can build excitement if they show the product in a compelling light.

Social media links. Give visitors another way to follow your progress. Not everyone wants to give out their email, but they might follow you on Instagram.

Mobile-optimized design. Over half of ecommerce traffic comes from mobile devices. If your coming soon page does not work on phones, you are losing signups.

Best Practices for High-Converting Coming Soon Pages

The average email opt-in rate for landing pages is around 1.95%. Top performers achieve 10% or higher. Here is what separates the two.

Keep forms simple. Every additional field you add creates friction. For a coming soon page, email alone is usually sufficient. You can collect more information later.

Be specific about what is coming. Mystery might seem intriguing, but it actually hurts conversions. People are more likely to sign up when they know exactly what they are getting.

Offer an incentive for email signup. Early access, exclusive discounts, or bonus content give visitors a reason to share their email. “Be the first to know” is good. “Get 15% off when we launch” is better.

Create urgency with countdowns. A ticking timer reminds visitors that the window to join the early list is closing. This is especially effective in the days leading up to launch.

Include social sharing options. Make it easy for visitors to spread the word. A simple “Share with a friend” link can significantly expand your reach without additional marketing spend.

Use social proof if you have it. Press mentions, testimonials from beta testers, or follower counts add credibility. If you do not have these yet, skip this element rather than faking it.

Coming Soon Pages vs. Pre-orders: What is the Difference?

Understanding when to use each approach is crucial for maximizing your launch.

FactorComing Soon PagePre-orders
Customer actionEmail signupPurchase
Revenue capturedNonePartial or full
Commitment levelLowHigh
Best forUncertain timelines, early-stageConfirmed timelines, ready to ship
RiskEmail list may not convertMust deliver on promised timeline

Coming soon pages capture interest without requiring any commitment from the customer. There is no payment, no obligation. This makes them ideal when you are still finalizing details or testing demand.

Pre-orders capture actual purchases. Customers pay something, whether upfront, as a deposit, or via deferred charge. This requires a higher commitment but also generates revenue and provides a much stronger demand signal. For a detailed comparison of payment options, see our guide on pre-order payment models.

The key difference is commitment level. An email signup costs the customer nothing. A pre-order requires them to put money down, which means far higher intent to purchase.

For more on the mechanics of pre-orders, see the complete guide to pre-orders on Shopify.

When to Transition from Coming Soon Pages to Pre-orders

Coming soon pages work well as a starting point, but they leave money on the table. At some point, you want to convert that email list into actual revenue.

Here are the signals that you are ready to transition:

Your timeline is confirmed. Pre-orders require you to commit to a delivery window. If you are still uncertain about when you can ship, stick with email capture.

You have enough demand signals. If your email list is growing and engagement is high, you have validation that people want your product. Pre-orders let you capture that demand as revenue.

You are ready to commit to delivery. Taking pre-order payments means you are on the hook to fulfill. Make sure your supply chain can deliver before making this switch.

You need to generate revenue before production. For manufacturers or brands with high upfront costs, pre-order revenue can fund production runs. Data from PreProduct’s analysis of over 1 million pre-orders shows that 75,781 pre-order listings used charge-later, making up 43.8% of all pre-order listings. This flexibility lets merchants capture orders without charging immediately.

You want to reduce launch day risk. Pre-orders tell you exactly how much inventory to produce. This is far more reliable than trying to guess based on email list size.

The Two-Step Launch Strategy: Coming Soon Pages to Pre-orders

The most effective approach combines both tactics in sequence. Here is how it works.

Phase 1: Build the email list. Create your coming soon page and start driving traffic. Focus on capturing as many qualified leads as possible. At this stage, you are building anticipation and gathering demand signals. This approach gives you more control than launching on a crowdfunding platform. If you are weighing your options, see our comparison of Shopify vs Kickstarter for product launches.

Phase 2: Convert the list with pre-orders. When you are ready to commit to a timeline, switch from email capture to pre-order functionality. Email your waitlist first with an exclusive window or early-bird discount. This rewards early interest and drives immediate conversions.

This two-step approach captures more revenue than either tactic alone. Coming soon pages build a larger audience than going straight to pre-orders, because the barrier to entry is lower. But pre-orders capture more value from that audience than waiting until launch day.

Nurturing the Transition

The email sequence between “thanks for signing up” and “pre-orders are live” matters. Consider sending:

  • Behind-the-scenes updates on product development
  • Sneak peeks of final designs or packaging
  • Social proof from beta testers or early reviewers
  • A countdown to pre-order launch with increasing urgency

When the pre-order goes live, email your waitlist first with an exclusive window or discount. This rewards early interest and drives immediate conversions. For guidance on this sequence, see how to build a pre-order email sequence that converts.

Coming Soon Page Examples for Shopify Stores

Looking at what works in practice helps illustrate these principles.

Paynter Jackets uses a waitlist approach for their limited-edition jacket drops. When a product sells out, they swap the buy button for an email capture form that builds the list for the next release. This creates a self-reinforcing cycle of exclusivity and demand. The simple design focuses entirely on the product and the signup form. See more pre-order landing page examples.

Paynter jackets

Away builds anticipation for new colorways and collaborations with dedicated landing pages that feature countdown timers and email capture. Their pages combine product photography with lifestyle imagery to paint a picture of who the product is for.

Away White Lotus edition

Effective elements to borrow:

  • Clean, focused design with minimal distractions
  • Clear value proposition in the headline
  • Single-field email capture form
  • Visual product representation
  • Expected timeline or countdown
  • Social proof when available

Frequently Asked Questions About Coming Soon Pages

How long should a coming soon page stay up?

There is no fixed rule, but two to four weeks is typical for product launches. Longer periods work for brand launches or high-ticket items that require more consideration. The key is maintaining engagement with regular updates so signups do not forget about you.

Can I accept pre-orders on a coming soon page?

Yes, but at that point it is really a pre-order page, not a coming soon page. The distinction matters for setting expectations. If customers can purchase, make sure your page clearly communicates payment timing, expected delivery and any other pre-order policies.

What is the average email conversion rate for coming soon pages?

The average email opt-in rate across all landing pages is around 1.95%. Well-optimized coming soon pages with strong offers and targeted traffic can achieve 5-10% or higher. The key factors are relevance of traffic, clarity of offer and simplicity of the signup form.

Should I show pricing on a coming soon page?

It depends on your strategy. Showing pricing filters out visitors who cannot afford the product, resulting in a more qualified list. Not showing pricing creates mystery and may capture more signups, but those leads may not convert when they see the final price. Test both approaches if possible.

What tools do I need to create a Shopify coming soon page?

For basic needs, Shopify’s built-in password page works well. For more customization, page builder apps like Shogun or PageFly offer drag-and-drop design. For pre-order functionality, you will need a dedicated pre-order app when you are ready to transition from email capture to purchases.

The Bottom Line on Coming Soon Pages

Coming soon pages are valuable, but they are step one, not the end goal. The real opportunity is capturing the email list you build and converting it into pre-order revenue.

Start with a coming soon page when your timeline is uncertain or you are testing demand. Transition to pre-orders when you are ready to commit to delivery and want to generate revenue before launch.

The merchants who build the biggest launch days use both approaches in sequence: coming soon pages to build the list, pre-orders to convert it.

Next steps:

Pre-sell With PreProduct

7 day free trial with all plans

Back in Stock Notifications on Shopify: Complete Setup Guide

Stockouts cost retailers serious money. According to industry research, global stockouts are responsible for roughly $1 trillion in missed sales each year. For Shopify merchants, a sold-out product page can mean losing customers to competitors, or worse, losing them forever.

Back in stock notifications on Shopify offer a way to recover some of those lost sales. Instead of showing a “Sold Out” label and hoping customers return later, you can collect their email address and automatically alert them when inventory is available again.

In this guide, you’ll learn exactly how to set up back in stock notifications on Shopify, from third-party apps to email platform integrations. But we’ll also cover something most guides skip: when pre-orders are actually the smarter choice for capturing revenue upfront, rather than just collecting emails and hoping for the best.

What Are Back in Stock Notifications?

Back in stock notifications are automated alerts that let customers know when a previously sold-out product becomes available again. The workflow is straightforward:

  1. A customer visits a product page that’s out of stock
  2. Instead of a “Buy Now” button, they see a “Notify Me When Available” button
  3. They enter their email address (and sometimes phone number)
  4. When you restock the product, an automated email or SMS goes out
  5. The customer clicks through and hopefully completes a purchase

The customer experience is simple, but the backend requires some setup. Shopify doesn’t include native back in stock alert functionality, so you’ll need either a dedicated app, an email marketing platform with this feature, or custom code.

Why doesn’t Shopify build this in? It’s a feature that requires ongoing email sending, subscriber management, and inventory syncing. Shopify keeps its core platform lean, leaving this functionality to apps and integrations that specialise in it.

Why Back in Stock Notifications Matter for Your Store

Back in stock emails have some of the strongest performance metrics in ecommerce marketing. According to Omnisend’s 2025 data, these emails achieve:

  • 58.03% open rate (compared to ~20% for standard promotional emails)
  • 21.19% click-through rate (well above typical ecommerce benchmarks)
  • 6.46% conversion rate (the highest of any email automation type)

These numbers make sense when you think about the psychology. Someone who signed up for a back in stock notification has already expressed clear purchase intent. They wanted your product, they just couldn’t buy it at that moment. When the notification arrives, it’s not a cold promotional email; it’s the answer they were waiting for.

Beyond direct conversions, back in stock notifications help you:

Capture demand signals. Every signup tells you someone wanted that product. Aggregate this data across your catalogue and you have real-time demand intelligence for inventory planning.

Reduce customer frustration. Instead of bouncing away from a “Sold Out” page, customers feel like they have a path forward. This keeps them engaged with your brand.

Build your email list. Even if a customer doesn’t convert when the product returns, you’ve added a qualified lead to your marketing list. They’ve demonstrated product interest, making them valuable for future campaigns.

Create urgency when you restock. Back in stock emails naturally drive urgency. The product was gone, now it’s back, and it might sell out again. This psychology converts browsers into buyers.

How to Set Up Back in Stock Notifications on Shopify

There are three main approaches to implementing back in stock alerts on your Shopify store. Each has trade-offs around cost, complexity, and features.

Option 1: Third-Party Shopify Apps

The most common approach is installing a dedicated back in stock notification app from the Shopify App Store. These apps handle everything: the “Notify Me” button, subscriber management, automated sending, and analytics.

How app setup typically works:

  1. Install the app from the Shopify App Store
  2. The app automatically adds a “Notify Me” button to sold-out product pages (or you configure where it appears)
  3. Customise the button styling to match your theme
  4. Configure your email templates and sending rules
  5. Connect SMS if you want multi-channel notifications

Most apps can be set up in 15-30 minutes. The “Notify Me” button replaces your standard buy button when a product variant hits zero inventory.

Popular app categories include:

  • Standalone back in stock apps (focused solely on restock alerts)
  • Combined pre-order and back in stock apps (offering both notification capture and pre-order purchasing)
  • Email marketing platforms with back in stock features built in

Pricing varies significantly. Some apps charge monthly fees ($10-50/month is common), while others charge based on notification volume or take a percentage of attributed sales. Consider your expected volume when evaluating pricing models.

Key features to look for:

  • Multi-channel support (email + SMS)
  • Theme compatibility (especially with Shopify 2.0 themes)
  • Integration with your existing email platform
  • Customisable signup forms and email templates
  • Analytics and conversion tracking
  • Asynchronous loading (so the button doesn’t slow your page)

Option 2: Email Platform Integrations

If you already use an email marketing platform like Klaviyo, Omnisend, or Dotdigital, you may be able to handle back in stock notifications without a separate app. These platforms often include built-in back in stock forms and automated flows.

Klaviyo’s back in stock feature, for example, works like this:

  1. Add Klaviyo’s back in stock script to your theme
  2. Customise the “Notify Me” button appearance in Klaviyo’s form editor
  3. Set up a back in stock flow that triggers when inventory is added
  4. Klaviyo automatically matches subscribers to restocked products and sends notifications

The advantage of this approach is consolidation. Your back in stock subscribers live alongside your other email segments, making it easier to include them in broader marketing campaigns.

The downside? Email platform back in stock features can be less robust than dedicated apps. You may have fewer customisation options, less sophisticated variant-level tracking, or limited SMS capabilities.

Option 3: Custom Code Solutions

Technically savvy merchants or development teams can build custom back in stock functionality using Shopify’s APIs, webhooks, and theme code. This approach offers maximum control but requires significant development resources.

A custom solution typically involves:

  • Theme modifications to display signup forms on sold-out products
  • A backend system to store subscriber data
  • Integration with inventory webhooks to detect restocks
  • Connection to an email service (SendGrid, Mailgun, etc.) for sending notifications
  • Custom analytics and reporting

This approach makes sense for large stores with unique requirements or merchants who want complete ownership of their customer data. For most Shopify stores, however, the time and cost of custom development outweighs the benefits compared to existing app solutions.

Best Practices for Back in Stock Notifications

Setting up the technical infrastructure is just the first step. How you execute your back in stock strategy determines whether you actually recover those lost sales.

Email Best Practices

Write compelling subject lines. Your subject line needs to cut through inbox noise. Be direct: “Good news: [Product Name] is back” or “[Product Name] is back in stock, grab it now” work well. Include the product name so subscribers immediately know why they’re receiving the email.

Personalise the content. Address customers by name. Reference the specific product they signed up for. Include the product image prominently. The email should feel like a personal update, not a mass broadcast.

Create urgency (honestly). If the product previously sold out, it might sell out again. You can mention limited quantities or high demand, but only if it’s true. Fake scarcity erodes trust.

Make the CTA obvious. One clear button: “Shop Now” or “Buy [Product Name]”. Don’t clutter the email with other products or offers that distract from the primary action.

Send immediately. Back in stock notifications should go out the moment inventory is added. Delays reduce conversion rates; someone else might buy the product first, or the customer’s interest may have cooled.

Multi-Channel Approach

Email isn’t your only option. SMS and push notifications can significantly boost your reach:

SMS alerts have open rates above 98% and are particularly effective for fast-moving products where speed matters. If someone signed up for a limited-edition drop, an SMS ensures they see the restock notification immediately.

Push notifications (web or app) offer another touchpoint for customers who have opted in. They’re especially useful for mobile shoppers.

WhatsApp is gaining traction for customer communications in many markets. Some back in stock apps now support WhatsApp notifications alongside email and SMS.

The key is letting customers choose their preferred channel during signup. Offering multiple options captures more subscribers and ensures notifications reach them on the channel they’re most likely to engage with.

Timing and Automation

Automate everything. Manual restock notifications don’t scale. Your back in stock system should automatically detect inventory changes and trigger notifications without human intervention.

Consider follow-up sequences. If someone doesn’t convert from the initial notification, a follow-up 24-48 hours later can capture additional sales. Just don’t overdo it; two touchpoints are usually enough.

Use low-stock alerts too. Some apps let you notify subscribers when inventory is running low, even before it sells out. This creates urgency and can drive purchases before you hit zero stock.

When Pre-orders Beat Back in Stock Notifications

Here’s what most back in stock guides won’t tell you: sometimes capturing an email address is the wrong strategy. If you know when inventory is coming, pre-orders let you capture revenue now instead of just collecting signups and hoping customers return later.

The Revenue Timing Problem

Consider the standard back in stock workflow:

  1. Product sells out
  2. Customer signs up for notification
  3. You wait for inventory (weeks or months)
  4. You send the notification
  5. Customer hopefully opens the email
  6. Customer hopefully clicks through
  7. Customer hopefully completes a purchase

That’s a lot of “hopefully.” Even with a 6.46% conversion rate (the best-case scenario), you’re losing over 93% of the interested customers who signed up.

Now consider pre-orders:

  1. Product sells out (or you launch a new product)
  2. Customer places a pre-order
  3. You charge upfront, later, or take a deposit
  4. Inventory arrives
  5. You fulfill the order

The sale is captured when interest is highest, not weeks later when the customer may have found an alternative or simply forgotten about your product.

Conversion Comparison

Back in stock notifications measure interest. Pre-orders measure commitment.

An email signup says “I was interested enough to give you my email address.” A pre-order says “I’m committed enough to give you my payment information.”

Data from over 1 million pre-orders shows that pre-order cancellation rates average just 5.4%. That means 94.6% of customers who place a pre-order follow through to purchase. Compare that to the 6.46% who convert from a back in stock email.

The math is clear: if you can take pre-orders instead of collecting email signups, you capture dramatically more revenue.

When to Use Pre-orders Instead

Pre-orders make more sense than back in stock notifications when:

You have a confirmed restock date. If you know inventory is arriving in 4 weeks, why collect emails when you could collect orders? Customers get the certainty of a secured product; you get the certainty of committed revenue.

You’re launching a new product. Pre-orders let you build hype, validate demand, and fund production before you’ve invested in inventory. This is especially valuable for brands launching new SKUs.

You have high-demand items with waitlists. If your back in stock signup list is growing into the hundreds or thousands, that’s demand you could be capturing as revenue. Long waitlists signal you should be taking pre-orders.

You need cash flow now. Back in stock notifications don’t generate revenue until inventory arrives and customers convert. Charge-upfront pre-orders bring revenue in immediately. Even charge-later models vault the customer’s payment method, creating a committed sale.

Your product has a long lead time. For made-to-order products, custom items, or products with extended manufacturing timelines, pre-orders are the natural fit. Customers understand they’re ordering in advance.

Payment Flexibility with Pre-orders

One reason merchants default to back in stock notifications is uncertainty about payment timing. Pre-orders solve this with flexible payment models:

Charge upfront: Collect full payment at checkout. Revenue is immediate, and there’s zero risk of failed future charges. Best for products with short lead times or when you need immediate cash flow.

Charge later: Customers go through checkout, but you vault their card and charge when inventory arrives. This works well when you’re not sure exactly when stock will land. 43.8% of pre-order listings use this approach.

Deposits: Collect a partial payment upfront (10-50% is common), then charge the balance later. Deposits reduce cancellation risk while being less intimidating than full upfront payment for higher-priced items.

These options give you more control than back in stock notifications, where the only “commitment” you capture is an email address.

Combining Back in Stock with Pre-orders

You don’t have to choose one strategy exclusively. Many Shopify merchants use both, depending on the situation.

Use back in stock notifications when:

  • You genuinely don’t know if or when a product will return
  • The product is being discontinued or is a limited run
  • Restock timelines are unpredictable

Use pre-orders when:

  • You have confirmed inventory incoming
  • You’re launching a new product
  • Lead times are known and communicable to customers
  • You want to capture revenue rather than just interest

The hybrid approach: Some merchants start with back in stock signups when inventory status is uncertain, then transition to pre-orders once they have restock confirmation. You can even re-engage your back in stock signup list with a “pre-orders now open” email, converting passive interest into active orders.

For a deeper comparison of these approaches, see our guide on pre-orders vs backorders vs waitlists.

Measuring Your Back in Stock Performance

Whatever approach you choose, tracking performance is essential. Key metrics to monitor:

Signup rate: What percentage of visitors to sold-out product pages sign up for notifications? Low signup rates may indicate a visibility problem (button placement, design) or a product problem (customers don’t want it enough to wait).

Open rate: Industry benchmark for back in stock emails is around 58%. Significantly lower rates suggest deliverability issues or weak subject lines.

Click-through rate: Benchmark is around 21%. Low CTR with high opens suggests the email content or CTA isn’t compelling.

Conversion rate: The 6.46% benchmark is for customers who receive the notification. Track your actual conversion to see how you compare.

Revenue per notification: How much revenue does each back in stock notification generate on average? This helps you understand the true value of the feature.

If your back in stock conversions are underperforming benchmarks, it may be time to test pre-orders instead. Converting even a fraction of your signup list into pre-order customers will likely generate more revenue than waiting for restock notifications.

Conclusion

Back in stock notifications are a valuable tool for recovering lost sales on Shopify. With conversion rates around 6.46%, significantly higher than standard email campaigns, they’re worth implementing for any store that regularly experiences stockouts.

But here’s the key takeaway: back in stock notifications capture emails, while pre-orders capture revenue. If you know when inventory is coming, pre-orders let you turn interested browsers into committed buyers today, not weeks from now when they may have moved on.

For managing out of stock products on Shopify, consider your situation carefully:

  • Uncertain restock? Use back in stock notifications
  • Confirmed restock date? Consider pre-orders to capture revenue now
  • High demand product? Pre-orders with deposits let you gauge commitment without full upfront payment

The best strategy often combines both approaches, using back in stock for unpredictable inventory and pre-orders when you have clarity on when products will ship.

Ready to capture more revenue from your out-of-stock products? Explore how pre-orders work on Shopify to see if they’re right for your store.


Frequently Asked Questions

Does Shopify have built-in back in stock notifications?

No, Shopify doesn’t offer native back in stock alerts. You’ll need a third-party app from the Shopify App Store or an email platform integration like Klaviyo to add this functionality to your store.

What is the conversion rate for back in stock emails?

Back in stock emails have an average conversion rate of 6.46%, making them the highest-converting email automation type. Open rates average around 58%, with click-through rates of 21%.

What’s the difference between back in stock notifications and pre-orders?

Back in stock notifications collect customer emails and alert them when products restock. Pre-orders capture payment or payment intent upfront, securing the sale before inventory arrives. Pre-orders convert interested customers immediately; back in stock notifications require customers to return and complete a purchase later.

Can I use both back in stock and pre-orders on Shopify?

Yes. Many merchants use back in stock notifications for uncertain restock timelines and pre-orders when they have confirmed inventory coming. The two strategies complement each other and can be used together based on your inventory situation.

How quickly should back in stock notifications be sent?

Immediately. Back in stock notifications should trigger automatically the moment inventory is added. Delays reduce conversion rates because customers may find alternatives or lose interest. Most back in stock apps send notifications within minutes of a restock.

Pre-sell With PreProduct

7 day free trial with all plans

Backorder vs Out of Stock: What’s the Difference (and When to Use Each)

Understanding backorder vs out of stock is essential for any ecommerce merchant facing inventory gaps. Stockouts cost retailers $1.2 trillion globally every year in direct lost sales alone. When customers land on a product page and can’t buy what they want, the consequences ripple through your revenue, customer loyalty and brand perception.

But there’s more than one way to handle out of stock ecommerce situations. You can mark products as “out of stock” and block purchases entirely. You can accept backorders and let customers buy now for later delivery. Or you can take a third approach that some merchants overlook: pre-orders.

Understanding the difference between backorder vs out of stock (and knowing when each makes sense) can mean the difference between capturing revenue and losing customers to competitors. By the end of this guide, you’ll know exactly which approach fits your situation.

What Does Backorder Mean? Understanding Backorder Meaning

So what does backorder mean exactly? A backorder happens when a product is temporarily unavailable but customers can still purchase it. The backorder meaning is simple: the item isn’t in your warehouse right now, but you’ve confirmed that more inventory is coming. Customers place their order, you take payment (or vault their card), and you ship once stock arrives.

Think of backorders as a promise: “We don’t have it today, but we will soon, and we’re holding your spot.”

The key characteristics of a backorder:

  • Customers can still purchase the product despite zero inventory
  • Restocking is confirmed with a known or estimated timeline
  • Payment is typically collected upfront or at time of shipment
  • Fulfillment is delayed until inventory is replenished

Backorders usually work best for short restocking windows. On average, it takes 14-21 days to fulfill a backorder, though this varies by product and supply chain. The shorter the window, the more willing customers are to wait.

From an operational perspective, backorders let you continue taking orders rather than turning customers away. But they also create fulfillment complexity. You need systems to track incoming inventory, manage customer expectations, and process payments at the right time.

What Does Out of Stock Mean?

When a product is marked “out of stock,” customers cannot purchase it at all. The buy button is disabled, replaced with a “Sold Out” badge, or the product may be hidden from your store entirely.

An out-of-stock status signals uncertainty. Unlike backorders, there’s no guarantee the product will return, and no commitment to a timeline. Customers have to wait and hope, or look elsewhere.

The key characteristics of out of stock:

  • Customers cannot purchase the product
  • Restocking timeline is unknown or uncertain
  • No payment is collected
  • The product may or may not return

Out of stock is the default setting for most ecommerce platforms when inventory hits zero. It’s the safest approach from a fulfillment standpoint because you’re not making promises you can’t keep. But it’s also the most expensive from a revenue standpoint.

When customers encounter out-of-stock products, 69% abandon their purchase entirely and shop elsewhere. And 43% will go directly to a competitor. Every “Sold Out” badge is a potential lost customer.

Key Differences Between Backorder and Out of Stock

The fundamental difference comes down to purchase availability and customer commitment. Here’s how they compare:

FactorBackorderOut of Stock
Can customers purchase?Yes, with delayed fulfillmentNo, purchase blocked
Restocking timelineConfirmed or estimatedUnknown or indefinite
Payment timingUpfront or deferredNone
Customer expectation“My order is coming soon”“Maybe it will come back”
Revenue impactPreserved (delayed)Lost
Operational complexityHigherLower

From a customer psychology perspective, the difference is significant. A backorder customer has made a commitment. They’ve decided to buy, entered their payment details and are waiting for delivery. An out-of-stock customer hasn’t committed to anything. They’re still in consideration mode and can easily be distracted by a competitor.

This psychological difference matters for your business. Customers who have already committed are less likely to cancel or shop around. But backorder customers also have higher expectations. They expect clear communication, accurate timelines and a smooth delivery experience.

When to Use Backorders

Backorders work best in specific scenarios where you have confidence in your restocking timeline and customers are willing to wait.

Fast-moving bestsellers

When a popular product sells out faster than expected, backorders let you continue capturing demand. If you have a reliable supplier and predictable restocking timeline, accepting backorders keeps sales flowing while you wait for the next shipment.

Core catalog items

For products that are a permanent part of your catalog, backorders make sense during temporary stockouts. These are items you’ll definitely restock, and customers know they’re getting a product that’s proven and available.

Short restocking windows

Backorders work best when the wait time is measured in days or weeks, not months. The sweet spot is typically 2-6 weeks. Beyond that, customer patience wears thin and cancellation risk increases.

Reliable supplier relationships

Only offer backorders when you’re confident in your restocking timeline. If your supply chain is unpredictable, making promises you can’t keep will damage customer trust more than simply saying “out of stock.”

When NOT to use backorders:

  • Seasonal items unlikely to restock this season
  • Products with uncertain supply chains
  • Wait times beyond 8-12 weeks
  • Items being discontinued or phased out

The risk with backorders is overpromising. If you tell customers their order will ship in two weeks and it takes six, you’ve created a support headache and potentially lost their trust for future purchases.

When to Mark Products Out of Stock

Sometimes the safest approach is to be upfront: this product isn’t available, and you can’t make promises about when it will return.

Discontinued products

If you’re not bringing a product back, don’t pretend otherwise. Mark it out of stock (or redirect to an alternative) and move on. Accepting backorders for discontinued items is a recipe for refunds and complaints.

Uncertain restocking timelines

When you genuinely don’t know when inventory will arrive, it’s better to be honest. Telling customers “out of stock” is more trustworthy than making up a timeline you can’t guarantee.

Supply chain disruptions

Major supply chain issues can make restocking timelines impossible to predict. During periods of uncertainty, marking products out of stock protects both customer expectations and your operations team.

Quality or compliance issues

If a product is unavailable due to quality concerns or regulatory issues, you need to resolve those before selling again. Out of stock is the appropriate status while you work through the problem.

The downside of out of stock is lost revenue. But the upside is operational simplicity and honest customer communication. Sometimes it’s better to lose a sale today than damage trust with a broken promise.

For Shopify merchants dealing with stockouts, we’ve written a comprehensive guide on what to do when products are out of stock on Shopify, covering strategies from hiding products to setting up notifications. Understanding Shopify backorder functionality is crucial for maintaining sales during inventory gaps.

The Third Option: Preorder vs Backorder

Here’s where most backorder vs out of stock discussions fall short. They treat these as the only two options when there’s a third approach that often works better for ecommerce: pre-orders.

Understanding preorder vs backorder differences is crucial for choosing the right strategy. Pre-orders are different from backorders in a few important ways:

  • Proactive vs reactive: Pre-orders are typically used for new products or planned restocks, while backorders are reactive responses to unexpected stockouts
  • Longer acceptable timeframes: Customers willingly wait months for pre-orders but lose patience after a few weeks with backorders
  • Different psychology: Pre-order customers are excited early adopters; backorder customers are frustrated buyers whose item wasn’t available

The data backs this up. According to our analysis of over one million pre-orders generating $85M+ in revenue, the most common pre-order shipping timeframe is 121-150 days. That’s 4-5 months. Customers don’t just tolerate these wait times, they expect them.

The average pre-order cancellation rate? Just 5.4%. Despite wait times that would be unacceptable for a backorder, pre-order customers stay committed because they’ve made a conscious choice to wait for something they want.

Another insight: 90.4% of pre-orders carry no discount. Customers aren’t waiting because they got a deal. They’re waiting because they want early access to the product. This is fundamentally different psychology than a backorder, where customers often feel they’re being inconvenienced.

When pre-orders work better than backorders:

  • New product launches (build anticipation before inventory arrives)
  • Restocks with longer lead times (4+ weeks)
  • Made-to-order or custom products
  • Limited edition drops (create scarcity and urgency)
  • Seasonal products returning next season

Pre-orders also give you payment flexibility that backorders typically don’t. With charge-later pre-orders, you can vault a customer’s card at checkout and charge when you’re ready to ship. This reduces refund risk for longer timelines while still capturing customer commitment.

For a deeper comparison, see our guide on pre-orders vs backorders vs waitlists.

How to Choose Between Backorder vs Out of Stock

With three options available, how do you decide which approach fits your situation? Here’s a decision framework based on the most common backorder vs out of stock scenarios:

ScenarioBest ApproachWhy
Known restock date (2-4 weeks)BackorderShort wait, high confidence, keep sales flowing
Known restock date (4-12 weeks)Pre-order with charge-laterLonger wait needs proper expectation-setting
Unknown restock timelineBack-in-stock notificationDon’t make promises you can’t keep
New product launchPre-orderBuild anticipation, capture early demand
Seasonal product (returning later)Pre-order or notificationDepends on how far out the restock is
Product being discontinuedOut of stock + redirectDon’t accept orders you can’t fulfill
Made-to-order itemsPre-order with depositCollect commitment before production
High-ticket itemsPre-order with depositReduce risk for both parties

The key questions to ask:

  1. How confident are you in the restock timeline? High confidence = backorder or pre-order. Low confidence = out of stock or notification.
  2. How long will customers wait? Under 4 weeks = backorder probably works. Over 4 weeks = consider pre-orders with proper messaging.
  3. Is this a new launch or a restock? New launches benefit from pre-order anticipation. Restocks can go either way.
  4. What’s the price point? Higher-ticket items may warrant deposit-based pre-orders to secure customer commitment.
  5. How will this affect your operations? Backorders and pre-orders both require systems to track orders, manage fulfillment holds and communicate with customers.

Best Practices for Shopify Backorder and Out of Stock Management

Regardless of which approach you choose, clear communication is essential. Customers can handle waiting. What they can’t handle is uncertainty. Here are best practices for managing backorder vs out of stock situations in your store.

Set expectations on the product page

Don’t bury the shipping timeline in fine print. If an item is on backorder or pre-order, make the expected delivery date prominent. “Ships in 2-3 weeks” or “Expected ship date: April 15” gives customers the information they need to decide.

Use dedicated buttons and messaging

A generic “Add to Cart” button doesn’t tell customers they’re committing to a delayed order. Use clear labels like “Pre-order Now” or “Backorder” to signal that this isn’t a standard purchase.

Send automated updates

Keep customers informed throughout the wait. A simple “Your order is still on track to ship next week” email can prevent support tickets and build trust. If timelines change, communicate proactively.

Consider payment timing carefully

For short backorders, charging upfront is usually fine. For longer waits (especially 30+ days), consider charge-later options where you vault the customer’s card and charge closer to shipment. This reduces refund requests and expired card issues.

Our data shows that 43.8% of pre-order listings use charge-later, which suggests merchants are finding value in delaying payment for longer lead times.

Forecast demand to prevent stockouts

The best backorder strategy is avoiding backorders in the first place. Use inventory forecasting tools and pre-order inventory management to predict demand and set reorder points that give you buffer before running out.

Don’t overcommit

If you’re not sure how much inventory you’ll receive, consider capping backorders or pre-orders to avoid overselling. It’s better to turn away some orders than to cancel orders after customers have committed.

Putting It All Together: Backorder vs Out of Stock

The backorder vs out of stock decision isn’t just about definitions. It’s about choosing the right tool for your specific out of stock ecommerce situation.

Backorders keep sales flowing during short, predictable stockouts. They work best when you have confidence in your restocking timeline and customers are willing to wait a few weeks.

Out of stock is the honest approach when you can’t make promises. It protects customer trust and operational simplicity, even though it means lost sales in the short term.

Pre-orders offer a third path that many merchants overlook. When comparing preorder vs backorder options, pre-orders handle longer timelines, build anticipation for new products and give you payment flexibility that backorders don’t. For most ecommerce scenarios beyond simple restocks, Shopify pre-orders are worth considering.

The common thread across all three approaches? Communication. Customers can handle delays when they know what to expect. What they can’t handle is uncertainty, broken promises or radio silence.

If you’re running a Shopify store and want to explore pre-orders as an alternative to Shopify backorder management, our guide on how to do pre-orders on Shopify covers the full setup process. And for managing inventory across pre-orders and regular stock, see our guide on managing pre-order inventory in Shopify.

Whatever approach you choose, the goal is the same: capture demand, keep customers informed and deliver on your promises.

Pre-sell With PreProduct

7 day free trial with all plans