Can Pre-orders Sell Out? Yes, Here’s Why and How to Set Limits

A pre-order is just an order placed before stock has landed in your warehouse. So yes, a pre-order can absolutely sell out, the moment a merchant runs out of the supply they’ve allocated to that campaign.

If you’re a shopper wondering why a pre-order page suddenly says sold out, this is by design, not a glitch. If you’re a merchant trying to figure out how to cap pre-orders without overselling, this guide walks through the formula, the variant-level controls and the per-customer limits that keep your pre-order campaign in your control.

For the full setup walkthrough, see our complete guide on how to do pre-orders on Shopify.

Yes, Pre-orders Can Sell Out (And Here’s Why)

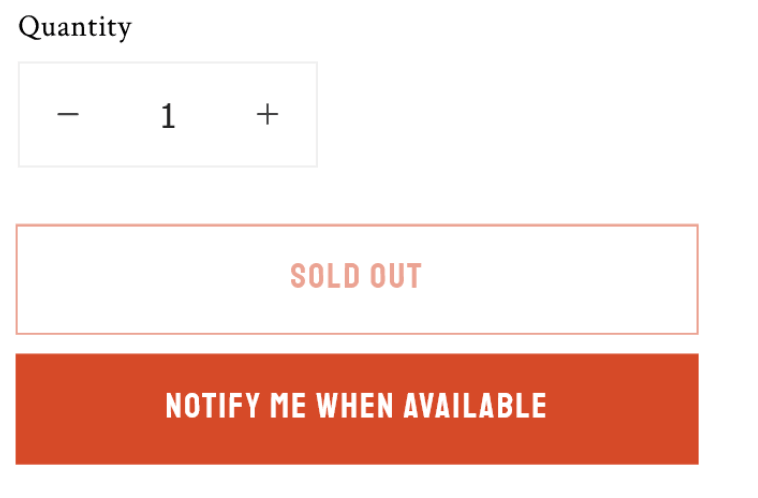
Pre-orders are inventory-aware. Each listing draws down against an allocation set by the merchant, usually tied to an incoming purchase order, a production run or a deposit cap. When that allocation is gone, the buy button disappears or switches to a waitlist state. From a customer’s perspective, it reads as “sold out” because functionally it is.
Major retailers handle this the same way. Target’s own help centre notes that “when an item is available for preorder, there is a limited quantity of Preorder inventory available”, and once the limit is met, no additional pre-orders can be placed (see Target’s pre-order help page). It’s standard practice, not a quirk of small brands.

The simplest framing: a pre-order is a merchant making a promise to deliver. If you can only realistically deliver 150 units, you shouldn’t be taking 300 pre-orders. Caps protect the brand from refunds, chargebacks and the worst kind of customer service emails.

According to Wikipedia, pre-orders exist so manufacturers can gauge demand and sellers can be assured of minimum sales. The cap is what keeps that gauge accurate.

Why Merchants Cap Pre-order Quantities

There’s no single reason to set a pre-order limit, but four come up over and over.

  • PO-bound stock. The most common case. You’ve placed a purchase order for a fixed quantity. You don’t want pre-orders to outrun what’s actually coming in.
  • Made-to-order capacity. A small studio or maker can only produce so many units a week. Pre-orders need to respect that capacity, not the appetite for the product.
  • Deposit risk. With deposit pre-orders, you’ve collected only part of the revenue. Over-promising puts cash flow and operations at risk if you can’t deliver.
  • Brand strategy. Founders editions, capsule drops and limited runs use scarcity intentionally. The cap is part of the marketing.

If you’re managing pre-orders against incoming purchase orders or an ERP, the cap is usually the single most important number to get right. We’ve covered the operational side of that in our guide on managing pre-orders on your ERP.

How to Calculate a Safe Pre-order Limit

The cap shouldn’t be the raw PO quantity. There are two buffers worth subtracting before you set the public-facing limit.

The formula:

Maximum pre-orders = PO quantity − defect/buffer stock − expected cancellations

The defect buffer covers units that arrive damaged, fail QA or get held back as warranty stock. 10 to 15% is a reasonable starting point depending on your supplier reliability.

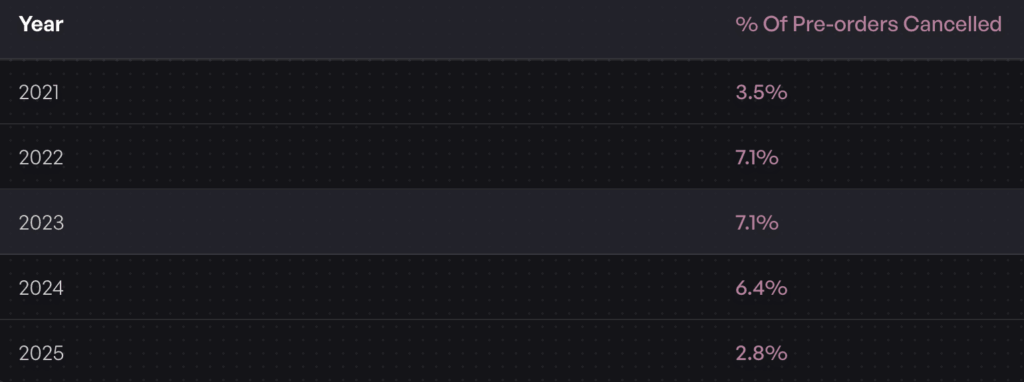
The cancellation buffer covers customers who change their mind before fulfilment. Across the 1 million pre-orders dataset, the average cancellation rate sits at 5.4%, with 2025 Q1 trending lower at 2.8%. If you’re charging a deposit or charging upfront, expect the lower end. If you’re using charge-later, expect closer to the average.
A Worked Example

You have an incoming purchase order for 150 units.

  • Subtract 15% defect/buffer stock: 150 − 23 = 127
  • Subtract 5.4% expected cancellations on the remaining stock: 127 − 7 = 120

So your safe pre-order cap is roughly 120 units. You could comfortably push to 130 if you’re using a deposit or charge-upfront model, since those tend to commit customers more strongly. Push past 150 and you’re betting on every single unit arriving in perfect condition and zero customers cancelling. Not a bet worth making.

Setting Pre-order Limits at the Variant Level

Product-level caps aren’t always enough. Demand rarely splits evenly across sizes, colours or configurations. If you’re allocating 120 units across five sizes, you don’t want one popular size selling 80 pre-orders while two others sell three each, then having to refund the oversold size when stock lands.

Variant-level allocation matters. The practical approach:

  1. Use historical sales data to weight the allocation. If size M historically sells 35% of units, allocate 35% of the cap to size M.
  2. If you don’t have historical data, look at industry-standard size curves for your category.
  3. Build in the ability to reallocate mid-campaign. If size L is selling out fast and size XS is barely moving, shift the cap. Pre-order software should let you do this without taking the campaign down.

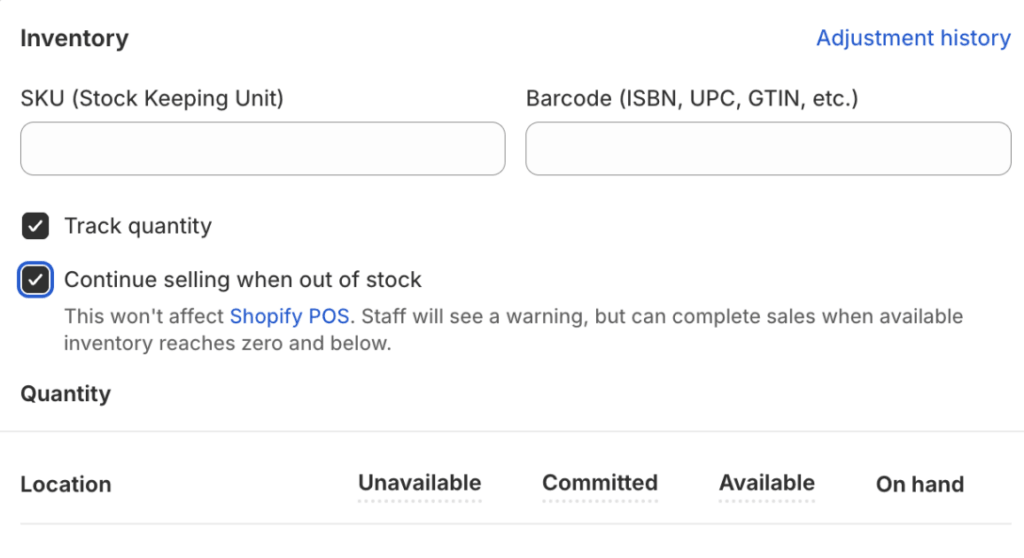
Once a variant hits its cap, the pre-order button should automatically delist for that variant only, leaving the rest of the listing live. Native Shopify settings can stop a product from selling at zero stock, but they can’t manage allocations the way a pre-order tool can. For the bigger picture on inventory operations, see our guide on how to manage pre-order inventory in Shopify.

Customer Purchase Limits, a Separate Lever

Inventory caps stop your campaign from overselling. Per-customer limits stop one buyer from wiping out the campaign. They’re different tools for different problems.

Common scenarios where per-customer caps make sense:

  • Hype-driven launches. Sneaker drops, limited collabs and trading-card style releases where resellers will buy 20 units if you let them.
  • Founders editions. Fair distribution matters more than max revenue.
  • Made-to-order capacity. Per-customer caps prevent a single bulk order from blocking out everyone else’s lead time.

Shopify has a native quantity-per-order field at the product level, but it’s blunt and doesn’t enforce across separate orders. For pre-orders specifically, the app layer is where the real enforcement happens. PreProduct lets you set per-customer caps that hold across multiple sessions, so one buyer can’t make three separate orders to grab nine units of a one-per-customer drop.
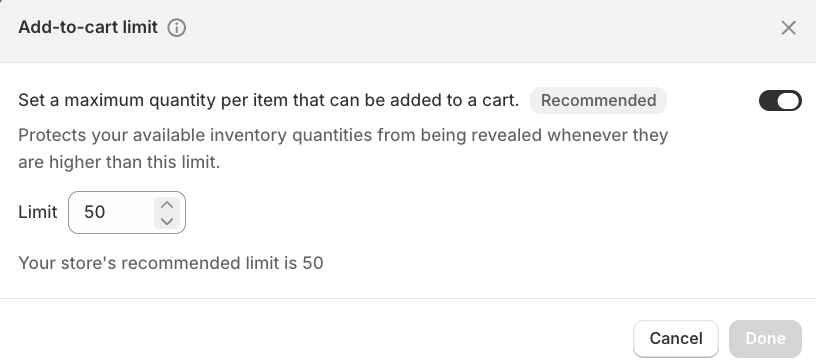
How you communicate the cap matters too. Make the limit visible on the product page so customers don’t feel ambushed at checkout. Our breakdown of pre-order button design best practices covers where to surface details like this without breaking the page layout.

Preventing Overselling Once the Cap Is Hit

The worst pre-order experience: a customer adds an item to cart, checks out, gets a confirmation email, and a week later receives a refund saying the product is no longer available. That’s not a cap, that’s a broken cap.

Three behaviours need to fire the moment a cap is reached.

  • The buy button switches state. Either hidden, replaced with a “notify me” button, or replaced with a “join the waitlist for the next batch” CTA. Don’t leave it as a live pre-order button against a depleted cap.
  • The cart and checkout reject further attempts. Even if a customer has the product in cart from before the cap closed, the checkout should validate against current availability.
  • Channels stay in sync. If you’re selling on Shopify, Amazon and in-person via POS, the cap needs to reflect across all of them. A pre-order tool should be the source of truth, not three separate spreadsheets.

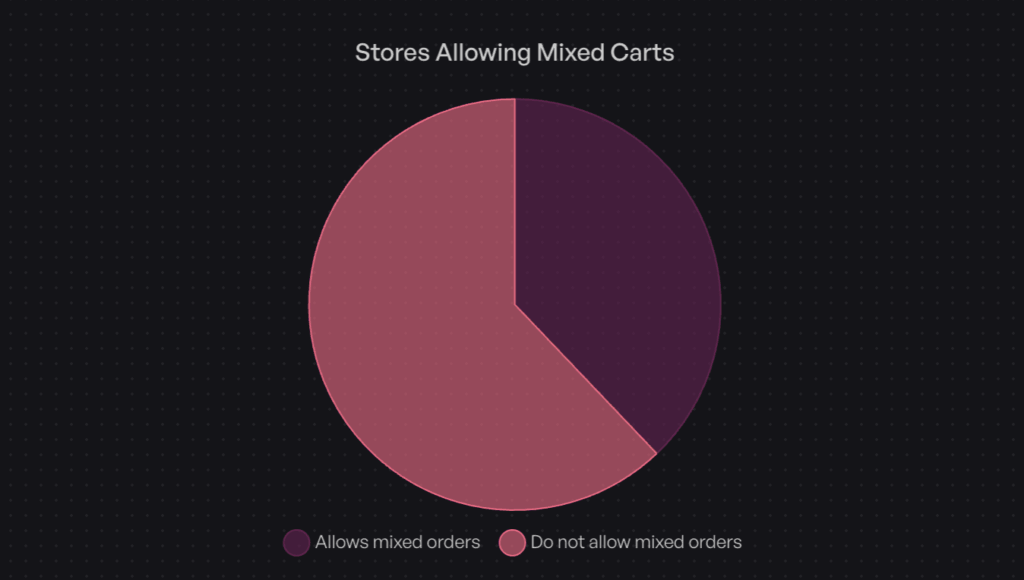
Carting policy matters here too. 62.1% of stores in the 1 million pre-orders dataset isolate pre-orders to their own cart, partly because it makes overselling easier to control. Mixed carts work, but the inventory logic has to be tighter.
What to Do When Your Pre-order Sells Out

Selling out is a good problem. Handle it badly and you waste demand. Handle it well and you set up the next campaign with stronger signal.

A clean post-sellout flow:

  1. Open a waitlist for the next batch. The customers who arrived too late are the highest-intent leads you’ll get for the next PO. Our guide on back-in-stock notifications on Shopify covers the setup.
  2. Communicate the lead time clearly. Tell the waitlist when the next batch is expected. If you don’t know yet, say so honestly.
  3. Resist the urge to raise the cap mid-campaign. If scarcity was real, don’t undermine it. If you can supply more, prep a second campaign instead.
  4. Use the demand signal. Cancellations stayed below 5.4% in your last campaign? Use that for next time’s buffer. The next PO can be sized with much more confidence.

For the distinction between pre-orders, backorders and waitlists in this context, our pre-orders vs backorders vs waitlists comparison breaks down when each tool earns its place.

Frequently Asked Questions

Does Pre-order Mean Sold Out?

No. A pre-order means the product hasn’t shipped yet, usually because stock hasn’t landed. Pre-orders only show as sold out when the merchant’s cap has been reached. The two states are different: pre-order is an active sales channel, sold out is the end of one.

Are Pre-orders Guaranteed?

Pre-orders are a commitment from both sides. The customer commits to buy, the merchant commits to deliver against the timeline shared at checkout. If a merchant can’t deliver, the standard remedy is a full refund. That’s why setting the cap correctly matters: a missed pre-order delivery is more damaging than a smaller, sold-out campaign.

How Do I Limit Pre-orders on Shopify?

Shopify’s native inventory settings can stop a product from selling at zero stock, but they don’t handle pre-order-specific caps, variant-level allocation or per-customer limits. A dedicated pre-order app handles all three. With PreProduct, you set the cap, the variant allocation and the per-customer rules at listing creation, then the app enforces the rest automatically.

Can I Set a Different Pre-order Limit Per Variant?

Yes, and you usually should. Allocating one product-level cap to a multi-variant listing almost always means some variants oversell and others underperform. Variant-level limits keep the allocation honest and let you reallocate mid-campaign if demand skews.

How Do I Stop One Customer Buying All My Pre-order Stock?

Use per-customer purchase caps. These are different from inventory caps. They limit how many units a single customer can pre-order across one or more orders. For limited drops, founders editions or any campaign where fair distribution matters, this is the lever to use.

Pre-orders Sell Out by Design

Pre-orders can sell out, and that’s a feature of running pre-orders properly, not a bug.

The recap:

  • Pre-orders draw against a merchant-set cap, usually tied to an incoming PO or a production run.
  • A safe cap subtracts a defect buffer (10 to 15%) and an expected cancellation buffer (around 5.4% on average).
  • Variant-level allocation prevents lopsided overselling within a multi-variant listing.
  • Per-customer limits are a separate tool for managing fair distribution on hype-driven drops.
  • When the cap is hit, the buy button needs to change state and a waitlist should open for the next batch.

If you’re setting up pre-orders on Shopify and want variant-level caps, per-customer limits and automatic state changes when a cap is reached, PreProduct handles all of that natively. Start a free trial and set your first pre-order cap in minutes.

Pre-sell With PreProduct

7 day free trial with all plansMigrate pre-orders

Sold Out on Shopify? Turn Sold-Out Products Into Pre-Orders

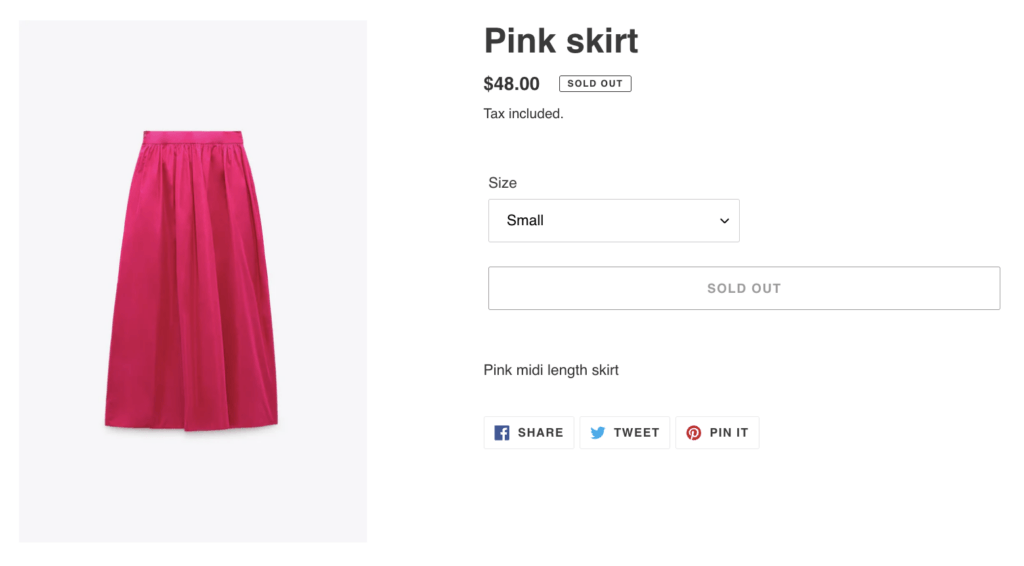
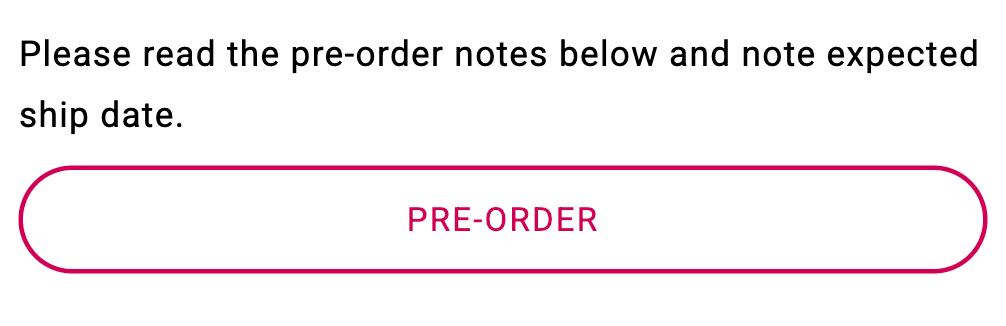
Every sold-out product on your Shopify store is a sale walking out the door. The fix isn’t a “notify me” form. It’s letting shoppers commit and pay (or reserve) right now via a pre-order. That’s what PreProduct does: it swaps the greyed-out “Sold Out” button for a pre-order button so demand converts instead of bouncing to a competitor.

The good news? You have better options. Whether it’s switching to pre-orders, capturing back-in-stock signups, or recommending alternatives, there are proven strategies to keep selling when products are out of stock. This guide breaks down why products show as sold out on Shopify, what it costs you when they do, and five strategies to recover that lost revenue.

Sold out vs out of stock: is the product really gone?

Before jumping into strategy, it’s worth understanding the difference between sold out vs out of stock. A product sold out means all units have been purchased, while out of stock can also mean a settings issue is making inventory appear unavailable. Shopify Community forums are full of merchants discovering their “sold out” problem was actually a configuration mistake.

Here are the most common causes:

  • Zero inventory (genuine stockout). The product has actually sold through all available units. This is the straightforward case where you need a strategy to handle the gap.
  • Inventory tracking enabled without stock set. If you turn on “Track quantity” for a product but never enter an initial stock number, Shopify defaults to zero. The product looks sold out even though you never sold a single unit.
  • Multi-location inventory issues. If you use multiple Shopify locations, stock might be assigned to a warehouse or retail location that isn’t connected to your online sales channel. The product shows as sold out online even though units exist elsewhere.
  • Variant-level stock at zero. Even one variant (size, colour, style) sitting at zero can make the entire product appear unavailable in some themes, especially if that variant is the default selection.
  • Sync failures with third-party systems. If you use a 3PL, ERP, or dropshipping supplier, inventory syncing delays can temporarily show products as sold out when stock is actually available.

Quick fix: Shopify’s “Continue selling when out of stock” toggle. In your Shopify admin, you can enable this on any product under Inventory settings. It lets customers purchase even when stock is at zero. The caveat: without clear messaging about shipping timelines, you risk support tickets from customers expecting immediate fulfillment. Pair this toggle with transparent product page copy or a pre-order app that sets expectations upfront.

What a sold out product costs your Shopify store

Leaving a Shopify sold out badge on your product pages isn’t a neutral decision. It has real, compounding costs:

Lost revenue from ready-to-buy customers. The customer who lands on a sold out product page was often ready to purchase. They came from an ad, a Google search, or a social post. Without an alternative action (pre-order, notification signup, or product recommendation), that visit turns into a bounce and you’ve paid for traffic that converted to nothing.

Wasted marketing spend. If you’re running paid ads to product pages and some of those products are sold out, you’re burning budget. Even organic traffic to a dead-end product page represents a missed opportunity.

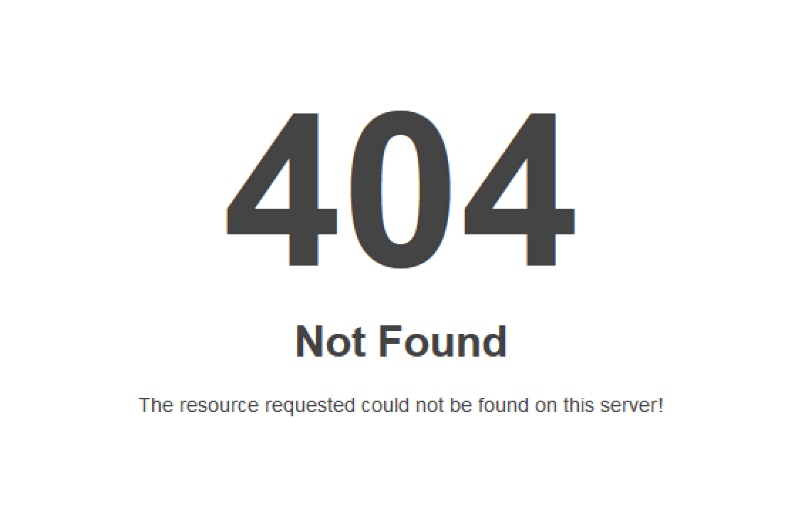
SEO damage if you delete or unpublish. Deleting a sold out product creates a 404 error. Any backlinks pointing to that page stop passing authority. Any organic ranking the page built disappears. Even unpublishing the product removes it from search results over time. Both options destroy SEO equity you may have spent months building.

No demand signal for inventory planning. A sold out product with no pre-order or notification option gives you zero data on how many people still want it. You’re left guessing how much to reorder, when to restock, and whether the demand is still there. Pre-orders solve this directly: if 200 people pre-order, you know exactly how much to reorder.

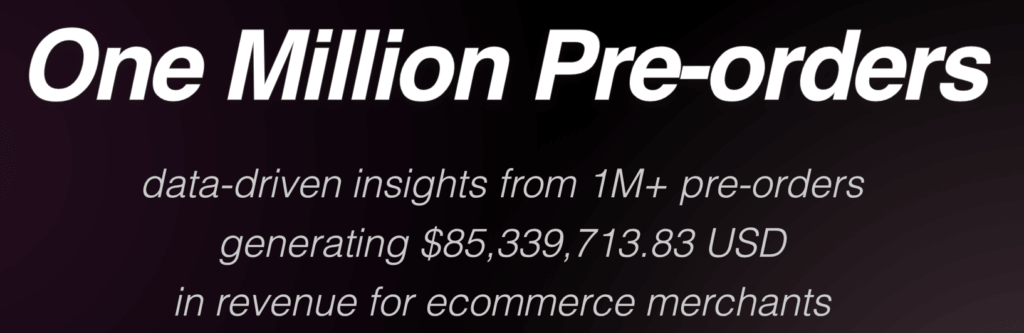
Across over 1 million pre-orders and $85 million in sales, the data shows that merchants who switch from “Sold Out” to pre-orders capture revenue they’d otherwise lose completely.

5 strategies for sold out products on Shopify

There’s no single right answer for every stockout. The best approach depends on whether the product is coming back, how long the wait will be, and what experience you want to offer customers. Here are five strategies, starting with the most revenue-positive.

1. Switch to pre-orders (capture revenue now)

Pre-orders replace the “Sold Out” button with an option for customers to purchase the product before it’s back in stock. This is the most revenue-positive approach because you’re capturing actual orders, not just interest.

With a pre-order app, you can choose the payment model that suits your situation:

  • Charge upfront: Collect full payment at checkout. Best when you’re confident about a short restock timeline (under 30 days).
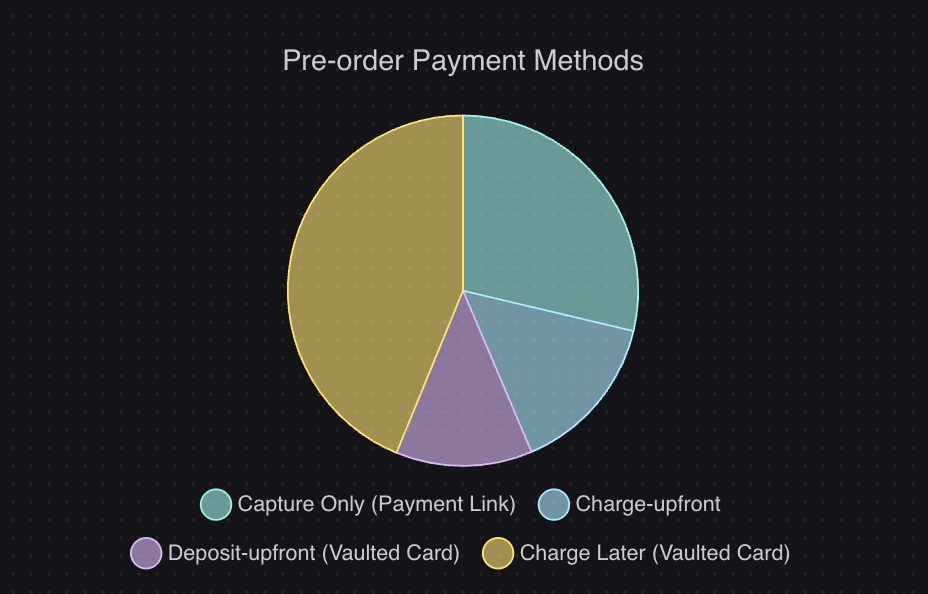
  • Charge later: Vault the customer’s card at checkout but don’t charge until stock arrives. This works well for longer lead times where you don’t want to hold customer funds. 43.8% of pre-order listings use this charge-later model, making it the most popular approach.
  • Deposit: Take a partial payment now and collect the balance when you’re ready to ship. This works well for higher-priced items where customers want commitment from both sides.

Best for: Products you know are being restocked or have an estimated ship date. If you can give customers a rough timeline, pre-orders are almost always the best option.

One thing merchants often worry about is whether customers will actually follow through. The data is encouraging: across 1 million+ pre-orders, the average cancellation rate is just 5.4%. And 90.4% of pre-order listings offer no discount at all, which means you don’t need to cut your margin to make pre-orders work.

For a complete walkthrough on setting this up, see our guide on how to do pre-orders on Shopify.

2. Set up back-in-stock notifications (capture interest)

If you’re not ready to commit to taking orders, back-in-stock notifications let customers sign up to be alerted when a product is available again. This is typically done via email or SMS.

This approach is lower risk since you’re not collecting payment or making fulfillment commitments. You’re just capturing intent. The trade-off is that you’re not capturing revenue either. A signup is a signal, not a sale.

Best for: Products where restocking is uncertain, lead times are unpredictable, or the item was a one-off that may or may not return. Also useful as a secondary option alongside pre-orders for customers who prefer not to commit upfront.

Keep in mind: The longer the wait between signup and restock notification, the lower the conversion rate tends to be. Customers may have already bought elsewhere or lost interest.

3. Display restock dates and keep pages live

Sometimes the simplest approach is also effective. If you know a product is coming back within a short window, update the product page with clear messaging about when it will be available again. Something like “Back in stock by May 15” sets expectations and gives customers a reason to return.

Pair this with a pre-order option for maximum effectiveness. Customers who are willing to wait can order now; customers who want to wait can bookmark the date.

Shopify’s “Unlisted” status (launched in 2025) is worth knowing about here. It lets you remove a product from your collections and on-site search while keeping the URL live and indexed by Google. This is useful for seasonal items that you want to keep discoverable through organic search but don’t want cluttering your storefront during off-season.

Best for: Short stockout windows (1-4 weeks) on popular, high-demand products.

4. Recommend alternative products

Not every sold out product needs a waiting strategy. Sometimes the better move is redirecting customers to similar items they can buy right now.

You can do this through:

  • Shopify’s built-in product recommendations, which pull from purchase history and browsing behaviour
  • Manual “You Might Also Like” sections on the product page, curated by your team
  • Third-party recommendation apps that use AI to match products based on attributes

Best for: Large catalogs with substitutable products, discontinued items that won’t be restocked, or situations where the customer’s need is more important than the specific product.

5. Hide sold out products in Shopify collections (don’t delete)

Many merchants want to hide sold out products on Shopify entirely, but removing them is a mistake. Instead, push them to the bottom of your collections rather than deleting them.

You can do this manually through Shopify’s collection sorting, or use apps that automatically move sold out items to the end of collection pages. This keeps the product page live (protecting SEO) while ensuring customers see available products first.

Never delete or unpublish a sold out product page unless you’re absolutely certain it has no organic traffic, no backlinks, and will never be restocked. The SEO cost is almost always higher than the benefit of a “cleaner” catalog.

Best for: Seasonal items, large catalogs where sold out products create visual clutter, or products that cycle in and out of stock regularly.

When to use which sold out product strategy

Choosing the right approach depends on a few key factors. Here’s a decision framework:

SituationBest StrategyWhy
Product is being restocked with a known timelinePre-ordersCapture revenue now; provide demand data for reorder quantities
Product is being restocked but timeline is unclearBack-in-stock notifications + estimated datesLow-risk capture; keeps customers engaged without fulfillment commitment
Product is a high-demand item with a short stockoutRestock dates + pre-ordersTransparency builds trust; pre-orders capture the most eager buyers
Product is discontinued or was a one-offAlternative recommendationsRedirect purchase intent to available products
Product cycles in and out of stock seasonallyDe-prioritize + Unlisted statusProtect SEO while keeping storefront clean
High-ticket product with long lead timeDeposit pre-ordersSecure commitment from both sides; improve cash flow during production

For a deeper comparison of pre-orders, backorders, and waitlists, see our complete comparison guide.

Protecting your SEO when a product is sold out on Shopify

How you handle sold out products has a direct impact on your search rankings. Here are the key principles:

Don’t delete product pages. Deleting creates 404 errors. Google de-indexes pages that return 404s, and any backlinks pointing to them stop passing authority. If you’ve built up organic traffic to a product page, deleting it wipes that out.

Use 301 redirects only for permanently discontinued items. If a product is truly never coming back, redirect its URL to the most relevant alternative (a similar product or the parent collection page). Never redirect to the homepage, as this looks like a soft 404 to Google.

Add availability schema markup. Use structured data to tell search engines the product’s current status. Options include PreOrder, BackOrder, OutOfStock, and InStock (for more on the difference between backorder and out of stock, see our comparison guide). This helps Google display accurate availability in search results and can improve click-through rates.

Keep temporary stockouts live with updated messaging. If the product is coming back, keep the page active. Update the description to reflect current availability and pair it with a pre-order button or notification signup. A product page that still receives traffic and engagement signals is a product page that keeps its rankings.

Use Shopify’s “Unlisted” status for seasonal items. This lets you hide the product from your on-site collections and search while keeping the URL indexed by Google. It’s the best of both worlds for products that cycle in and out of availability.

For more on managing inventory around stockouts, see our guide on how to manage pre-order inventory in Shopify.

Preventing stockouts in the first place

The best stockout strategy is not having one. While that’s not always possible, there are ways to reduce how often it happens:

  • Set low-stock alerts. Use Shopify’s built-in notifications or Shopify Flow automations to trigger reorder processes before you hit zero.
  • Use pre-order data for demand forecasting. If 200 people pre-order a product, you have a concrete signal for your next production run. This beats guessing based on last quarter’s sales.
  • Build safety stock buffers. For high-velocity products, maintain a buffer above your reorder point. Factor in your supplier lead time and typical demand variability.
  • Monitor sell-through rates. Track how quickly products move and adjust reorder timing accordingly. Products that consistently sell out faster than expected need larger or earlier orders.
  • Diversify your supply chain. Having backup suppliers or manufacturers reduces the risk of a single point of failure leaving you out of stock.

Pre-orders are also a prevention tool in themselves. By listing upcoming products for pre-order before they ship, you validate demand before committing to large inventory purchases. This is especially valuable for new product launches where demand is uncertain.

FAQ: sold out products on Shopify

What does “sold out” mean on Shopify?

A sold out product on Shopify means all available inventory has been purchased, or the product’s stock count is at zero. However, products can also show as sold out due to configuration issues like unset inventory quantities, multi-location sync problems or variant-level stockouts.

What is the difference between sold out vs out of stock?

Sold out vs out of stock are often used interchangeably, but there is a practical difference. “Sold out” typically means customer demand depleted all inventory. “Out of stock” can also refer to supply chain issues, sync errors or configuration mistakes where stock exists but is not available for purchase online.

Should I delete sold out products from my Shopify store?

No. Deleting a sold out product creates a 404 error that destroys any SEO value the page has built. Instead, keep the page live and add pre-orders, back-in-stock notifications or alternative product recommendations. Only use 301 redirects for products that are permanently discontinued.

Can I still sell a sold out product on Shopify?

Yes. You can enable Shopify’s “Continue selling when out of stock” toggle, or use a pre-order app to let customers purchase before the product is restocked. Pre-orders are the most effective approach because they capture actual revenue and give you demand data for your next reorder.

Stop losing sales to sold out products on Shopify

A product sold out on your Shopify store doesn’t have to mean a lost sale. The strategies in this guide give you a clear path forward depending on your situation:

  • Pre-orders capture revenue and provide demand data for restocking decisions
  • Back-in-stock notifications capture interest when timelines are uncertain
  • Restock dates set expectations and keep customers engaged
  • Alternative recommendations redirect purchase intent to available products
  • De-prioritizing protects SEO while keeping your storefront focused

The key takeaway: don’t default to showing a Shopify sold out badge as your only strategy. Treat every stockout as an opportunity to keep the customer relationship alive, whether that’s through a pre-order, a notification, or a relevant recommendation.

If you’re ready to start turning sold out products into pre-order revenue, start taking pre-orders with PreProduct today.

Pre-sell With PreProduct

7 day free trial with all plansMigrate pre-orders

How to Take Pre-orders on Shopify POS (Trade Shows, Retail & Events)

Paragon FX Group walked away from a single convention with $10,000 in pre-orders. Not website orders placed later. Not “check us out online” business cards. Actual transactions, processed in person, on the convention floor. As they put it: “We might have lost those sales if customers had to order from the website.”

Here’s the problem: if you’ve tried to take pre-orders through Shopify POS, you’ve likely discovered that it doesn’t work. Shopify’s native pre-order functionality is limited to online stores only. That means anyone selling at trade shows, conventions, pop-up shops or retail locations has been stuck telling excited customers to “visit our website later.” A Shopify pre-order app can solve the online side, but POS has remained a gap.

That friction kills sales. This guide shows you how to solve it with a working Shopify POS pre-order integration, so you can capture orders on the spot, whether you’re at Comic-Con or your own retail store.

What is a Shopify POS pre-order? A Shopify POS pre-order is an order placed through Shopify’s Point of Sale system for a product that isn’t yet available to ship. Unlike standard POS transactions that fulfill immediately, pre-orders include a fulfillment hold until stock arrives, allowing merchants to take in-person orders at trade shows, conventions and retail events for upcoming products.

Why Shopify POS Doesn’t Support Pre-orders Natively

If you’ve searched for how to enable pre-orders on Shopify POS, you’ve probably hit the same wall everyone else does. According to Shopify’s own documentation:

“Pre-order products are only supported on the Online Store and Custom Storefront sales channels.”

This isn’t a bug or a missing setting. Shopify POS does support selling plans for subscriptions, so the infrastructure exists. Pre-orders just haven’t been added to POS yet. Native support may come in the future, but even then you’d still need a pre-order app to manage the workflow: listing products, communicating with customers, triggering charges and releasing fulfillment holds.

What this means for retail merchants

For online-only stores, this limitation doesn’t matter. But if you sell in person, you’re at a disadvantage. Trade shows, conventions, pop-up events and retail stores are high-intent environments. Customers are physically present, holding your product, ready to commit. Asking them to “order online later” introduces friction that kills conversions.

Think about the typical trade show scenario. A customer loves your upcoming product. They want it. But it won’t ship for another 60 days. Without a pre-order option on your POS device, you’re stuck with awkward workarounds:

  • Handing out business cards and hoping they remember to order
  • Writing down names and emails manually
  • Asking them to scan a QR code to your website
  • Creating a “placeholder” product and hoping your fulfillment team knows not to ship it

None of these are reliable. All of them add friction. And in a busy convention environment where attention spans are short, friction means lost sales.

The Shopify Community forums are filled with merchants asking for this functionality. Posts date back to 2020, with merchants describing custom webhook solutions and manual workarounds. The demand is clear; the native solution isn’t.

How to Enable Pre-orders on Shopify POS

PreProduct bridges this gap with a dedicated Shopify POS integration that extends pre-order capabilities to your in-person sales channel. It’s the same pre-order functionality you’d use on your online store, adapted for the POS environment.

How it works

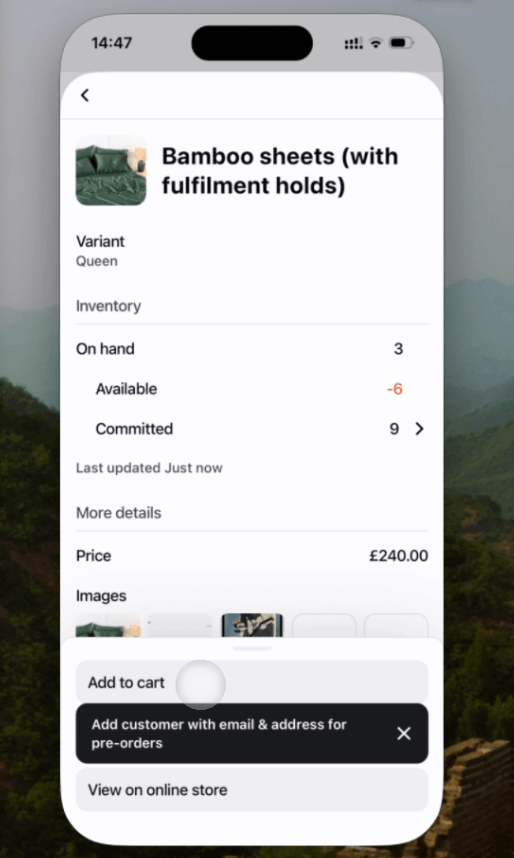
When you enable the integration, PreProduct adds a Pre-orders tile to your Shopify POS Smart Grid. This gives staff a visual indicator that pre-order functionality is available and active.

When a customer wants to pre-order a product:

  1. Staff adds the pre-order item to the cart (just like any other product)
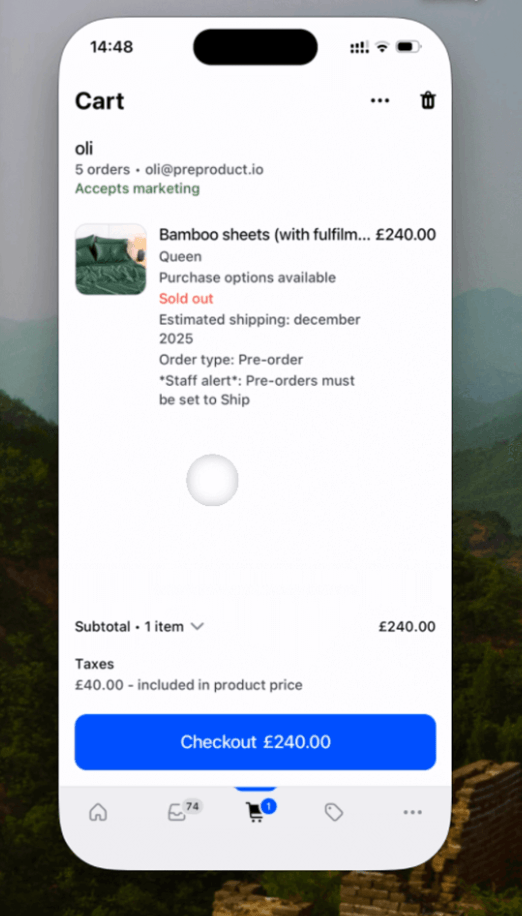
  2. PreProduct requires a customer profile with email and shipping address before checkout
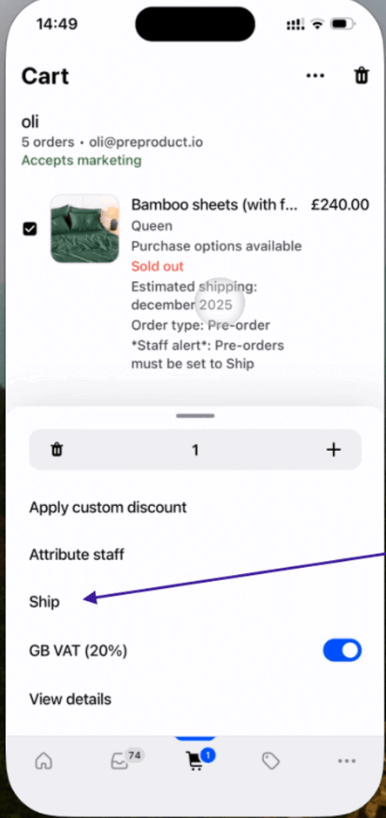
  3. Staff sets the order to “ship” (PreProduct reminds them) so Shopify knows it needs fulfillment later
  4. The order can be paid upfront, or left unpaid for later invoicing via draft order
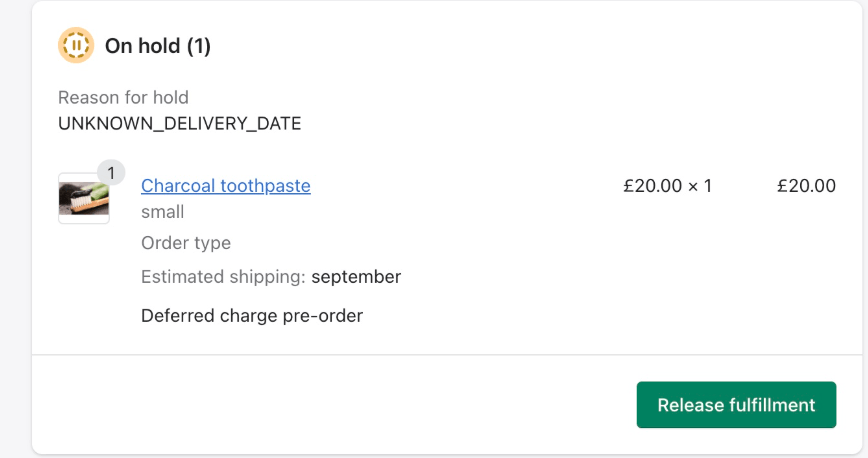
  5. PreProduct automatically adds a fulfillment hold to prevent premature shipping
  6. The pre-order appears in your PreProduct dashboard alongside online pre-orders

The experience for staff is streamlined. They see clear indicators when items are on pre-order, reminders about shipping requirements and visual cues throughout the process.

Payment flexibility

Unlike workarounds that require full payment upfront, PreProduct’s POS integration supports two payment approaches:

Charge upfront: The customer pays the full amount at checkout, just like a regular POS transaction. The fulfillment hold prevents your team from shipping before stock arrives.

Invoice later: If you’d rather collect payment when the product is ready to ship, you can leave the order unpaid in POS. PreProduct will create a draft order invoice that you can send when you trigger charges. This mirrors the charge-later pre-order payment model that 43.8% of pre-order listings use online.

What stays consistent across channels

The POS integration enforces the same rules as your online store:

  • Fulfillment holds prevent orders from flowing to your 3PL or warehouse until you release them (see our guide on how to manage pre-order inventory in Shopify)
  • Mixed cart policies apply; if you don’t allow customers to mix pre-orders with in-stock items online, the same rule applies in POS
  • Pre-order tagging marks orders so they’re identifiable in your Shopify admin, and each pre-order line carries the same hidden _preorder: true line-item property as online pre-orders, so ERP and 3PL automations detect POS pre-orders too
  • Customer communication flows work the same; customers receive the same emails and portal access

This means your operations team doesn’t need separate processes for online versus in-person pre-orders. Everything consolidates into a single workflow.

Best Use Cases for Shopify POS Pre-orders

Not every merchant needs POS pre-orders. But for certain business models, the ability to take pre-orders in person is a significant competitive advantage.

Taking pre-orders at trade shows and conventions

This is the highest-impact use case. Trade shows are unique selling environments: customers are physically engaged, often excited about exclusives or early access, and ready to make impulse decisions. The window is short. Once they walk away from your booth, the sale often disappears.

Paragon FX Group’s experience illustrates this perfectly. They sell collectibles and props, the kind of products that generate excitement at conventions. Their $10,000 in pre-orders came from customers who were ready to commit on the spot. Without a way to process those orders in person, they would have handed out flyers and hoped for the best.

The easier you make it to order, the more orders you’ll close. A dedicated POS pre-order integration qualifies as “streamlined.” Pen-and-paper signup sheets do not.

For high-ticket items, charging upfront secures commitment while the customer is engaged. With PreProduct’s fulfillment holds, you don’t have to worry about premature shipping.

In-person pre-orders at pop-up shops and retail events

Pop-up shops often feature products that aren’t yet available for immediate purchase. Maybe you’re showcasing a new collection that won’t ship for another month. Maybe you’re testing demand in a new market before committing to inventory.

In these scenarios, pre-orders serve two purposes:

  1. Revenue capture: You close sales while customers are engaged, rather than hoping they’ll remember to order online later
  2. Demand validation: Pre-order volume tells you which products resonate before you place production orders

For fashion brands especially, pop-ups are marketing investments. The goal isn’t just immediate sales; it’s building a customer file and validating product-market fit. Pre-orders at the event accomplish both.

Retail stores with long lead times

Some retail models involve products that can’t be fulfilled immediately. Made-to-order furniture, custom jewelry, personalized goods and specialty items often require weeks or months between order and delivery.

Without a pre-order system, these businesses typically resort to manual processes: paper order forms, follow-up calls to collect payment and spreadsheets to track fulfillment. A proper POS pre-order integration brings these transactions into your normal Shopify workflow, with automatic fulfillment holds and payment tracking.

The average cancellation rate for pre-orders is just 5.4%, meaning customers who commit tend to follow through. This makes pre-orders a reliable revenue forecasting tool for made-to-order businesses.

Setting Up Pre-orders on Shopify POS: Step-by-Step

Getting started requires a few prerequisites and configuration steps. Here’s what you need.

Requirements

Shopify POS Pro: The integration requires a paid Shopify POS plan. POS Pro enables the “Ship all items” functionality that’s essential for pre-order workflows. Without it, Shopify POS marks orders as fulfilled immediately, which breaks the pre-order process.

PreProduct app installed: You’ll need an active PreProduct subscription. If you’re already using PreProduct for online pre-orders, you’re halfway there.

Smart Grid configuration: Your POS Smart Grid must have the “Ship all items” tile enabled. This is what allows staff to mark orders for shipping rather than immediate pickup.

Enabling the integration

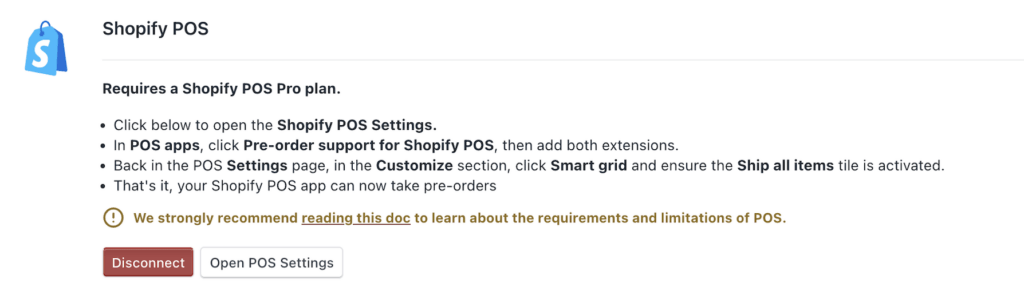
  1. In PreProduct, navigate to the Integrations screen
  2. Scroll to the Shopify POS card and click to activate
  3. Click Open POS Settings to access Shopify’s POS sales channel admin
  4. Under POS apps, find Pre-order support for Shopify POS
  5. Add both extensions to your POS configuration
  6. In the POS settings, go to Customize > Smart Grid and verify the “Ship all items” tile is active

That’s it for the technical setup. The integration is now live.

Training staff on the workflow

Staff need to understand a few key points:

Customer information is required: Before a pre-order can be added to cart, the customer must be attached to the session with both an email address and shipping address. If this information is missing, staff will see a prompt telling them to add the customer first.

Orders must be set to “ship”: When a pre-order item is in the cart, PreProduct adds a staff note reminding them that the order contains a pre-order and needs to ship. Staff should click the “Ship all items” tile in Smart Grid, or click the line item and select “Ship” from the menu. This tells Shopify the order still needs to be fulfilled later. If they skip this step, Shopify treats it like a pickup and marks the order as fulfilled immediately.

Payment can be collected now or later: Depending on your setup, staff can process full payment at checkout or leave the order unpaid for later invoicing. Make sure they know which approach you’re using.

For the complete technical documentation, including screenshots and troubleshooting, see the full POS integration guide.

Best Practices for Taking Pre-orders in Person

Once your integration is live, a few practices will help you maximize results.

Always capture complete customer information

The integration requires email and shipping address for good reason. Without contact information, you can’t send order updates, payment reminders, or shipping notifications. Make collecting this information a natural part of the conversation, not an afterthought at checkout.

For trade shows, consider having customers fill out a brief form on a tablet before you add items to cart. This speeds up checkout and ensures you have accurate information.

Communicate lead times clearly

In-person customers may have different expectations than online shoppers. Make sure staff can clearly articulate when the product will ship, what payment will look like (upfront vs. invoiced later) and how customers will receive updates.

For longer lead times (60+ days), transparency is essential. Customers who understand the timeline are less likely to cancel or file chargebacks. The pre-order’s expected ship date should be mentioned verbally and confirmed in the order receipt. Consider building a pre-order email sequence to keep customers informed throughout the waiting period.

Choose your payment approach

For POS pre-orders, you have two options: charge upfront or invoice later. Charging upfront locks in the sale immediately and works well for most convention scenarios. Invoicing later (via draft order) gives flexibility if customers prefer to pay when the product ships.

Track pre-order performance by channel

Once you’re taking pre-orders both online and in person, compare performance across channels. Are convention pre-orders converting at higher rates? Are in-store customers selecting different products than online buyers?

PreProduct’s dashboard consolidates all pre-orders regardless of source, making this analysis straightforward. Use the insights to inform future event participation and inventory planning.

Shopify POS Pre-order Limitations

No solution is perfect, and it’s important to understand where the POS integration has constraints.

Deferred-charge isn’t supported: Shopify POS doesn’t support purchase options, which power the deferred-charge model online. This means the “vault the card now, charge later” flow doesn’t work on POS. Instead, POS pre-orders left unpaid will receive a draft order invoice when you trigger charges. PreProduct handles this automatically, even if you have a mix of online and POS pre-orders for the same listing.

Capture-only pre-orders don’t work: If you use capture-only pre-orders online (where you send a payment link when ready), this model isn’t supported through POS.

Requires POS Pro: The free Shopify POS Lite plan won’t work. You need POS Pro for the shipping functionality that makes pre-orders possible.

Staff need to follow the prompts: Unlike online stores where the pre-order flow is automatic, POS requires staff to follow specific steps. PreProduct shows in-app messaging to guide them (reminders to add customer info, set orders to ship, etc.), but if they skip these prompts the workflow breaks.

These limitations are Shopify platform constraints, not PreProduct constraints. Until Shopify extends native pre-order support to POS, workarounds are necessary for certain functionality.

Frequently Asked Questions About Shopify POS Pre-orders

Does Shopify POS support pre-orders natively?

No. Shopify’s official documentation states that pre-order products are only supported on Online Store and Custom Storefront sales channels. POS is not included.

What payment options work with Shopify POS pre-orders?

Two options: charge upfront (full payment at checkout) or leave unpaid and invoice later via draft order. True deposit pre-orders (partial payment now, balance later via vaulted card) aren’t supported on POS due to Shopify limitations. For deposit workflows, you’d need to use your online store.

Does deferred-charge (pay later) work on POS?

Not through the standard vaulted card method. Shopify POS doesn’t support purchase options. However, you can leave orders unpaid at checkout and send draft order invoices later when you’re ready to collect payment.

Do I need Shopify POS Pro?

Yes. POS Pro is required because it enables the “Ship all items” functionality. Without this, Shopify marks orders as fulfilled immediately, breaking the pre-order workflow.

Will POS pre-orders sync with my online pre-orders?

Yes. All pre-orders appear in your PreProduct dashboard regardless of source. Fulfillment holds, tagging and customer communication work the same across channels.

Start Taking Pre-orders at Your Next Event

The gap between in-person enthusiasm and online conversion is where sales go to die. Customers who are ready to buy at a trade show, convention or pop-up shouldn’t have to navigate to your website later. They should be able to commit on the spot.

With PreProduct’s Shopify POS integration, you can capture those orders immediately. Same pre-order workflow as your online store. Same fulfillment holds. Same dashboard.

If you’re already using PreProduct for online pre-orders on Shopify, enabling POS takes minutes. If you’re new to PreProduct, the integration is included on all plans.

Don’t be the booth handing out business cards while competitors are processing orders.

Pre-sell With PreProduct

7 day free trial with all plansMigrate pre-orders

How to Run a Pre-order Campaign: Complete Guide for Ecommerce Brands

A pre-order campaign is more than just flipping a switch and hoping customers find your product. It’s a coordinated effort to build anticipation, capture demand, and generate revenue before your inventory even arrives. Yet most merchants treat pre-orders as an afterthought, missing out on the strategic advantages that come from proper campaign planning.

The difference between “having pre-orders enabled” and “running a pre-order campaign” can be significant. A coordinated launch concentrates demand into a defined window, creating momentum that builds on itself. That kind of energy doesn’t happen by accident. It comes from deliberate marketing, clear communication, and a phased approach that builds excitement before launch day.

This guide breaks down exactly how to plan and execute a pre-order campaign from start to finish. We’ll cover everything from choosing the right payment model to post-campaign analysis, backed by insights from over $85 million in pre-order sales.

What Is a Pre-order Campaign?

A pre-order campaign is a structured marketing effort designed to sell products before they’re available to ship. Unlike simply enabling pre-orders on your store, a campaign involves deliberate phases: building anticipation, launching with momentum, sustaining interest through the pre-order window, and following through with clear communication until fulfillment.

Pre-order campaigns make sense in several scenarios:

  • New product launches where you want to validate demand before committing to large inventory orders
  • Restocks of popular items where you know demand exists but need time to replenish
  • Limited edition releases where scarcity and exclusivity drive urgency
  • Seasonal products where timing matters and you need to capture intent early
  • Made-to-order items where production only begins after orders come in

The key distinction is intentionality. A campaign has a beginning, middle, and end. It has marketing assets, email sequences, and clear timelines. It treats the pre-order period as an opportunity rather than an inconvenience.

Why Run a Pre-order Campaign Instead of Just Enabling Pre-orders?

Merchants who treat pre-orders as campaigns rather than features see better results across multiple dimensions.

Revenue concentration matters. When you launch with coordinated marketing, you compress demand into a shorter window. This creates visible momentum that feeds on itself. Customers see other people buying, which validates their decision to purchase. Social proof builds naturally when you have a defined launch moment.

Demand forecasting becomes more accurate. A campaign gives you a cleaner signal of actual demand. Instead of trickling orders over weeks or months, you get a concentrated burst that helps you understand how many units you’ll actually sell. This informs production decisions, inventory planning, and future marketing spend.

Customer acquisition costs can decrease. When you build anticipation before launch, your audience is primed to convert. Email subscribers who’ve been warmed up convert at higher rates than cold traffic. Influencer partnerships generate more impact when coordinated around a specific launch date rather than an evergreen availability.

Brand building compounds. Successful pre-order campaigns become part of your brand story. Customers remember being part of a launch. They share their excitement on social media. They become advocates who bring others into your next campaign.

The data supports treating pre-orders as strategic opportunities. Our analysis of 1 million+ pre-orders reveals patterns in payment models, pricing, and timelines that successful merchants use to optimize their approach.

Phase 1: Pre-Campaign Preparation (4-6 Weeks Before Launch)

The work you do before opening pre-orders determines how successful your campaign will be. This preparation phase covers three critical areas: payment model selection, timeline setting, and asset creation.

Choose Your Payment Model

Your payment model affects customer psychology, cash flow, and operational complexity. There’s no universally right answer; the best choice depends on your specific situation.

Charge upfront works best when:

  • Your lead time is relatively short (under 30 days)
  • You have established trust with your audience
  • You need cash flow immediately to fund production
  • You’re offering limited quantities where demand certainty matters

Charge later (collecting payment at shipping) works best when:

  • Your lead time is longer or uncertain
  • You’re launching a new product where customers may be hesitant
  • You want to maximize pre-order volume by reducing purchase friction
  • You’re comfortable with the operational complexity of deferred charging

According to our data, 43.8% of pre-order listings use charge-later payment models. This suggests many merchants find that reducing upfront commitment increases total pre-order volume.

Deposits (partial payment now, balance at shipping) work best when:

  • You’re selling higher-ticket items where full payment feels risky
  • You want some commitment without the full friction of charge-upfront
  • You need partial cash flow now but don’t want to charge the full amount

For a deeper comparison of these approaches, see our complete guide to pre-order payment models.

Set Realistic Timelines

Nothing damages a pre-order campaign like missed shipping dates. Customers are surprisingly patient when expectations are set correctly from the start. They become frustrated when promises are broken.

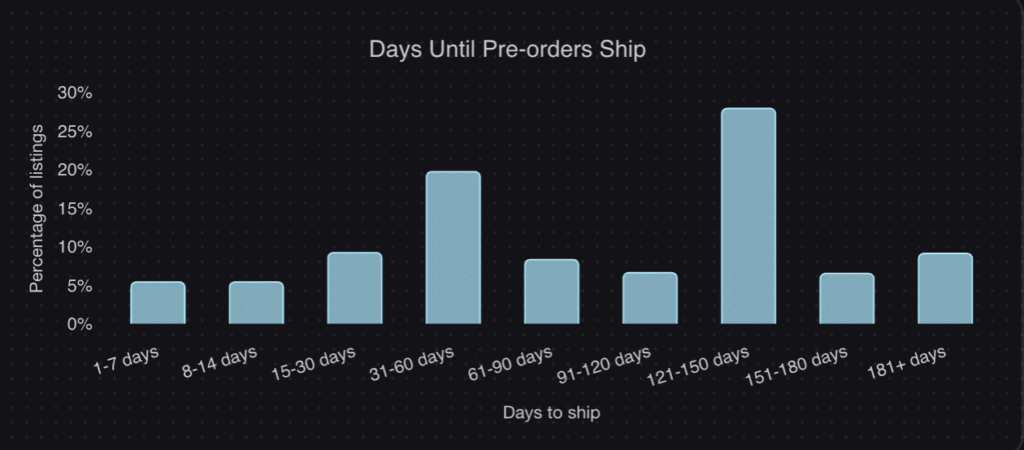
Our data shows that the most common shipping timeframe for pre-orders is 121-150 days, representing 28.1% of all pre-orders. This tells us that customers are willing to wait several months for products they want, as long as they know what to expect.

Best practices for timeline setting:

  • Add buffer to your estimates. If your manufacturer says 8 weeks, tell customers 10-12 weeks. Under-promising and over-delivering builds trust.
  • Plan for delays. Manufacturing issues happen. Have a communication plan ready for if (when) timelines slip.
  • Be specific when possible. “Ships in Q2” is less compelling than “Ships week of May 15th.” Specificity signals confidence (although this needs to be balanced with the need for the last point!)
  • Account for shipping transit time. Your timeline should reflect when customers receive products, not when you ship them.

The gap between pre-order open and delivery should be reflected in your pre-order policy. For example, a pre-order with a 6 month ETA should probably be a charge-later or deposit listing. Where as charging upfront for a pre-order shipping in two weeks is absolutely fine.

Build Your Marketing Assets

Before launch day, you need everything ready to go:

Product photography and video. Even if your final product isn’t ready, you need compelling visuals. Factory samples, 3D renders, or prototype images work fine as long as you’re transparent that final products may vary slightly.

Landing page or product page. Your pre-order product page needs to clearly communicate that this is a pre-order, when customers can expect delivery, and how payment works. Ambiguity creates support tickets and cancellations.

Email sequences. Draft your launch announcement, reminder emails, and post-purchase communication before you go live. You’ll want:

  • Teaser emails for the weeks before launch
  • Launch day announcement
  • Mid-campaign reminders for those who haven’t purchased
  • Order confirmation with clear pre-order terms
  • Shipping updates as you approach fulfillment

For detailed guidance, see our pre-order email sequence guide.

Social content calendar. Plan your posts for each day of the campaign. Behind-the-scenes content, customer quotes, progress updates, and deadline reminders all keep momentum going.

Phase 2: Building Anticipation (2-4 Weeks Before Launch)

The pre-launch period is about priming your audience so they’re ready to buy the moment pre-orders open.

Email List Warm-up

Your existing subscribers are your most likely customers. Start warming them up:

  • Tease the product. Share glimpses without revealing everything. Create curiosity.
  • Offer early access. Let subscribers know they’ll get first dibs on pre-orders.
  • Build a VIP list. Create a separate signup for people who want launch notifications. This segment is your highest-intent audience.

Social Media Seeding

Use social platforms to build buzz:

  • Behind-the-scenes content showing product development, manufacturing visits, or design decisions
  • Countdown posts as launch day approaches
  • Influencer seeding by sending samples to creators who will share their honest reactions on launch day

Pre-launch Landing Page

If you’re not ready to take pre-orders yet, create a coming soon page that captures email addresses. This builds your launch list while creating a sense of anticipation. Include:

  • Product imagery
  • Brief description of what’s coming
  • Expected launch date
  • Email signup form
  • Social proof if available (press mentions, early reviews, etc.)
https://shop.mattel.com.au/collections/coming-soon

Phase 3: Campaign Launch (Days 1-7)

Launch day is your biggest opportunity for momentum. Concentrate your efforts here.

Launch Day Execution

Everything should fire simultaneously:

  • Email blast to your full list, with VIP early access going out slightly earlier if you offered it
  • Social media announcement across all platforms
  • Influencer activation with coordinated posts from creators who received samples
  • Paid advertising launch if you’re running ads, start them now to capture the launch momentum

The goal is creating the feeling that something is happening. When customers see activity across multiple channels, social proof kicks in.

First Week Momentum

Keep the energy going through week one:

  • Daily social updates showing order counts, customer reactions, or production progress
  • User-generated content requests asking customers to share their purchase excitement
  • Progress tracking like “500 units claimed, only 200 remaining” creates urgency without being manipulative (as long as numbers are real)

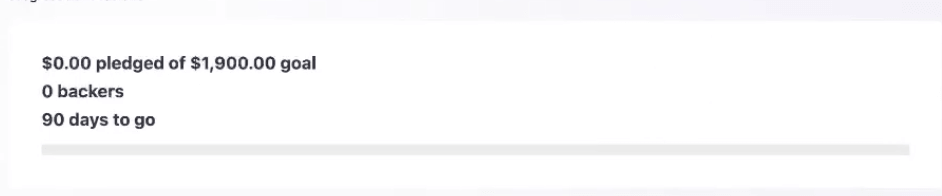
Consider adding a crowdfunding-style progress bar to your product page. Visual progress indicators tap into the same psychology that makes Kickstarter campaigns compelling.

Phase 4: Mid-Campaign Management (Week 2+)

After the initial launch burst, maintaining momentum requires consistent effort.

Maintaining Momentum

  • Weekly email updates to your list highlighting progress, new testimonials, or behind-the-scenes content
  • New angles and content that give you fresh reasons to reach out to your audience
  • Genuine scarcity messaging if you have limited quantities or a deadline approaching

The key is providing value with each touchpoint, not just asking for the sale repeatedly.

Customer Communication

For customers who have already pre-ordered:

  • Order confirmation with crystal clear terms on when they’ll be charged (if charge-later) and when they’ll receive products
  • Shipping timeline reminders as you approach the estimated date
  • Production updates if you have interesting progress to share

Good communication during the pre-order period reduces cancellations. Our data shows an average cancellation rate of 5.4%. Merchants who communicate proactively typically see rates below this average.

Phase 5: Campaign Close and Post-Launch

Closing the Campaign

If your pre-order has a deadline:

  • Last chance messaging in the final 48-72 hours creates urgency
  • Deadline reminders via email and social media
  • Final conversion push with any remaining incentives you’re offering

Be specific about what happens when the deadline passes. “Pre-orders close Sunday at midnight” is more compelling than “pre-orders ending soon.”

Post-Campaign Analysis

After your campaign closes (or after you fulfill and ship), review your performance:

  • Pre-order conversion rate: What percentage of product page visitors placed pre-orders?
  • Email signup to pre-order conversion: How many of your launch list actually bought?
  • Average order value: Did bundling or upsells work?
  • Cancellation rate: How does yours compare to the 5.4% average?
  • Time to charge (if charge-later): How long between order and payment collection?
  • Payment success rate: Did deferred charges go through smoothly?

If you experience failed charges during collection, our guide on recovering failed Shopify payments covers dunning strategies and best practices (for example, PreProduct has a failed charge flow that can be initiated).

Pre-order Campaign Metrics That Matter

Track these KPIs to optimize future campaigns:

Conversion metrics:

  • Pre-order page conversion rate
  • Email click-to-purchase rate
  • Ad ROAS for pre-order campaigns

Financial metrics:

  • Average order value
  • Revenue per email subscriber
  • Cost per pre-order acquisition

Operational metrics:

  • Cancellation rate
  • Support ticket volume
  • Charge success rate (for deferred payment models)

Engagement metrics:

  • Email open and click rates throughout campaign
  • Social engagement on pre-order announcements
  • Referral/share rates

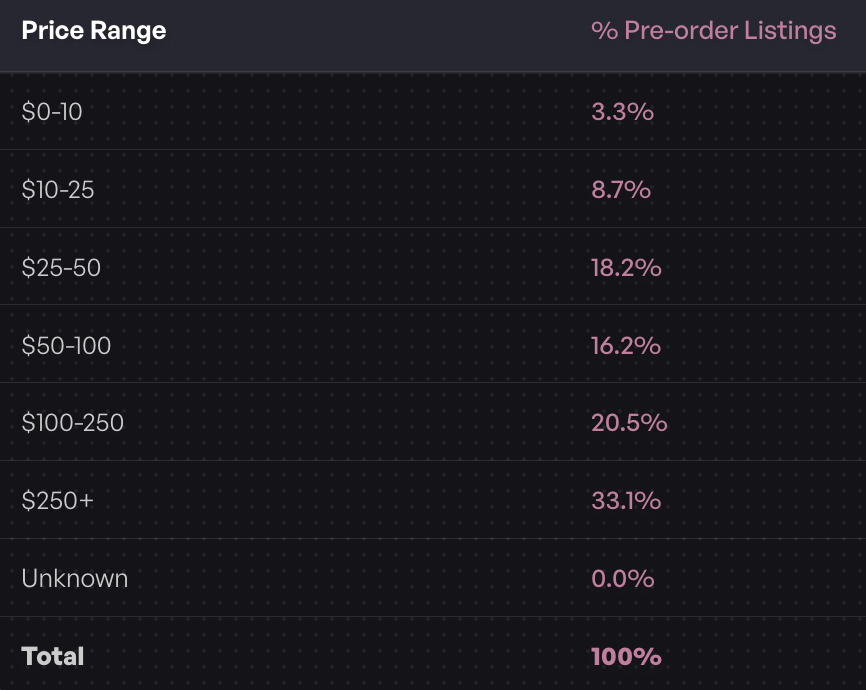
For benchmarks on pricing and other factors, our 1M pre-orders report shows that the most common price range for pre-order products is over $250, representing 26.8% of listings. This suggests pre-orders work particularly well for higher-ticket items where customers are willing to wait for quality.

Common Pre-order Campaign Mistakes to Avoid

1. Not communicating delivery timelines clearly. Vague shipping estimates create customer anxiety and support burden. Be as specific as possible, and if anything changes, communicate immediately.

2. Overpromising and under-delivering. Whether it’s product features, quality, or timing, broken promises destroy trust. It’s better to launch with realistic expectations than to set yourself up for disappointment.

3. Missing early-bird incentives. Give customers a reason to buy now rather than later. Limited-time pricing, exclusive bonuses, or early access to future products can compress your sales into the launch window.

4. Ignoring post-purchase communication. The sale isn’t over when someone pre-orders. Keep customers engaged and informed throughout the waiting period. Silence breeds anxiety and cancellation requests.

5. Not having a cancellation recovery plan. Some cancellations are inevitable. Have a process for handling them gracefully, and consider whether you can win back cancelled customers with future offers.

Pre-order Campaign Ideas by Industry

Different product categories call for different approaches.

Fashion and Apparel

  • Seasonal collection drops where the entire collection launches on pre-order before production
  • Limited colorways available only through pre-order
  • Collaboration pieces with designers or influencers
  • Made-to-order models that reduce waste and overproduction

Consumer Electronics and Gadgets

  • New product launches where pre-orders fund production runs
  • Next-gen product releases before current inventory is depleted
  • Founder’s edition packaging or features exclusive to pre-order customers

Food and Beverage

  • Seasonal products (holiday items, limited flavors)
  • New flavor launches with exclusive early access
  • Subscription box previews where subscribers get first access to new products

Home Goods and Furniture

  • Custom/made-to-order pieces where production begins after order
  • New collection launches before warehouse stock arrives
  • Exclusive finishes or materials available only through pre-order

For more pre-order best practices across industries, we’ve compiled data-driven strategies from merchants running successful campaigns.

Conclusion

Running a successful pre-order campaign is where you do more than just enable ‘pre-order’ on your store. It’s where you put in intentional planning across five phases: preparation, anticipation-building, launch, mid-campaign management, and post-campaign analysis.

The merchants who see the best results treat pre-orders as strategic marketing events rather than operational necessities. They choose payment models that match their business needs, set realistic timelines with built-in buffer, and communicate consistently throughout the customer journey.

Key takeaways:

  • Start preparing 4-6 weeks before you want to open pre-orders
  • Choose a payment model based on your lead time and customer trust level
  • Build anticipation through email warm-up and social seeding before launch
  • Concentrate marketing efforts on launch day for maximum momentum
  • Communicate proactively with customers throughout the waiting period
  • Analyze results to improve future campaigns

If you’re running pre-orders on Shopify, tools like PreProduct can help you manage payment collection, customer communication, and fulfillment holds. But regardless of what tools you use, the principles remain the same: plan deliberately, launch with momentum, and communicate clearly.

Your next product launch deserves more than a passive pre-order button. Give it a campaign!

Pre-sell With PreProduct

7 day free trial with all plansMigrate pre-orders
Shopify Split Payments: How to Let Customers Pay in Parts

Payment flexibility matters more than most merchants realize. According to Baymard Institute, 10% of shoppers abandon their carts because there aren’t enough payment methods. For merchants selling higher-ticket items or running pre-orders with long lead times, that’s revenue walking out the door. Split payments can be the difference between a completed order and an abandoned cart.

But here’s the catch: Shopify doesn’t natively support split payments for online checkout. You can’t split a transaction across two credit cards or let a customer pay half now and half later without some workarounds. The good news is there are several ways to make split payments work on your store. This guide breaks down your options so you can pick the right approach for your business.

What Are Split Payments on Shopify?

Split payments let customers divide a purchase into multiple transactions. This can mean:

  • Splitting across payment methods (two credit cards, card + gift card)
  • Partial payments (deposit now, balance later)
  • Installments (pay over several weeks or months)

These terms often get used interchangeably, but they work differently on Shopify. For a deeper dive into partial payments, deposits and deferred charges, see our Shopify partial payments guide.

Why Split Payments Matter for Your Store

The data makes a strong case. Shopify reports that Shop Pay Installments reduces abandoned carts by 28%, with one in four merchants seeing a 50% increase in AOV after enabling it. For pre-orders specifically, payment flexibility plays an even bigger role. According to data from over 1 million pre-orders, 43.8% of pre-order listings use charge-later models where customers pay nothing upfront. Removing that upfront friction helps validate demand before you commit to inventory.
The Shopify Split Payment Limitation

Let’s be clear about what Shopify can and cannot do natively.

What Shopify does NOT support:

  • Splitting an online checkout across two credit cards
  • Letting customers pay a portion now and the rest later (without apps)
  • Multiple payment methods in a single online transaction

What Shopify DOES support:

  • Split payments at point of sale (POS) for in-person transactions
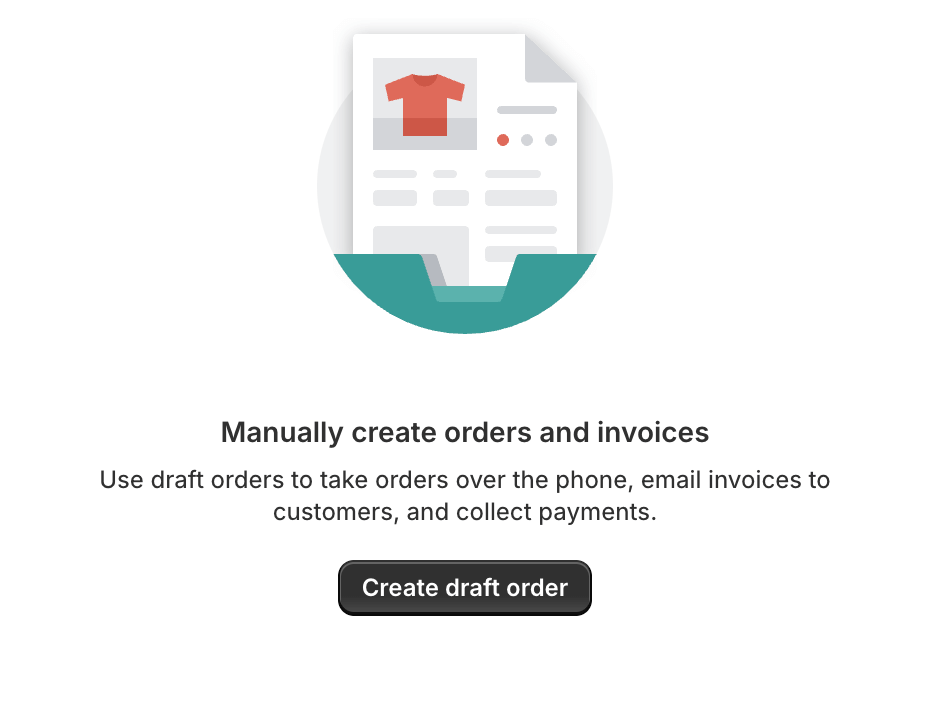
  • Draft orders with manual partial payments
  • Shop Pay Installments (BNPL through Affirm)
  • Shopify Plus B2B partial payments

The limitation comes down to how payment gateways work. Security requirements make it difficult to hold multiple payment methods in a single checkout session. This is why most split payment solutions for online stores require either manual processes or third-party apps.

Technical note: Only certain payment gateways support storing card details for later charges. Shopify Payments and PayPal support vaulted cards, which means they can securely save a customer’s payment method to charge later without the customer taking any additional action. This distinction matters when choosing how to handle split payments, and we’ll cover it more in the third-party apps section.

5 Ways to Accept Split Payments on Shopify

1. Shopify POS (In-Person Sales)

If you sell in person, Shopify POS supports split payments natively. Customers can pay using any combination of:

  • Multiple credit cards
  • Cash and card
  • Gift cards and card
  • Store credit and other methods

This works well for retail stores, markets and pop-ups. The catch is obvious: it only works for in-person sales. If your business is primarily online, you’ll need one of the other options below.

2. Draft Orders (Manual B2B Method)

Draft orders let you create custom invoices with partial payment requirements. Here’s how it works:

  1. Create a draft order in Shopify admin
  2. Set a deposit amount or percentage
  3. Send the invoice to your customer
  4. Manually record additional payments as they come in

Best for: B2B transactions, custom quotes, one-off large orders where you’re already in direct contact with the customer.

Limitations:

  • Manual process that doesn’t scale
  • No automation for balance collection
  • Requires hands-on management of each transaction

For low-volume, high-touch situations, draft orders work fine. For anything at scale, you’ll want a more automated solution.

3. Shop Pay Installments (Native BNPL)

Shop Pay Installments is Shopify’s built-in buy now, pay later option, powered by Affirm. Customers can split purchases into 2-4 interest-free payments.

How it works:

  • Customer selects Shop Pay Installments at checkout
  • Affirm runs a soft credit check
  • If approved, customer pays in bi-weekly installments
  • You receive the full payment upfront (minus fees)

Eligibility requirements:

  • Store must be in the US, Canada or UK
  • Must use Shopify Payments as your gateway
  • Orders typically between $50-$3,000

Best for: In-stock items with immediate shipping. Shop Pay Installments charges the customer right away and you ship the product. It’s not designed for pre-orders or products with long lead times.
For more on installment options, see our Shopify payment plans guide.

4. Shopify Plus B2B Partial Payments

If you’re on Shopify Plus with B2B customers, you can now set deposit requirements directly on payment terms. This is a relatively new feature that lets you:

  • Require a percentage upfront on wholesale orders
  • Record partial payments in the Shopify admin
  • Manage payment schedules for net terms

Best for: Wholesale accounts, B2B customers on net-30/60/90 terms, enterprise clients who expect deposit and balance payment structures.

This feature is limited to Plus merchants with the B2B channel enabled.

5. Third-Party Apps

For most online stores, third-party apps are the practical solution for split payments. But not all apps work the same way. There are two fundamentally different approaches:

Invoice-based apps (Split Partial Deposit, SpurIT, etc.):

  • Send payment links via email for the balance
  • Customer must click a link and complete payment manually
  • Works with any payment gateway
  • Requires customer action for each subsequent payment

Vaulted card apps (PreProduct):

  • Customer completes checkout once, card stored securely
  • Balance charges happen automatically, no customer action needed
  • Requires Shopify Payments or PayPal
  • Single checkout experience, multiple charges
  • Supports multi-step payment plans where customers choose their installment count

This isn’t just a feature difference. It’s an architectural distinction that affects customer experience and conversion rates. With invoice-based apps, every balance payment is a potential drop-off point. The customer has to open an email, click a link, and re-enter payment details. With vaulted card apps, the customer goes through the buying flow once and you handle the rest.

App TypeCustomer ExperienceGateway RequirementBest For
Invoice-basedMultiple touchpoints, customer action requiredAny gatewayNon-Shopify Payments stores
Vaulted cardSingle checkout, automatic chargesShopify Payments or PayPalStores wanting seamless experience

For stores using Shopify Payments, vaulted card apps provide a better customer experience. For stores on other gateways, invoice-based apps are your only option.

When to Use Each Split Payment Method

Choosing the right method depends on your situation. Here’s a quick framework:

Use Shopify POS if:

  • You sell in person (retail, markets, events)
  • Customers want to split across cards or payment types at the register

Use draft orders if:

  • You handle low-volume, high-value B2B transactions
  • You’re already in direct contact with each customer
  • You need complete flexibility on payment terms

Use Shop Pay Installments if:

  • You sell in-stock products that ship immediately
  • Your orders are typically $50-$3,000
  • You use Shopify Payments and are in the US, Canada or UK

Use Shopify Plus B2B if:

  • You’re on Plus with B2B customers
  • You need deposits on wholesale orders
  • Your customers expect net terms with partial payments

Use third-party apps if:

  • You sell pre-orders or products with lead times
  • You want deposits or charge-later models
  • You need automated balance collection
Use CaseBest MethodWhy
In-person retailShopify POSNative support, no setup needed
B2B wholesale (Plus)Shopify Plus B2BBuilt-in, no extra apps
Low-volume custom ordersDraft ordersFlexible, manual control
In-stock BNPLShop Pay InstallmentsNative, customer-friendly
Pre-orders and depositsThird-party appsAutomation, payment flexibility

Split Payments for Pre-orders

Pre-orders need a different approach because you’re selling products that don’t exist yet, or haven’t arrived. The timing between order and fulfillment changes everything.

The most popular pre-order payment models:

  • Charge-later: $0 upfront, charge when ready to ship. This is the most common approach, with 43.8% of pre-order listings using it according to PreProduct data. It removes upfront friction and lets you validate demand before inventory investment.
  • Deposits: 20-50% upfront, balance when ready. Works well for higher-priced items where you want customer commitment.
  • Multi-step plans: Spread payments across the production timeline with multi-step payment plans. Customers choose how many installments they want, and charges happen automatically on a schedule you define. Common for crowdfunding-style launches or higher-ticket pre-orders.

For a complete breakdown of payment models and when to use each, see our pre-order payment models guide.

The key for pre-orders is that vaulted card technology makes a significant difference. Customers only go through checkout once. No invoices, no payment links, no additional friction when it’s time to collect the balance.

Common Questions About Shopify Split Payments

Can I split a Shopify checkout between two credit cards?

Not natively. Shopify’s online checkout only supports one payment method per transaction. To split across cards, you’d need to use draft orders (manually) or a third-party app that supports multiple payment captures.

What if the second payment fails?

This is where dunning workflows matter. Good split payment apps will automatically retry failed charges and notify customers. For a deep dive on recovering failed payments, see our failed Shopify payments guide.

Which payment gateways support vaulted cards?

Shopify Payments, PayPal and Cybersource can securely store card details for deferred charging. Other gateways don’t support this, so you’ll need invoice-based solutions instead.

What’s the ideal deposit percentage?

Most merchants find 20-50% works well. Lower deposits reduce friction; higher deposits secure more commitment. It depends on your product price point and lead times.

Can I use Shop Pay Installments for pre-orders?

Shop Pay Installments charges customers immediately, so it’s designed for in-stock products. For pre-orders where you want to charge later, you’ll need a different approach like charge-later or deposit pre-orders.

Making Split Payments Work for Your Store

Split payments aren’t one-size-fits-all. The right approach depends on whether you’re selling in person or online, whether you use Shopify Payments, and whether you need deposits for pre-orders or installments for in-stock products.

Here’s the quick version:

  • In-person? Shopify POS handles it natively
  • B2B on Plus? Use the built-in partial payments feature
  • In-stock products via buy-now-pay-later (ship now)? Shop Pay Installments (powered by Affirm)
  • In-stock products via vaulted card (ship later)? We actually have a sister app to PreProduct called Payment Plans that is designed for non-pre-orders.
  • Pre-orders or custom orders? Third-party apps with vaulted card support give you the best experience

The distinction between invoice-based and vaulted card apps is worth understanding. For pre-orders especially, having customers complete checkout once and handling subsequent charges automatically makes a real difference in completion rates.

If you’re running pre-orders and want to explore deposit or charge-later options, PreProduct can help you set up split payment models that keep everything within Shopify’s native checkout.

Pre-sell With PreProduct

7 day free trial with all plansMigrate pre-orders