Prefer to watch a video? Click here to see Oli explain four different pre-order methods on Shopify.
Shopify pre-orders let you capture demand before inventory arrives. Whether you’re launching a new product, managing out-of-stock items, or building hype for an upcoming release, pre-orders help you take orders and revenue sooner while validating market interest.
This guide covers everything you need to know about Shopify pre-orders: choosing the right payment model, planning your strategy, setting up step by step, and running a campaign that converts. All backed by insights from over one million pre-orders processed through our platform.
What are pre-orders and why use them?
A Shopify pre-order allows customers to purchase products before they’re available for general sale or when inventory is temporarily out of stock. Unlike backorders and waitlists, pre-orders involve a customer commitment to purchase upfront. Instead of waiting until products hit your warehouse, you start taking orders immediately.
Business benefits of Shopify pre-orders
Validate demand before committing to inventory
Shopify pre-orders help you gauge genuine customer interest before investing in large production runs. By tracking pre-order volume, you can adjust inventory levels to match actual demand, reducing the risk of stockouts, overstocking, or having to discount unsold products.
Improve cash flow and take revenue sooner
Pre-orders powered through PreProduct have generated over $85.3 million in revenue. Taking payment upfront or capturing payment details earlier gives you working capital before products ship, particularly valuable for small businesses and startups managing tight cash flow.
Build hype and marketing momentum
Pre-orders create anticipation around product launches. You effectively launch twice: once when you announce the pre-order and again when the product becomes available. This dual-launch approach generates sustained buzz and gives you multiple marketing touchpoints.
Secure committed customers
Customers who pre-order demonstrate higher commitment than those who add items to wishlists. Pre-order customers have already made a purchase decision, reducing the risk they’ll buy from a competitor when your product finally launches.

Customer benefits
Guaranteed access to new or limited products
Pre-orders ensure customers secure their spot for highly anticipated releases or limited-edition items that might sell out quickly.
Early-bird incentives
Many brands offer exclusive discounts, bonus content, or limited-edition packaging to reward customers who commit early.
First access to innovation
For customers who value being first to try new products, pre-orders provide that exclusive early-adopter experience.
How Shopify pre-orders work
Understanding the pre-order flow helps you design a better customer experience. Here’s how a typical Shopify pre-order journey unfolds:
- Announcement: You announce the upcoming product with details about features, pricing, and expected delivery. This typically happens through email campaigns, social media, and on-site banners.
- Pre-order period opens: A designated window begins where customers can place orders. This period can range from a few weeks to several months depending on your product and lead time.
- Customer places order: Customers order through your Shopify store. The checkout experience includes clear messaging about estimated delivery dates and when payment will be processed.
- Payment processing: Depending on your pre-order model (covered below), customers either pay immediately, accept a future charge, pay a deposit, or receive a payment link when you’re ready to charge.
- Order confirmation and updates: Customers receive confirmation via email. Throughout the pre-order period, you keep them updated on production progress and shipping timelines, either passively via a customer portal or actively via email/SMS.
- Charges processed and product ships: When inventory arrives, any deferred charges are processed and products ship to pre-order customers.

Shopify pre-order payment models
Shopify supports multiple pre-order payment models. Your ideal approach depends on your product lead times, price point, and cash flow needs. For a deeper comparison of every model, see our pre-order payment models guide. You can also read our Shopify partial payments guide for more on deposits and installments specifically.
Most models use card vaulting (secure card storage) rather than traditional authorization holds, giving you flexibility for longer lead times.
Charge upfront pre-orders
Customers pay 100% at the time of pre-order placement. This model works best when you need immediate working capital or when lead times are relatively short (under 60 days).
Best for:
- Products with short lead times (under 60 days)
- Lower-priced items where customers are comfortable paying in full
- Brands with established trust and reputation
- Situations requiring immediate cash flow for production
Considerations:
According to our analysis of over one million pre-orders, charge-upfront accounts for a smaller percentage of listings compared to deferred payment models. Customers may hesitate to pay months in advance, especially for higher-priced items or brands they’re less familiar with.
Charge later pre-orders
Customers proceed through checkout and accept a future charge. Their card information is securely vaulted with your payment processor, and you trigger payment when inventory arrives and you’re ready to ship. No authorization hold is placed, so there’s no expiration window to worry about.
This is the most popular model: 43.8% of all pre-order listings on PreProduct use charge-later, making it the dominant payment method for pre-orders.
Best for:
- Products with longer lead times (60+ days)
- Mid-high priced items where customers prefer not to pay months in advance
- First-time orders of a product or from a new supplier, where flexibility matters
- Any timeline where authorization holds would expire before you’re ready to charge
Considerations:
When you’re ready to ship, you trigger the charge. If the card has expired or been cancelled, the charge will fail and you’ll need to collect updated payment information via a dunning flow. Learn more in our charge later guide.
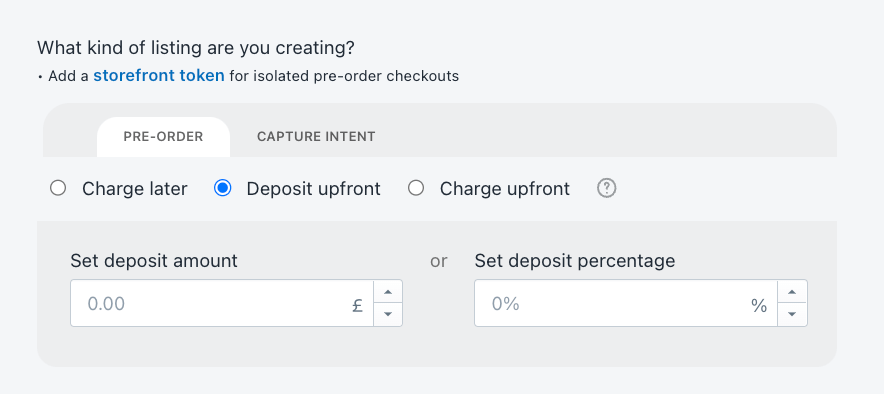
Deposit pre-orders
Customers pay a partial amount upfront (typically 10-50% of the total price), with the remaining balance charged later when you’re ready to ship. Like charge-later orders, the customer’s card is vaulted for the future balance charge.
Best for:
- Mid-high priced items ($50-200+)
- Products with long lead times but requiring some upfront capital
- Merchants who want assurance that buyers are committed
- Balancing cash flow needs with customer comfort
Considerations:
Deposits signal stronger commitment than charge-later-only models while being less intimidating than full upfront payment. This middle-ground approach works well for premium products where you need some working capital but want to reduce purchase friction. See our Shopify deposits page for more details.
Capture-only pre-orders
This model captures customer information without taking any payment. You replace the standard purchase button with a pre-order button, and email a payment link later when ready to process orders.
Capture-only payment links account for 28.7% of PreProduct pre-order transactions, making it the second most popular model.
Best for:
- Conservative markets where merchants are hesitant to exchange any payment details upfront
- Products with highly uncertain timelines
- Testing demand before committing to production
- Situations where you want zero checkout friction upfront
Considerations:
This approach has the lowest commitment level, which can lead to lower conversion rates when payment time comes. However, it’s excellent for demand validation since customers can opt in without any payment friction. It’s also one step above waitlists, as the order is already captured and can be prepopulated at checkout.
Authorization period pre-orders
The most basic approach is placing a traditional authorization hold on the customer’s card. In Shopify, this is the “manual payment capture” method. You must capture payment within the authorization window (typically 7-30 days) before the hold expires.
Best for:
- Very short lead times (under 7-30 days)
- Products arriving imminently where you know exact ship dates
Considerations:
This model is limited by authorization hold expiration windows. For most products with longer lead times, charge-later with card vaulting is more practical. The extended 30-day authorization period is currently only available to Shopify Plus merchants and adds a 1.75% fee if charged after day 7.
Planning your Shopify pre-order strategy
Before launching pre-orders, strategic planning ensures better outcomes. For a deep dive, see our Shopify pre-order best practices guide.

When to use pre-orders
Pre-orders work well for:
- New product launches: Build anticipation and validate demand before committing to large production runs
- Seasonal or limited releases: Create urgency for products available only during specific periods
- Out-of-stock bestsellers: Continue taking orders when inventory temporarily runs out
- Custom or made-to-order products: Collect orders before beginning production
- High-ticket items: Gauge serious buyer interest before investing in expensive inventory
Setting realistic timelines
According to our data, 121-150 days represents the most common fulfillment window at 28.1% of pre-orders, while 20.6% ship within 30 days. Your estimated timeline should account for:
- Manufacturing or production time: Factor in supplier lead times plus buffers for delays
- Shipping and freight: Expected shipping times from the supplier, whether sea or air freight
- Quality control: Building in time for inspection, especially for first runs or new suppliers
- Customs and import processing: For international products, adding 1-2 weeks can be sensible
- Buffer for unexpected delays: Add 10-20% padding to your estimated timeline
Be conservative with your customer-facing shipping statement. It’s better to over-deliver than create frustration by missing promised dates. You can always update your shipping statement along the way and send out updates to your customers.
Pricing strategies
Products priced between $25-50 represent 42.7% of individual pre-orders, though the most common listing price range exceeds $250 (26.8% of listings).
Early-bird discounts: Consider limited-time discounts (typically 10-20% off) to reward customers who commit earliest. This creates urgency and helps you gauge initial demand quickly.
Pay early and save: Some pre-order solutions let you offer a discount to customers who want to pay off a deferred-charge pre-order early, improving cashflow while giving them the option to pay later.
Pay in installments: Optional multi-step payment plans let customers pay in installments, improving conversion for price-sensitive customers or high-ticket items. For more on this, see our Shopify payment plans guide.
Tiered pricing: Consider Kickstarter-style pricing tiers:
- Super early bird: 20% off (first 50 customers)
- Early bird: 15% off (next 100 customers)
- Standard pre-order: 10% off (remaining slots)
- Launch price: Full price at product release
Inventory planning
Use pre-order volume to inform production quantities. If you’re taking capture-only pre-orders (where no payment is collected upfront), build in an expected conversion rate (typically 70-85%) when planning inventory. Charge-later and deposit models typically have higher conversion since cards are vaulted.
For more detail on inventory workflows, see our pre-order inventory management guide and demand planning guide.
Setting up pre-orders on Shopify
Shopify native pre-orders vs. apps
As of 2024, Shopify introduced native “Purchase Options” functionality that allows apps to facilitate deferred-charge pre-orders through your native Shopify checkout. Purchase options require a supporting app to use, however the “continue selling when out of stock” checkbox allows merchants to sell without any third-party solutions.
That said, most merchants running serious pre-order campaigns still use a dedicated app for enhanced features like communication and payment flexibility.
| Feature | Native Shopify Pre-orders | App-Based Pre-orders |
|---|---|---|
| Cost | Free and built-in | Monthly subscription cost |
| App Required | No additional app required | Requires third-party app |
| Payment Flexibility | Limited (charge upfront only) | Multiple models (upfront, later, deposit, capture-only) |
| Customer Communication | No automated communication | Automated messaging and customer portals |
| Fulfillment Management | Basic fulfillment management | Advanced controls (holds, automation) |
| Analytics and Pre-order Insights | None | Pre-order analytics and performance tracking |
| Variant-Specific Controls | Not supported | Variant-specific pre-order limits |
For smaller merchants running occasional, simple pre-orders that can be charged upfront, Shopify’s native option (using selling plans) may suffice. For brands building Shopify pre-orders into their core strategy, dedicated apps provide significantly more control and better customer experience. Check out our Shopify pre-order app buying guide for a full comparison, or visit the PreProduct Shopify pre-order app page.
Payment processor requirements
Not all payment methods support pre-orders, particularly deferred charging models. Currently supported options include:
- Shopify Payments (full support for all pre-order models)
- PayPal (supports most pre-order types)
- Cybersource – as of early 2026, merchants have reported Cybersource support for deferred charges as well
Third-party gateways often don’t support deferred charging. Shop Pay, Apple Pay, and Google Pay also have limitations with charge-later pre-orders. Shopify automatically hides incompatible payment providers at checkout for pre-order products.
Installing a pre-order app
We’ll use PreProduct as an example, though the general process can apply to other pre-order apps.
Step 1: Install from Shopify App Store
Search “pre-order” in the Shopify App Store and install your chosen app. PreProduct offers a free trial and/or a commission-only plan to test functionality.
Step 2: Integration based on theme version
For Shopify 2.0 themes (recommended):
If your app doesn’t support auto-install, you’ll need to add its app block from the Shopify Customize editor:
- Navigate to your theme customizer
- Select the product template
- Drag and drop the pre-order app block where you want it to appear (typically above the add-to-cart button)
- Save changes
For Shopify 1.0 themes:
If your app doesn’t support auto-install, you’ll need to add its snippet code to your theme:
- Access Theme Code Editor from the “Online store” section of your Shopify admin
- Locate your product template file (usually in the snippets directory, within a file like:
product-template.liquid,add-to-cart-button.liquidorproduct-form.liquid) - Add the app’s snippet code above the buy button’s
<button>tag - Save changes
Most modern themes use Shopify 2.0, making integration significantly simpler. (PreProduct supports auto-install for most themes, but not all.)
Listing your first pre-order product
After integration, configure your first pre-order listing. This can be done via an automation/rule-based setup, or manually product by product.
- Select product or variant: Choose which products or specific variants to list as pre-order. Advanced apps allow variant-specific pre-ordering, so you can pre-order only out-of-stock sizes or colors while keeping others available for immediate purchase.
- Choose payment model: Select your preferred payment approach: charge upfront, charge later, deposit, or capture-only.
- Set estimated delivery date: Provide a realistic delivery timeframe. This date appears to customers and can be updated as circumstances change.
- Configure pre-order limits (optional): Decide whether to limit quantity to create scarcity or leave unlimited.
- Add early-bird discount (optional): Set discount pricing to incentivize early commitment.
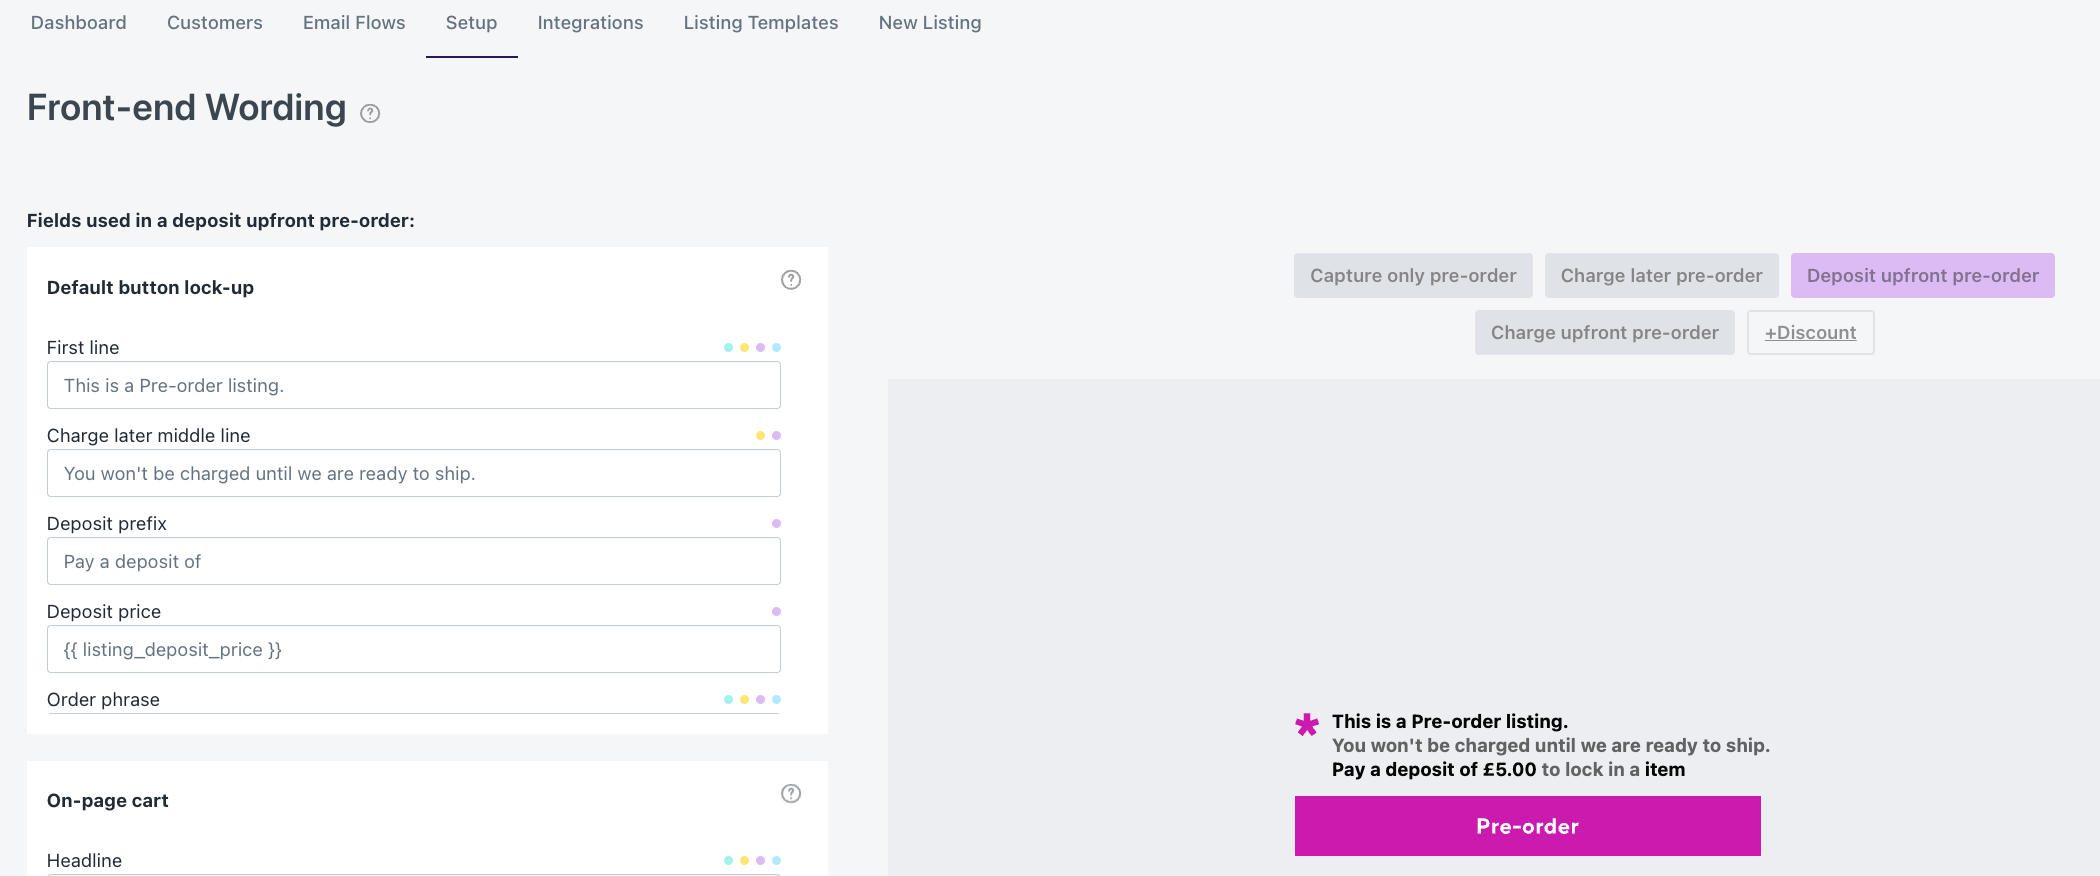
- Customize messaging: Check the front-end wording on your product, cart, and checkout screen. If it doesn’t match your brand voice or clearly communicate the pre-order, change it via the app’s “customize wording” screen.

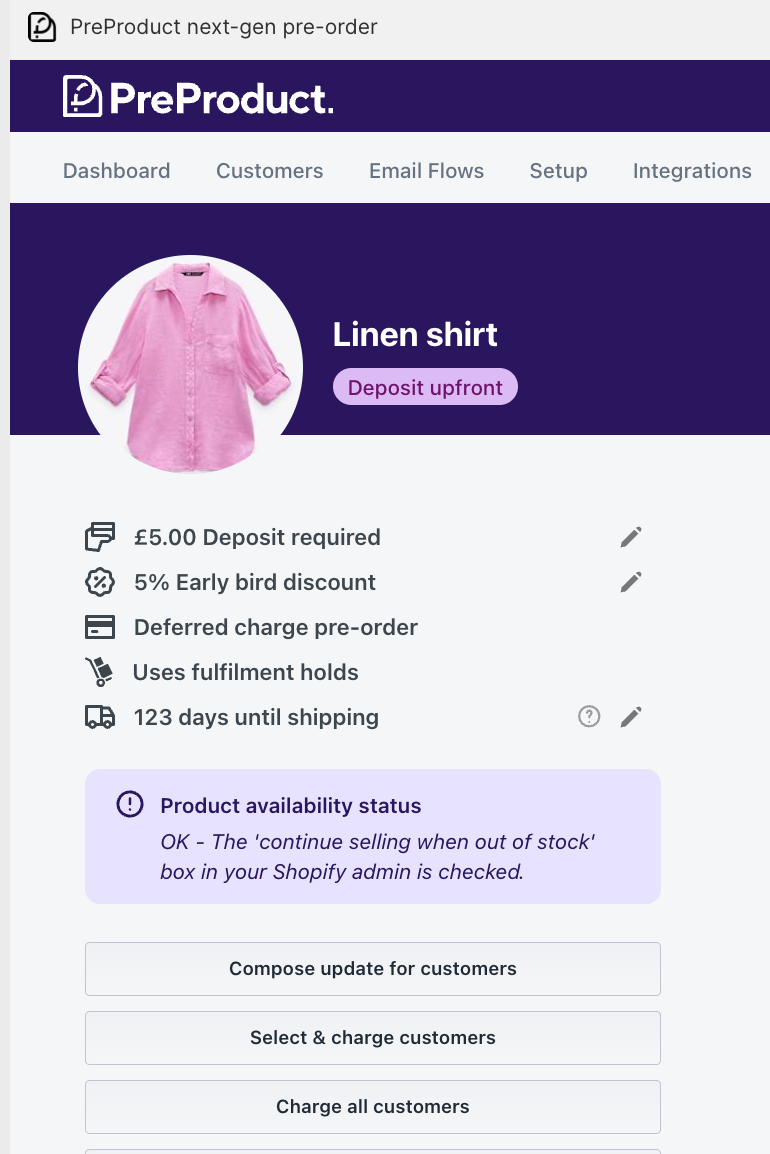
Fulfillment holds and order management
Pre-order apps typically place fulfillment holds on pre-order items, preventing them from flowing prematurely to your 3PL, ERP, or fulfillment system. This ensures pre-orders stay isolated until you’re ready to ship.
When inventory arrives and you’re ready to fulfill:
- For charge-later, capture-only, or deposit pre-orders, trigger payment from your app
- For charge-upfront pre-orders, trigger fulfillment from your app
- Either approach releases the fulfillment hold on the Shopify order, changing its status from “On hold” to “Unfulfilled”
- Orders then flow to your fulfillment system like regular orders
Auto-charge automation can trigger charges based on inventory levels in Shopify, streamlining this process further.
For more on fulfillment workflows, see our guides on managing pre-orders with ERPs and 3PLs.
Running a successful Shopify pre-order campaign
Getting your Shopify pre-order set up is only half the picture. Running a successful pre-order campaign requires thoughtful marketing, clear communication, and awareness of your obligations.

Marketing your pre-orders
Strong pre-order marketing turns a product announcement into a successful campaign. Start by building anticipation before the pre-order period opens: tease the product, build an email waitlist, and create countdown content.
When pre-orders open, maximize visibility through email announcements, social media, influencer outreach, and paid advertising. Create urgency with early-bird pricing, limited quantities, and exclusive bonuses.
For detailed strategies, see our pre-order marketing strategy guide and pre-order email sequence walkthrough.
Customer communication best practices
Clear communication builds trust and reduces cancellations. Our data shows that approximately 5.4% of pre-orders get cancelled on average, with proper communication helping minimize this rate.
Front-end messaging: Clearly indicate pre-order status on product pages, cart, and checkout. Display estimated delivery dates prominently. If you allow mixed carts (combining pre-order and ready-to-ship items), note that orders may ship in multiple shipments. From our data, 37.9% of stores permit mixed carts, with most merchants preferring isolated pre-order workflows to avoid complicated fulfillment logistics.
Email communication: Send immediate order confirmations, periodic progress updates (every 2-4 weeks for long lead times), and shipping notifications. For charge-later or deposit-balance orders, set up an upcoming charge email to give customers advance notice before their card is charged.
Customer portals: Quality pre-order apps offer customer portals where buyers can view order status, see estimated shipping dates, access payment schedules, and request cancellations, reducing support inquiries while giving customers transparency.

Legal requirements
Understanding pre-order legal obligations protects your business and builds customer trust. We’ve created a pre-order policy guide with free templates to help you draft compliant policies.
In the United States, the FTC’s 30-Day Rule requires you to ship within the timeframe you advertise, or within 30 days if no timeframe is specified. If delays occur, notify customers and offer full refund options.
Be transparent about pre-order status, delivery timelines, payment terms, and cancellation policies. If selling internationally, research requirements for the UK, EU, and Australia. For templates and more detail, use our pre-order policy guide and generator.

Common issues and how to fix them
Payment charge failures: Customer’s vaulted card can fail when you attempt a deferred charge (card expired, cancelled, or insufficient funds). Set up automated emails requesting updated payment information, and provide a customer portal where buyers can u600pdate their cards.
Theme compatibility: If the pre-order button doesn’t display correctly, check that your theme supports Shopify 2.0 app blocks. Contact app support for theme-specific assistance, especially for custom themes.
Fulfillment hold confusion: If pre-order items accidentally ship early, double-check fulfillment hold settings in your app. Set up tag-based workflows if your 3PL does not support fulfillment holds. Some ERPs and 3PLs use “virtual warehouses” for pre-order stock allocation.
Managing delays: Communicate proactively as soon as delays are known. Explain the reason honestly, offer options (wait with bonus incentive, partial refund, or full cancellation), and update estimated delivery dates across all touchpoints.

Measuring pre-order success
Track these metrics to optimize your pre-order strategy over time:
- Conversion rate: Percentage of product page visitors who complete pre-orders
- Pre-order volume: Total orders taken, which validates demand and informs inventory planning
- Average order value (AOV): Revenue per transaction, often higher for pre-orders due to early-bird bundles
- Cancellation rate: Rates above 8-10% may indicate overly long lead times or poor communication
- Email engagement: Open and click rates for pre-order update emails
Integrate with Google Analytics using UTM parameters to track which marketing channels drive the highest pre-order conversions.
Frequently asked questions about Shopify pre-orders
Does Shopify have built-in pre-orders?
Yes, Shopify has a “continue selling when out of stock” checkbox that allows zero-stock products to pass through checkout. However, it only supports charge-upfront models and lacks advanced features like automated customer communication, multiple payment models, and analytics. Most serious pre-order campaigns benefit from dedicated apps.
What payment methods work with Shopify pre-orders?
Shopify Payments and PayPal support all pre-order payment models. Third-party payment gateways often don’t support deferred charging (charge-later models). Shop Pay, Apple Pay, and Google Pay have limitations with certain pre-order types. Shopify automatically hides incompatible payment options at checkout.
Can I offer partial payment or deposits?
Yes, with pre-order apps that support deposit models. Customers pay a percentage upfront (typically 10-50%), with the remaining balance charged when you’re ready to ship. This balances cash flow needs with customer comfort, especially for higher-priced items. See our Shopify deposits page for setup details.
How do I handle pre-order cancellations?
Pre-orders can be cancelled through standard Shopify order cancellation procedures or via your pre-order app. Quality pre-order apps offer customer portals where buyers can request cancellations directly. Your refund policy is at your discretion.
What apps are best for Shopify pre-orders?
Popular options include PreProduct (comprehensive features with all pre-order types listed in this guide), Purple Dot, Amai PreOrder Manager, and PreOrder Globo. Choose based on required payment models, automation needs, and budget. See our buying guide for a full comparison.
Are there legal requirements for pre-orders?
Yes. In the US, the FTC 30-day rule requires shipping within stated timeframes or within 30 days if no timeframe is specified. You must notify customers of delays and offer cancellation options. Other countries have similar consumer protection requirements. See our pre-order legal guide for details by country.
How long should a pre-order period be?
According to our data analyzing over one million pre-orders, 121-150 days represents the most common fulfillment window (28.1%), while 20.6% ship within 30 days. Your timeline should match production realities plus buffer for delays. Shorter is generally better for maintaining customer excitement and reducing cancellations.
Can I mix pre-order and regular products in the same cart?
Yes, although only 37.9% of stores in our dataset permit mixed carts. Many merchants prefer isolated pre-order workflows to avoid complications with their fulfillment processes. However, mixed carts can increase average order value. If you allow mixed carts, place some test pre-orders first to verify your 3PL and ERP handle fulfillment holds correctly.
How do pre-orders affect my Shopify inventory management?
Pre-order apps place fulfillment holds on pre-order items, preventing them from flowing to your 3PL or fulfillment system prematurely. When ready to fulfill, you release holds and orders process normally. Advanced apps integrate with Shopify inventory systems to trigger automatic charging when stock arrives. For more, read our pre-order inventory management guide.
What’s the typical pre-order cancellation rate?
Across our platform, approximately 5.4% of pre-orders get cancelled on average, with 2023 seeing the highest rate at 7.1%. Cancellation rates increase with longer lead times and poor communication. Keep customers engaged with regular updates and realistic delivery estimates.
Should I offer early-bird discounts for pre-orders?
Early-bird discounts (typically 10-20% off) create urgency and reward early commitment. They help gauge initial demand quickly and can accelerate word-of-mouth marketing. Test different discount levels to find the sweet spot between incentivizing purchases and maintaining margins.
How do I prevent pre-order items from shipping early?
Pre-order apps automatically apply fulfillment holds to prevent premature shipping. These holds integrate with Shopify’s fulfillment system, blocking orders from flowing to 3PLs or ERPs until you’re ready. When inventory arrives, you release holds manually or through automated triggers based on inventory levels.

Conclusion
Shopify pre-orders represent a powerful strategy for stores looking to validate demand, improve cash flow, and build marketing momentum around product launches. With over $85.3 million in pre-order revenue processed through PreProduct alone, merchants across industries are leveraging Shopify pre-orders successfully.
The key to running successful Shopify pre-order campaigns comes down to:
- Choosing the right payment model for your product and lead time
- Setting realistic delivery timelines with buffer for delays
- Communicating clearly and frequently with customers
- Marketing strategically to build urgency and maintain momentum
- Measuring performance to optimize future campaigns
Whether you’re launching your first product, managing out-of-stock bestsellers, or building hype for seasonal releases, Shopify pre-orders let you take orders and revenue sooner while keeping customers informed and engaged.
Pre-sell With PreProduct
7 day free trial with all plans