Launched a pre-order with a 60-day ship date, only to realize Shopify’s payment authorization expires in seven days? You’re not alone. The Shopify authorization period is one of the most common operational challenges pre-order merchants face, especially when lead times stretch beyond a week or two.
In this guide, we’ll break down how Shopify’s authorization period works, why it matters for pre-orders, and how to handle pre-orders with lead times that exceed the standard seven-day window. Whether you’re running restock campaigns, made-to-order launches, or seasonal pre-sales, understanding authorization periods helps you choose the right payment strategy for your business.
We’ll cover extended authorization options for Shopify Plus merchants, vaulted card solutions that eliminate time constraints entirely, and the cost implications of each approach. By the end, you’ll know exactly which payment method fits your pre-order model.
What is a Shopify authorization period?
Payment authorization basics
A payment authorization is essentially a hold placed on a customer’s credit card. When someone enters their card details at checkout, the card issuer verifies that funds are available and reserves that amount. The merchant can then capture (collect) those funds later, within a specific timeframe.
This system exists for several reasons. It protects customers from unauthorized charges, reduces fraud risk for card issuers, and gives merchants flexibility in when they collect payment. For example, a merchant might authorize payment immediately but wait to capture until the product ships.
The authorization period is the window during which a merchant can capture an authorized payment. Once this period expires, the hold is released, funds return to the customer’s available balance, and the merchant can no longer collect payment through that original authorization.
Shopify Payments standard authorization period
For most Shopify merchants using Shopify Payments, the standard authorization period is seven days. This means you have seven days from the moment a payment is authorized to capture those funds. If you don’t capture within this window, the authorization expires.
After expiration, the customer’s card is released and you cannot collect payment. The order remains in your Shopify admin, but you’ll need to contact the customer to arrange new payment, either through a new order or by sending a payment link.
This seven-day standard isn’t unique to Shopify. It’s an industry-wide norm set by major card networks like Visa and Mastercard. Most payment processors, regardless of platform, operate under similar constraints.
What happens when an authorization expires
When a Shopify authorization period expires, several things occur. First, the hold on the customer’s card is automatically released by their card issuer. No charge goes through, and the customer sees the pending amount disappear from their statement.
In your Shopify admin, the order status remains but shows that payment wasn’t captured. You’ll see a notification that the authorization has expired. At this point, you have two main options: cancel the order and create a new one with fresh payment details, or contact the customer directly to collect payment through alternative means.
This creates friction for both you and your customer. The customer may be confused about whether their order is still valid. Your team needs to spend time following up, and there’s a risk the customer decides not to complete the purchase. For pre-order merchants with longer lead times, this scenario becomes inevitable unless you plan ahead.
Authorization periods and pre-orders: The core challenge
Why authorization periods matter for pre-orders
Pre-orders often involve lead times that extend well beyond seven days. Whether you’re manufacturing custom products, waiting on supplier shipments, or running seasonal campaigns, 30 to 90-day lead times are common. Understanding authorization periods is essential when setting up Shopify pre-orders, as it directly impacts which payment model you should use.
The standard seven-day Shopify authorization period simply doesn’t align with these timelines. If you authorize payment at checkout for a product that won’t ship for two months, that authorization will expire 53 days before you’re ready to fulfill.
This creates operational complexity. You either need to charge customers upfront (potentially months before they receive anything) or find an alternative payment method that accommodates your timeline. Neither option is ideal without careful planning.
Common merchant scenarios
Consider a fashion brand producing made-to-order pieces with a six-week production cycle. Customers place orders in early September for items shipping in late October. With standard authorization, payment would need to be captured within seven days, forcing the brand to collect funds more than a month before fulfillment.
Or take a furniture maker offering build-to-order pieces with 90-day lead times. Standard authorization is completely incompatible with this model. The authorization would expire 83 days before the product is ready to ship.
Seasonal products present similar challenges. A brand taking holiday pre-orders in September for November delivery faces a 60-day gap between order placement and fulfillment. The seven-day authorization window closes long before products are ready.
Restock pre-orders can work with standard authorization if the restock arrives within a week, but supplier delays are common. A planned seven-day restock can easily stretch to two or three weeks, causing authorization issues.
Extended authorization periods for Shopify Plus merchants
How extended authorization works
Shopify Plus merchants have access to extended authorization periods, a feature that extends the payment capture window from seven days to up to 30 days. This feature launched in October 2020, specifically to address fulfillment delays and give merchants more flexibility.
Extended authorization is available for specific card types: Visa, Mastercard and American Express. Not all cards support extended holds, so even on Shopify Plus, you may encounter cards that revert to the standard seven-day period.
To use extended authorization, manual payment capture must be enabled in your payment settings. Shopify sends automatic notifications one day before an authorization expires, giving you time to capture before losing the hold.
Setting up extended authorization
Navigate to Settings, then Payments in your Shopify admin. Under Payment authorization, select “Manually capture payment for orders.” This enables you to control when payments are captured rather than collecting automatically at checkout.
Once manual capture is enabled, Shopify Plus stores using Shopify Payments automatically gain access to extended authorization for supported card types. There’s no additional setup required beyond enabling manual capture.
You’ll receive email notifications when authorizations are approaching expiration, typically 24 hours before the 30-day window closes. This gives you a final opportunity to capture payment before the hold releases.
Extended authorization fees and limitations
While extended authorization provides more time, it comes with an additional cost. Shopify charges a 1.75% fee when you capture payment after the standard seven-day period. This fee applies on top of your regular credit card processing rates.
For example, if you capture a $100 payment on day 15 (after the seven-day window), you’ll pay your standard Shopify Payments rate (typically 2.9% + 30¢ for online stores) plus the additional 1.75% extended authorization fee. The total comes to $4.95 in fees instead of $3.20.
The 30-day maximum still presents limitations. For pre-orders with longer lead times (60, 90, or 120+ days), even extended authorization isn’t sufficient. You’ll need a different solution.
Card type dependency is another limitation. If a customer’s card doesn’t support extended authorization, you’re back to the seven-day window regardless of being on Shopify Plus.
Vaulted cards: The better solution for long lead time pre-orders
What are vaulted cards and how do they work
Vaulted cards, also called deferred payments, offer a fundamentally different approach. Instead of authorizing payment and racing against a countdown, vaulted card payments securely store customer payment details for future use, with no time limit.
Here’s how it works: At checkout, the customer enters their card details and agrees to a future charge. Shopify or your payment provider (like Stripe) securely stores (vaults) these payment details in a PCI-compliant manner. Later, when you’re ready to fulfill the order, you trigger the charge. The customer’s card is processed at that point.
This eliminates the authorization period problem entirely. Whether your lead time is 30 days, 90 days, or six months, you can charge the customer when it makes sense for your operations and their expectations.
Vaulted card payments became widely available on Shopify in 2022, transforming pre-order operations for merchants who needed charge-later flexibility without authorization period stress.
Vaulted cards vs authorization periods
The differences between standard authorization, extended authorization, and vaulted cards are significant:
| Feature | Standard Authorization | Extended Authorization (Plus) | Vaulted Cards |
|---|---|---|---|
| Time Limit | 7 days | 30 days | Unlimited |
| Additional Fee | Standard rates | +1.75% after day 7 | Standard rates |
| Plan Required | All plans | Shopify Plus only | All plans with Shopify Payments |
| Card Type Support | All | Visa, MC, Amex | All |
| Best For | 1-week lead times | 2-4 week lead times | 30+ day lead times |
Standard authorization works fine for quick turnarounds. Extended authorization suits Shopify Plus merchants with moderate lead times who can absorb the extra fee. Vaulted cards are the most flexible and cost-effective option for longer timelines.
Why 56.4% of pre-orders use vaulted cards
According to data from one million pre-orders, 56.4% of pre-order listings use the charge-later (vaulted card) method, making it the single most popular pre-order payment approach. This isn’t surprising given the flexibility it provides.
Merchants choose vaulted cards because they eliminate authorization expiration anxiety. You’re not watching the clock or manually tracking when to capture payments. The payment details are safely stored until you’re ready.
Customers often prefer charge-later arrangements too. Being charged when the product ships (rather than weeks or months before) feels fairer and builds trust. They know their money isn’t tied up for an extended period before receiving anything.
The data shows 47.8% of pre-orders are charged within 30 days of the order being placed. This means nearly half of all pre-order merchants need a solution that extends beyond the standard seven-day authorization period. Vaulted cards provide that solution without additional fees.
When to use vaulted cards for your pre-orders
Vaulted cards make the most sense when your lead times regularly exceed 30 days. If you’re manufacturing products to order, sourcing from overseas suppliers, or running seasonal campaigns with multi-month gaps, vaulted cards eliminate timing stress.
They’re also ideal when lead times are uncertain or variable. If you’re not confident about exact ship dates, you don’t want to be racing against an authorization deadline. Vaulted cards let you charge when you’re actually ready to fulfill.
Customer expectations matter too. If your audience prefers to pay when products ship rather than months in advance, charge-later pre-orders align with that preference. This is particularly common in sustainable fashion and made-to-order categories where customers understand production takes time.
From a cost perspective, vaulted cards are more economical than extended authorization for longer timelines. You pay standard Shopify Payments rates regardless of when you charge, whereas extended authorization adds 1.75% after day seven.

Alternative payment capture strategies for pre-orders
Charge upfront pre-orders
Charging upfront means capturing payment immediately at checkout. This eliminates any authorization period concerns because you’re not deferring the charge at all.
According to the one million pre-order dataset, 14.9% of pre-orders use the charge-upfront method. This works best when you have high customer trust, shorter lead times (even if beyond seven days), or strong cash flow needs that justify collecting payment early.
The trade-off is customer experience. Charging someone in August for a product arriving in November can feel uncomfortable for customers, particularly if they’re unfamiliar with your brand. Clear communication about payment timing is essential.
Charge-upfront pre-orders work well for restock scenarios where customers are familiar with the product, limited edition launches with high demand, or when you’re offering significant discounts that justify early payment.
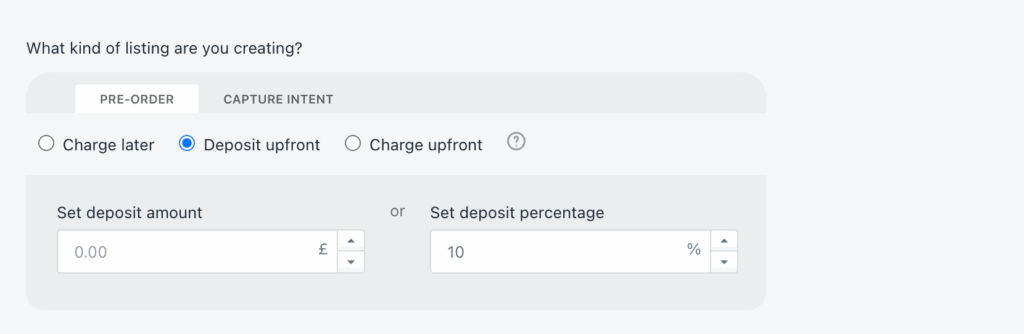
Deposit-based pre-orders
Deposit pre-orders capture a portion of the payment upfront (typically 10-50%) and collect the balance later via vaulted card. This approach accounts for 12.6% of pre-orders based on PreProduct’s dataset.
Deposits work particularly well for high-ticket items where you want to secure customer commitment without charging the full amount months in advance. The upfront deposit reduces cancellation risk while the deferred balance maintains goodwill.
For example, you might take a 30% deposit at checkout and charge the remaining 70% when the product is ready to ship. The deposit is processed immediately (no authorization period issue), and the balance uses vaulted card technology.
This approach balances cash flow needs with customer experience. You get some revenue upfront to fund production or offset supplier costs, while customers appreciate not paying the full amount until fulfillment is imminent.
Payment links and capture-only pre-orders
The capture-only method, used by 28.7% of pre-orders, involves collecting payment information without any upfront charge. You then send a payment link or invoice when ready to fulfill.
This approach offers maximum flexibility for merchants but requires more manual work. You’re essentially managing payment collection separately from the initial order, which can lead to customer drop-off if they don’t complete the payment when invoiced.
Capture-only makes sense for lower-volume merchants, custom orders, or situations where you want to give customers maximum flexibility. It works well when you have strong customer relationships and low risk of non-payment.
The downside is operational complexity and potential revenue loss if customers don’t respond to payment requests. You also need systems in place to track which orders are awaiting payment vs. fully paid.
Third-party payment gateways and authorization periods
Do third-party gateways have longer authorization periods?
One common question is whether switching to a third-party payment gateway (instead of Shopify Payments) provides longer authorization periods. Unfortunately, the answer is generally no.
Authorization period lengths are set by card networks (Visa, Mastercard, etc.), not by Shopify or individual payment processors. The seven-day standard is an industry-wide rule that applies across most processors and platforms.
Certain industries get exceptions. Lodging, car rentals, and cruise lines can hold authorizations for up to 30 days because of the nature of their business. Ecommerce pre-orders don’t fall into these exception categories.
This means whether you use Shopify Payments, Stripe, Authorize.net, or another gateway, you’re generally working within the same seven-day authorization window (with some card-specific variations of 5-10 days).
When third-party gateways make sense
Third-party gateways can still be valuable if they offer vaulted card capabilities or flexible payment capture workflows that suit your needs better than Shopify Payments.
For example, Stripe offers robust APIs for storing payment methods and charging them later, similar to Shopify’s vaulted card functionality. If you’re building custom checkout flows or need specific payment features, a gateway like Stripe or Braintree might provide more flexibility.
The trade-off is that using a third-party gateway instead of Shopify Payments means you lose some Shopify-native features, potentially pay higher transaction fees, and may need more technical setup.
For most merchants, Shopify Payments with vaulted card support provides the simplest solution. But if you have specific requirements or already use a preferred gateway with deferred payment capabilities, that can work too.
How to set up charge-later pre-orders with vaulted cards
Requirements for vaulted card payments
To use vaulted card payments on Shopify, you need Shopify Payments enabled as your payment processor (or PayPal automatic payments). This feature isn’t available with third-party gateways through Shopify’s native checkout.
You’ll need a pre-order app that supports deferred payment functionality. Not all pre-order apps offer charge-later capabilities, so ensure your chosen solution integrates with Shopify’s vaulted card system.
Clear customer communication is essential. Your product pages, checkout flow, and confirmation emails should clearly explain when payment will be collected and what customers can expect.
Step-by-step setup process
Start by enabling Shopify Payments if you haven’t already. Go to Settings > Payments and complete the Shopify Payments setup process.
Next, enable manual payment capture. In Settings > Payments > Payment authorization, select “Manually capture payment for orders” and save your changes.
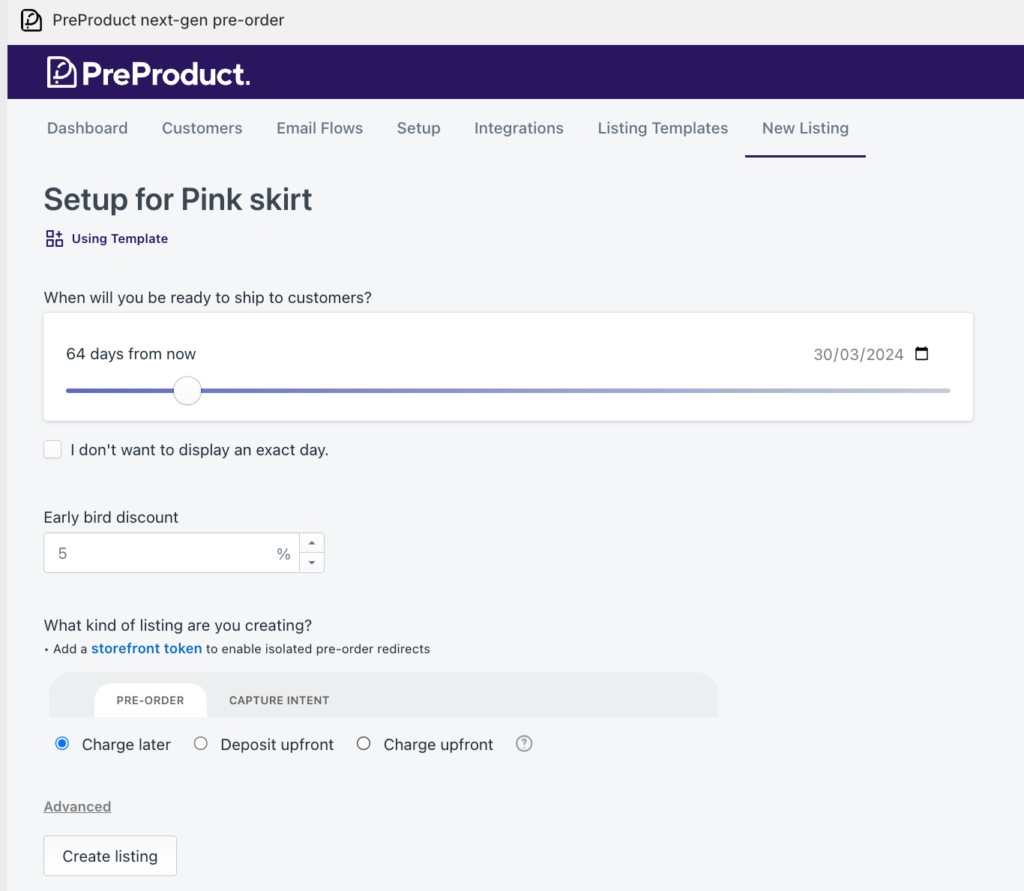
Install a pre-order app with vaulted card support, such as PreProduct. Configure your app to create charge-later pre-order listings for the products you want to offer on pre-order.
Customize your front-end messaging to clearly indicate payment timing. Your product page should state something like: “Your card details will be securely saved. We’ll charge you one week before your estimated ship date of [DATE].”. We have a post here on legal compliance for pre-orders and minimum communication requirements for pre-orders.
Test the entire customer experience. Place a test order, go through checkout, and confirm that payment details are vaulted properly and that you can trigger the charge from your admin when ready.
Ensure your product has the “Continue selling when out of stock” setting enabled in Shopify. This allows customers to purchase even when inventory shows zero, which is necessary for most pre-order setups.
PreProduct’s approach to authorization periods
PreProduct handles vaulted card setup automatically for charge-later and deposit-upfront pre-orders. When you create a pre-order listing, PreProduct configures the necessary settings to vault customer payment details without authorization period limitations.
You can trigger charges individually or set up inventory-based automation. For example, when stock is added to a product in your Shopify admin, PreProduct can automatically charge customers and release fulfillment holds.
Failed payment handling is built in. If a customer’s card declines when you attempt to charge, PreProduct can send dunning emails with clear instructions for updating payment methods, reducing lost revenue from expired cards or insufficient funds.
PreProduct also places automatic fulfillment holds on pre-order items, preventing them from being prematurely shipped before you trigger the charge. This keeps operations clean and prevents the nightmare scenario of shipping products before collecting payment.
Customer communication and authorization periods
Setting clear expectations upfront
Product page messaging is your first opportunity to set expectations. Include clear, specific language about when payment will occur. For example: “Pre-order now, pay when it ships. We’ll charge your card one week before your estimated ship date.”
At checkout, reiterate payment timing in your terms or checkout instructions. Customers should explicitly understand they’re agreeing to a future charge, not an immediate one.
Order confirmation emails should reinforce these details. State clearly: “Your order is confirmed. Your card ending in [######] will be charged on approximately [DATE], one week before your estimated ship date of [DATE].”
The estimated ship date should be visible throughout the customer experience. Consider using date ranges if exact timing is uncertain: “Estimated shipping: Late November 2026” rather than committing to a specific day you might miss.
Handling authorization expirations and failed charges
If you’re using standard authorization and it expires, proactive communication is critical. Contact the customer immediately to explain the situation and request updated payment information.
For vaulted card payments, failed charges are a different challenge. The card might have expired, been canceled, or have insufficient funds. Your pre-order system should offer dunning email flows when charges fail.
Effective failed charge emails include a clear subject line (“Action needed: Update payment for your order”), explanation of what happened, and a simple link to update payment details. Customer portals where buyers can self-serve payment updates reduce support burden significantly.
Set a clear policy for how long you’ll attempt to collect payment before canceling the order. Some merchants try for seven days, others for 14-30 days. Communicate this timeline to customers so they know the urgency.
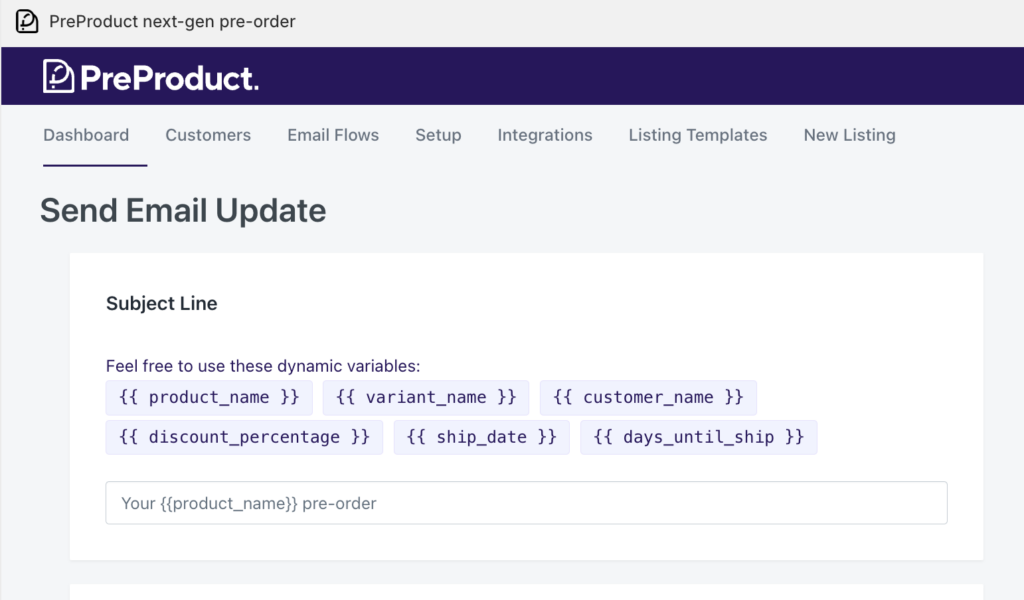
Email sequence best practices
A solid email sequence for charge-later pre-orders includes three potential touchpoints:
Order confirmation: “Thank you for your pre-order. Your card will be charged on approximately [DATE] when your order is ready to ship.”
Charge notification: “Your payment of $[AMOUNT] has been processed and your order is now preparing to ship.” Include tracking information if available, or an estimated ship date.
Failed charge follow-up: If the charge fails, send immediate notification with clear instructions for updating payment details and a deadline for action before the order is canceled.
Authorization periods and your tech stack
How authorization timing affects fulfillment integrations
Pre-orders shouldn’t flow through to your 3PL or fulfillment center until you’ve collected payment and are ready to ship. This is where fulfillment holds become critical.
Shopify’s fulfillment hold status prevents orders from syncing to connected fulfillment systems. For charge-later pre-orders, this hold should remain in place until you trigger the charge and release fulfillment simultaneously.
PreProduct automatically manages this workflow. When you create a charge-later listing, fulfillment holds are applied. When you trigger charges (individually or via automation), PreProduct releases those holds at the same time, allowing orders to flow to your 3PL integration.
Without proper hold management, you risk shipping products before collecting payment, which creates accounting headaches and potential losses if payments subsequently fail.
ERP and inventory management considerations
If you use an ERP or inventory management system connected to Shopify, pre-order status and payment timing should be reflected accurately. Some ERPs only pull “paid” orders, which means charge-later pre-orders won’t appear until payment is captured.
This can be beneficial for cash flow tracking (you only see paid orders in your ERP) or problematic for demand planning (you can’t see full pre-order demand). Understand how your specific ERP integration handles unpaid orders.
PreProduct provides visibility into pre-order demand regardless of payment status. You can view all pre-orders, filter by charge status, and export data for demand planning and ERP integration purposes.
When setting up integrations, test how pre-orders flow through your system. Place test orders with different payment types and verify they appear correctly in your ERP, inventory system, and fulfillment platform at the appropriate times.
Shopify Flow automation and authorization periods
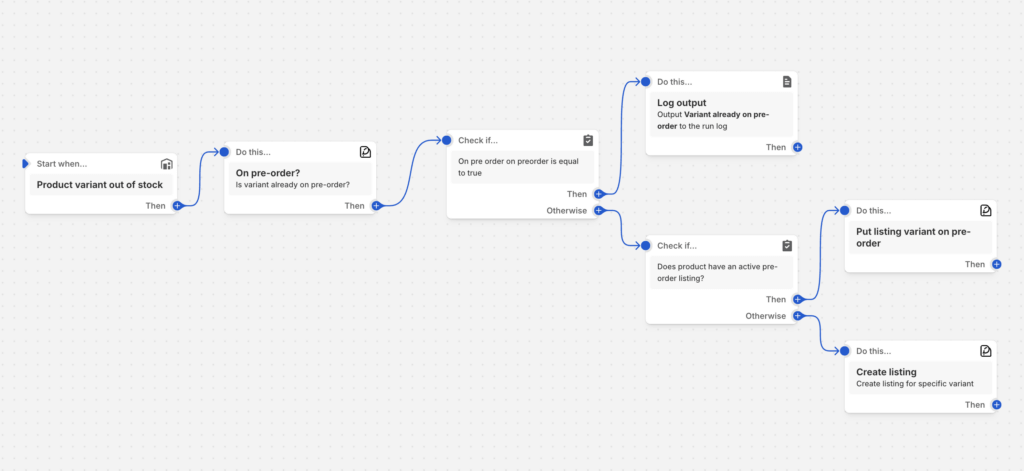
Shopify Flow allows you to build automated workflows based on events in your store. For pre-orders, you can create flows that trigger actions based on payment capture timing.
For example, you might build a flow that automatically tags orders when payment is captured, triggering a fulfillment workflow or customer notification sequence. Or you could create flows that alert your team when authorizations are approaching expiration.
PreProduct offers 15+ Shopify Flow actions specifically for pre-orders, allowing you to automate charge triggers, fulfillment releases, customer notifications, and more based on inventory changes or custom conditions.
Flow integration lets you connect pre-order events to the rest of your Shopify ecosystem. Tag customers who complete pre-orders, trigger email campaigns in Klaviyo when charges succeed, or update inventory systems when pre-order limits are reached.
Cost analysis: Authorization strategies compared
Standard 7-day authorization costs
If you can fulfill within seven days and capture payment within the standard authorization period, you’ll pay Shopify Payments’ standard rates with no additional fees. For most merchants, this is 2.9% + 30¢ per transaction for online orders.
On a $100 order, standard fees total $3.20. There’s no additional cost for authorization, as long as you capture within the seven-day window.
The risk with standard authorization isn’t financial (if you meet the deadline), it’s operational. Miss that seven-day window and you lose the authorization, requiring manual follow-up and potentially losing the sale entirely.
Extended authorization costs (Shopify Plus)
Shopify Plus merchants capturing payment between days 8-30 pay an additional 1.75% fee on top of standard credit card processing fees. This fee only applies to the capture amount, not to refunds or partial captures.
For a $100 order captured on day 15, you’d pay the standard 2.9% + 30¢ ($3.20) plus the 1.75% extended authorization fee ($1.75), totaling $4.95 in payment processing fees.
For a $500 order captured on day 20, standard fees are $14.80 (2.9% + 30¢) plus $8.75 (1.75%), totaling $23.55 in fees.
Extended authorization makes financial sense if you’re on Shopify Plus, need the 8-30 day window, and the 1.75% fee is acceptable for your margins. For lower-margin products or longer timelines, vaulted cards are more cost-effective.

Vaulted card costs
Vaulted card payments using Shopify Payments incur only the standard credit card processing fees, regardless of when you trigger the charge. There’s no authorization period fee, no extended authorization fee, no time-based penalty.
A $100 order charged via vaulted card on day 60 costs exactly the same as one charged on day 1: 2.9% + 30¢ = $3.20 in fees.
A $500 order charged via vaulted card 90 days after the initial order costs: 2.9% + 30¢ = $14.80 in fees, compared to $23.55 if you’d used extended authorization beyond day 7.
The cost advantage of vaulted cards increases as your lead time extends. For timelines beyond 30 days, vaulted cards are the only option that doesn’t require upfront payment or manual reinvoicing.
Choosing the right payment strategy for your pre-orders
Decision framework
Choosing the right payment approach depends on several factors: your typical lead times, whether you’re on Shopify Plus, your cash flow needs, customer expectations, and operational preferences.
Use standard 7-day authorization when your lead time is consistently under seven days, you can fulfill quickly and predictably, and you want to avoid additional setup complexity.
Use extended authorization (Shopify Plus) when your lead time falls between 8-30 days, you’re already on Shopify Plus and have access to this feature, and you’re comfortable paying the 1.75% fee for the convenience of a longer capture window.
Use vaulted cards (charge-later) when your lead time regularly exceeds 30 days, your lead time is uncertain or variable, you want to charge customers closer to ship date rather than months in advance, your customers prefer “pay when ships” models, or you want the most cost-effective option for long timelines.
Use charge-upfront when you need cash flow immediately to fund production, you have high customer trust and brand familiarity, you’re offering significant discounts that justify early payment, or you’re running limited edition or restock campaigns where customers expect immediate charges.
Use deposits when you’re selling high-ticket items where full upfront payment feels like too much, you want to secure customer commitment while maintaining goodwill, or you need some cash flow upfront but want to defer the bulk of payment until closer to fulfillment.
Real merchant examples
A fashion brand with six-week production cycles uses vaulted cards to charge one week before shipping. Customers appreciate not paying months in advance, and the brand avoids authorization period stress. Cash flow is predictable because they charge in batches as production completes.
A made-to-order furniture maker with 90-day lead times uses deposit pre-orders, collecting 30% upfront to secure commitment and fund materials, then charging the remaining 70% via vaulted card when pieces are ready to ship. This balances cash flow needs with customer experience.
A Shopify Plus merchant running seasonal products with 30-day lead times uses extended authorization. The 1.75% fee is acceptable for their margins, and the convenience of a longer capture window without needing to set up vaulted card workflows fits their operations.
A fast-moving restock campaign with 10-day lead times uses standard 7-day authorization paired with expedited fulfillment. Products typically ship within six days, allowing them to capture within the authorization window without issues.
Conclusion
The Shopify authorization period is a fundamental constraint that affects how you structure pre-order payments. The standard seven-day window works fine for quick fulfillment, but becomes a significant challenge as lead times extend.
Shopify Plus merchants gain access to extended authorization periods up to 30 days, though this comes with an additional 1.75% fee after day seven. For moderate lead times (8-30 days) and merchants already on Plus, this can be a convenient solution.
Vaulted cards represent the most flexible and cost-effective approach for longer pre-order timelines. With no authorization period limitations and no additional fees, charge-later pre-orders let you collect payment when it makes sense for your operations and your customers. The data backs this up: 56.4% of pre-orders use a vaulted card pre-order method, making it the most popular choice among merchants.
Understanding these options helps you choose the payment strategy that aligns with your lead times, cash flow needs, customer expectations, and operational complexity tolerance. There’s no single right answer, only the right answer for your specific business model.
Take stock of your typical pre-order lead times, evaluate the costs of different approaches, consider what your customers prefer, and test your chosen method end-to-end before launching. Pre-orders are powerful for capturing demand early and reducing inventory risk. Don’t let authorization period confusion hold you back from leveraging them effectively.
PreProduct handles charge-later, deposit, and charge-upfront pre-orders natively on Shopify, with built-in vaulted card support and no authorization period limitations. If you’re ready to start taking pre-orders on Shopify without worrying about authorization windows, explore how PreProduct can help streamline your pre-order operations.
Video
Pre-sell With PreProduct
7 day free trial with all plans