Intro
Around 30% of cart abandonment happens because customers can’t afford to pay the full price upfront. Whether you’re launching a new product, restocking bestsellers, or selling high-ticket items, offering flexible payment options can be the difference between a lost sale and a conversion.

Shopify payment plans give your customers the flexibility to pay over time while you maintain control over cash flow. From native solutions like Shop Pay Installments to custom deposit structures for pre-orders, this guide breaks down every option available, when to use each one, and how to implement them in your store.
We’ll cover Shop Pay Installments, third-party payment plan apps, and pre-order specific payment strategies. By the end, you’ll know exactly which payment model fits your products, lead times, and business goals.

What are payment plans
Shopify payment plans let customers split purchases into multiple payments instead of paying the full amount upfront. These payment structures come in several forms, each designed for different business needs and customer preferences.
Types of payment plans
Buy-now-pay-later Installments: Customers pay in 2-4 equal installments over weeks or months, i.e. “buy now, pay later” services (BNPL). Shop Pay Installments is Shopify’s native solution for this, partnering with Affirm to offer interest-free or low-interest payment options.
Split Payments: Customers use multiple payment methods for a single transaction, like paying part with a credit card and part with a gift card. This is primarily available for Shopify Plus merchants or through Shopify POS for in-person sales.
Deposits: You collect a percentage upfront, typically 20-50%, then charge the remaining balance later. This works well for pre-orders, made-to-order items, or custom products where full payment isn’t necessary until the item ships.
Multi-Step Payment Plans: Customers pay according to a custom schedule you or they define, spreading payments across multiple charges. For example, a $1,200 item could be split into 6 $200 payments over six months. Similar to BNPL Installments, but with more flexibility.
Why Payment Plans Matter for Shopify Merchants
Higher Conversion Rates: Merchants offering BNPL Installments saw between 20-40% increases in average order value according to Shopify’s own data. When customers can afford to buy now and pay later, they’re more likely to complete checkout.
Reduced Cart Abandonment: Shop Pay Installments reduces abandoned carts by 28% compared to third-party buy now, pay later solutions. The familiar, trusted Shop Pay interface removes friction at checkout.
Access to Higher-Ticket Purchases: Payment plans make expensive items accessible to more customers. A $800 purchase becomes four $200 payments, opening your products to buyers who couldn’t afford the full price upfront.
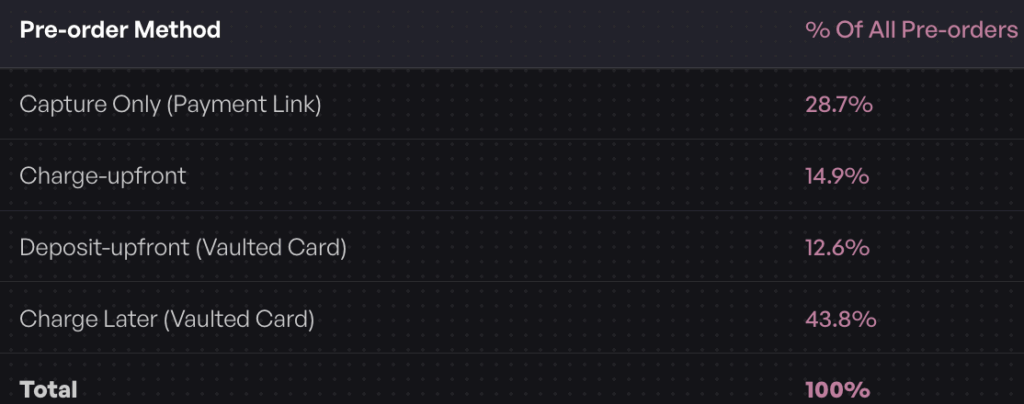
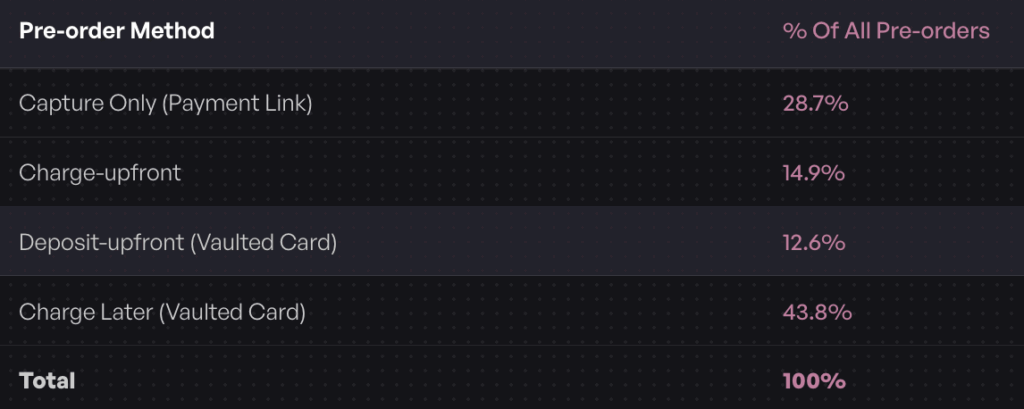
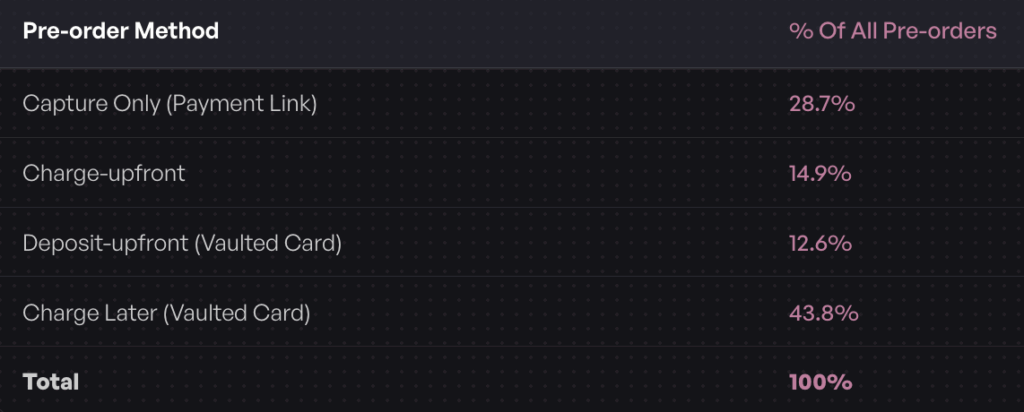
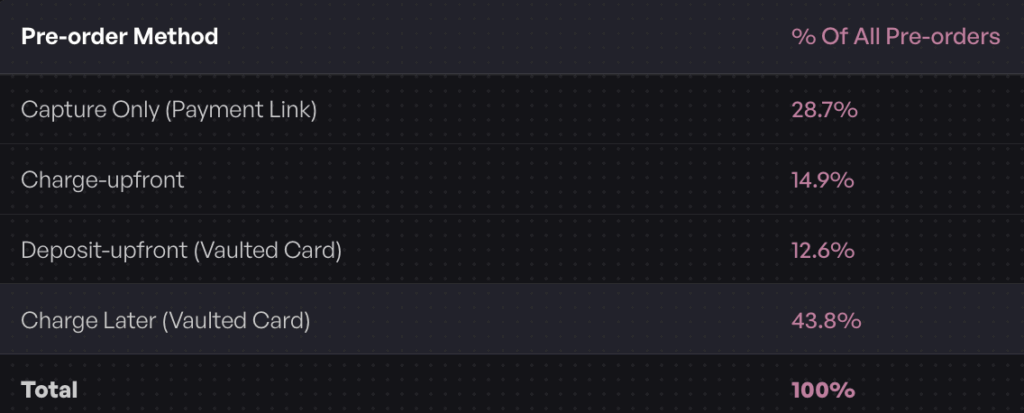
Improved Cash Flow for Pre-orders: For products with long lead times, taking deposits or deferred payments lets you validate demand and secure revenue before investing in inventory. Based on data from over 1 million pre-orders, 43.8% of merchants use charge-later models where no payment is taken upfront.
Ways to offer payment plans
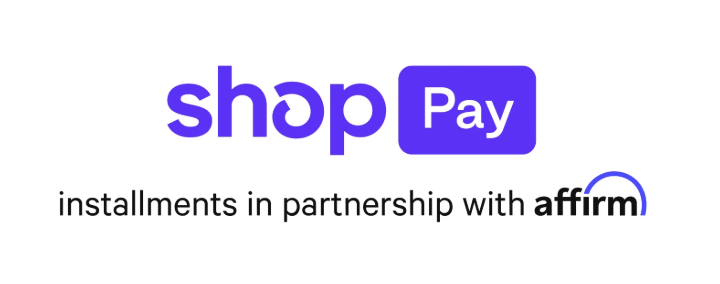
1. Shop Pay Installments
Shop Pay Installments is Shopify’s built-in buy now, pay later option, powered by Affirm. It’s the simplest way to offer Shopify payment plans if you’re based in the US, Canada, or UK and use Shopify Payments.
How Shop Pay Installments Works
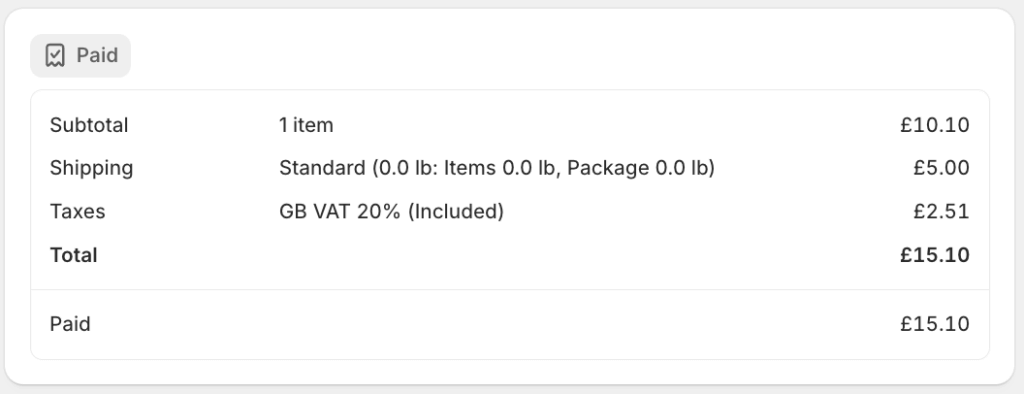
Customers see installment options directly on product pages and at checkout. They can choose to split their purchase into 2 or 4 interest-free payments every two weeks for orders between $50 and $1,000. For larger purchases, monthly installment plans are available.
The merchant receives the full payment upfront from Affirms, even though the customer pays over time. This means you’re not exposed to the risk of failed payments or defaults. Affirms handle all collections, customer communication, and payment processing.
Payment Options Available
Standard Package (available to all eligible merchants):
- 2 or 4 interest-free payments every 2 weeks
- Monthly installments up to 12 months
- Order values between $50 and $17,500
Premium Package (available for higher-volume merchants):
- All standard options
- Interest-free monthly payments up to 12 months
- Monthly installments with interest up to 24 months
- Order values up to $30,000
- Interest rates from 10-36% APR for monthly plans
Eligibility Requirements
To offer Shop Pay Installments, you need to meet these criteria:
- Store based in the United States, Canada, or United Kingdom
- Selling in USD, CAD, or GBP
- Shopify Payments activated
- Shop Pay enabled on your store
For Shopify POS, you’ll need version 8.4.0 or later to accept installments in person using QR codes.
Merchant Benefits
Performance Metrics: One in four merchants saw 50% average order value increases after enabling Shop Pay Installments. Repeat customers using installments complete checkout 30% faster than first-time users.
No Risk to Merchant: Affirms advance the full payment to you immediately. If a customer defaults on their installment plan, that’s Affirms’ problem, not yours. You’re paid in full regardless of what happens downstream.
Seamless Integration: Shop Pay Installments appears automatically at checkout once enabled. No code changes, no theme modifications, no additional setup beyond activating the feature in your Shopify Payments settings.
Limitations to Consider
Geographic Restrictions: Only available in the US, Canada, and UK. If you serve international customers, they won’t see installment options.
Requires Shop Pay Adoption: Customers must use Shop Pay at checkout. If they prefer other payment methods, they can’t access installments through this option.
Not Ideal for Long Pre-Order Lead Times: Shop Pay Installments charges customers immediately and spreads the payments over weeks or months. For pre-orders with 3-6 month lead times, this means customers pay in full long before they receive the product.
Limited Customization: You can’t adjust the installment terms, deposit amounts, or payment schedules. Affirms control the structure based on order value and customer creditworthiness.
2. Third party payment gateway apps
If Shop Pay Installments doesn’t fit your needs, third-party Shopify payment plan apps offer more flexibility. These solutions let you customize installment terms, offer deposit options, and control payment timing in ways the native Shopify option doesn’t allow.
When to Use Apps Instead of Shop Pay Installments
You Need Custom Installment Schedules: Apps let you define exactly when payments happen. Want to charge customers every three weeks instead of every two? Need payments triggered by specific dates or events? Apps give you that control.
Pre-order Specific Requirements: For products with extended lead times, you may want to take a deposit now and charge the balance only when the item ships. Shop Pay Installments doesn’t support this charge-later approach.
You Want Merchant Control Over Terms: With apps, you set the rules. Define deposit percentages, choose how many installments to offer, and decide whether to charge interest or fees.
Payment Flexibility Beyond Credit: Some apps support payment plans for any payment method your store accepts, not just credit cards through Shop Pay.
Non‑Shopify native apps
These solutions break out of Shopify’s native checkout flow entirely, using external payment processors and custom checkout pages.
Example: Paythen (via Stripe)
- Pricing: 2% transaction fee, no monthly subscription
- How it works: Uses Stripe outside Shopify checkout, connected via Zapier
- Best for: Maximum flexibility when breaking outside of Shopify is acceptable
- Technical note: Email-based Zapier workflow due to Shopify API limitations
Trade-offs:
- ✅ Fully customizable payment schedules
- ✅ Works without Shopify Payments
- ❌ Breaks native Shopify checkout experience
- ❌ Orders processed outside Shopify’s native flow
- ❌ More complex setup and maintenance
How to Choose the Right App
Consider Your Product Mix: If you primarily sell in-stock items with immediate shipping, standard installment apps work well. For pre-orders or made-to-order products, you need apps that support deposits and charge-later functionality.
Payment Schedule Flexibility: Do you need simple 2-4 installments, or do you want to define custom schedules? Apps like Paythen and PreProduct offer flexibility, while others provide preset options.
Integration Requirements: If you use Shopify Payments and want the tightest integration, look for apps that use Shopify’s purchase options API. If you use Stripe or other gateways, apps like Paythen are designed for that stack.
3. Third-party invoicing apps
These apps work by sending invoice emails to customers outside the Shopify checkout flow. Customers receive payment links via email and complete payment separately from your store.
Example: SPD Split Payment & Deposit
- Pricing: $17.95/month with 7-day free trial
- How it works: Customers receive email invoices for balance payments
- Best for: Simple deposit workflows where email invoicing is acceptable
- Limitation: Requires customers to take action on emailed payment links
Trade-offs:
- ✅ Works with Shopify native payment gateway
- ✅ Simple setup
- ❌ Customer friction (separate email/link process)
- ❌ Higher risk of non-payment if customers ignore emails
4. Third-party Shopify Purchase Options apps
These apps leverage Shopify’s native purchase options API, keeping everything within Shopify’s checkout while adding flexible deferred‑charge payment capabilities.
Example: PreProduct
- Pricing: Fixed or usage‑based (see PreProduct’s current pricing)
- How it works: Uses Shopify’s purchase options to vault the customer’s payment method, and then trigger charges on an ad‑hoc or scheduled basis.
- Native integration: Orders stay in Shopify admin, native checkout maintained
- Payment plans: Optional multi‑step payment plan offered for products on pre‑order.
Advantages:
- ✅ Fully native Shopify experience
- ✅ Orders appear in Shopify admin immediately
- ✅ Works with Shopify checkout, product pages, and cart
- ✅ Supports charge‑later (vaulted cards) and deposits natively, so further customer actions are not required
- ✅ Optional payment plans feature on top of base payment models
- ✅ No customer friction (stays in native flow)
- ❌ Multi‑step payment plans are only supported for Shopify Plus merchants.
- ❌ Currently only supports products on pre‑order, not in‑stock items
Best for: Merchants who want flexible payment options that don’t require further customer actions while maintaining Shopify’s native checkout experience, especially for pre‑orders.
Payment Plans for Pre-orders
Pre-orders have different payment needs than in-stock products. Lead times matter and your payment model directly impacts both conversion rates and cash flow.
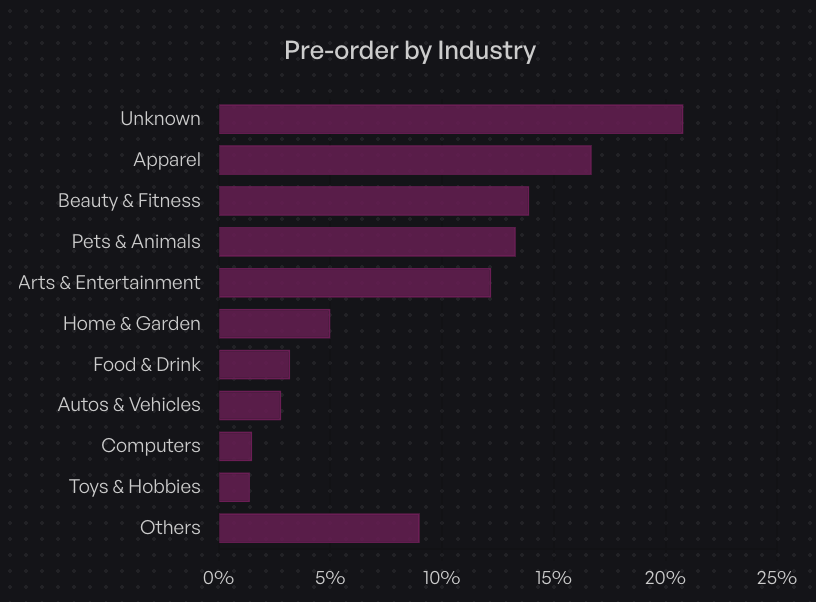
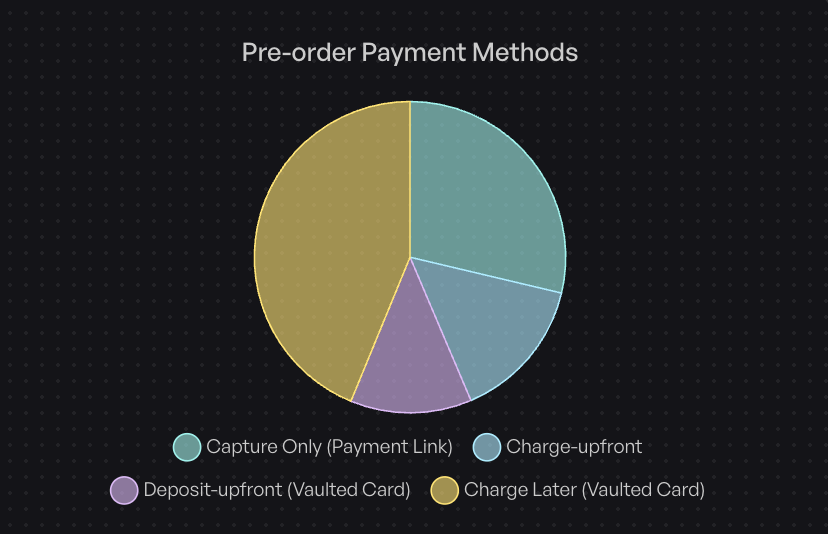
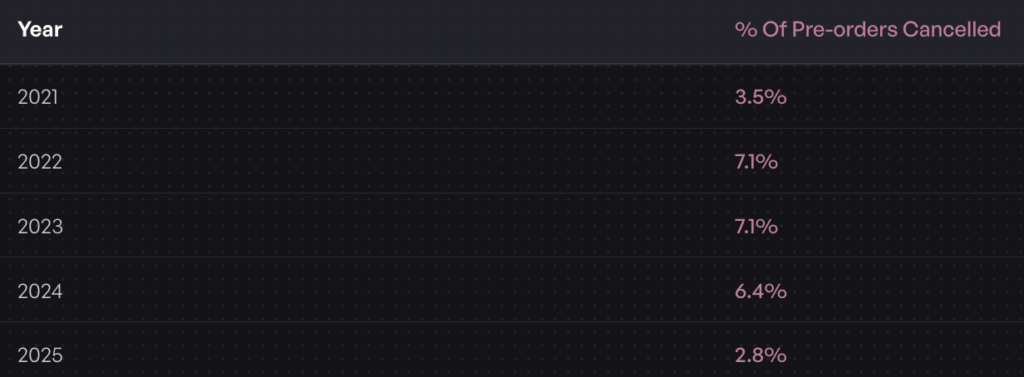
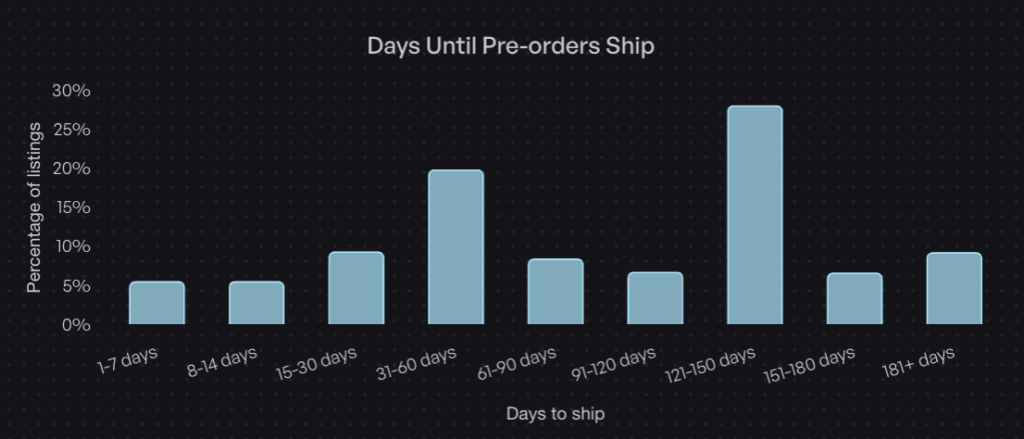
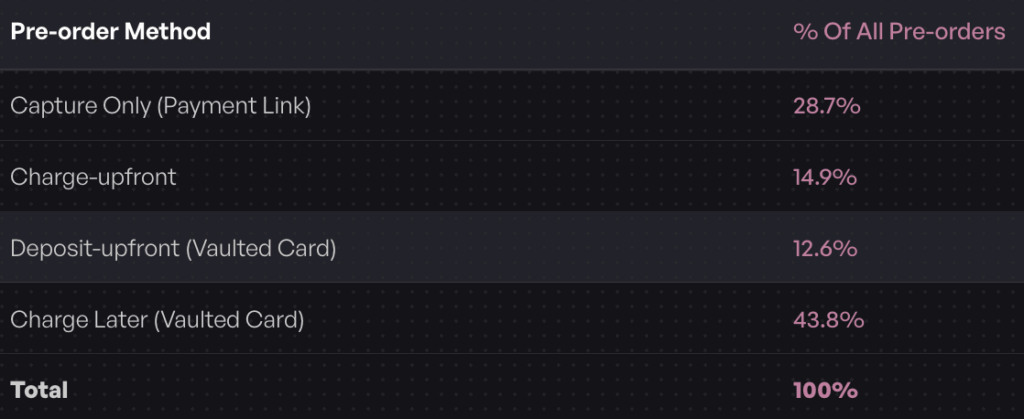
Data from over 1 million pre-orders representing $85 million in sales shows exactly how merchants structure Shopify payment plans for products that aren’t ready to ship yet.
Two Core Pre-Order Payment Models
When it comes to pre-orders, two payment models dominate because they work within Shopify’s native checkout while giving you flexibility on when to collect payment.
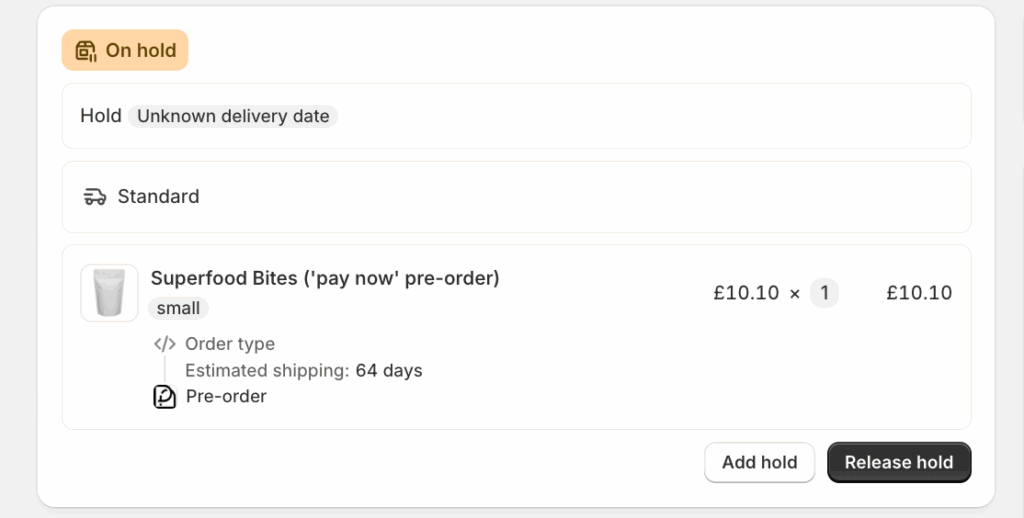
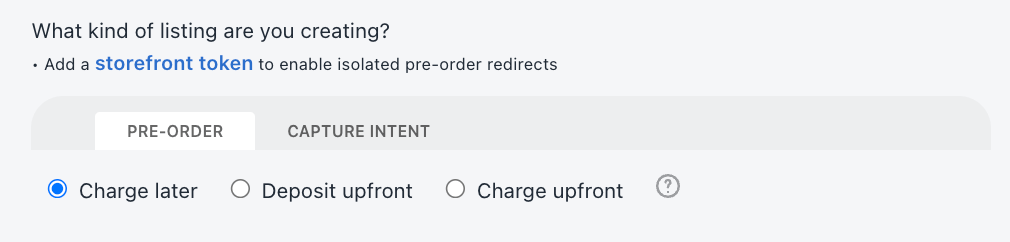
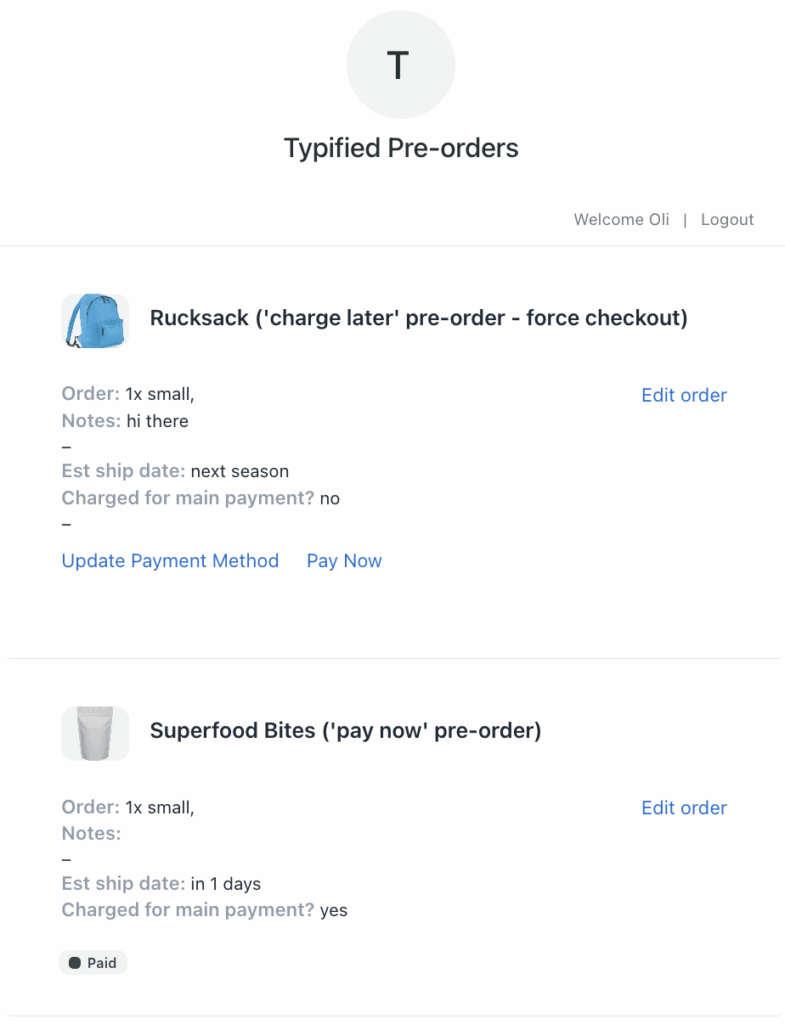
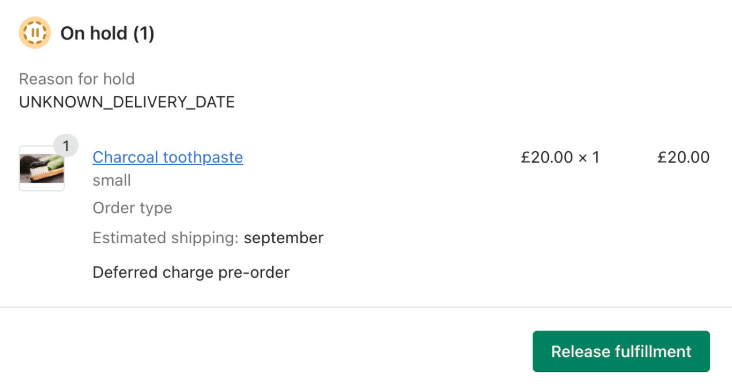
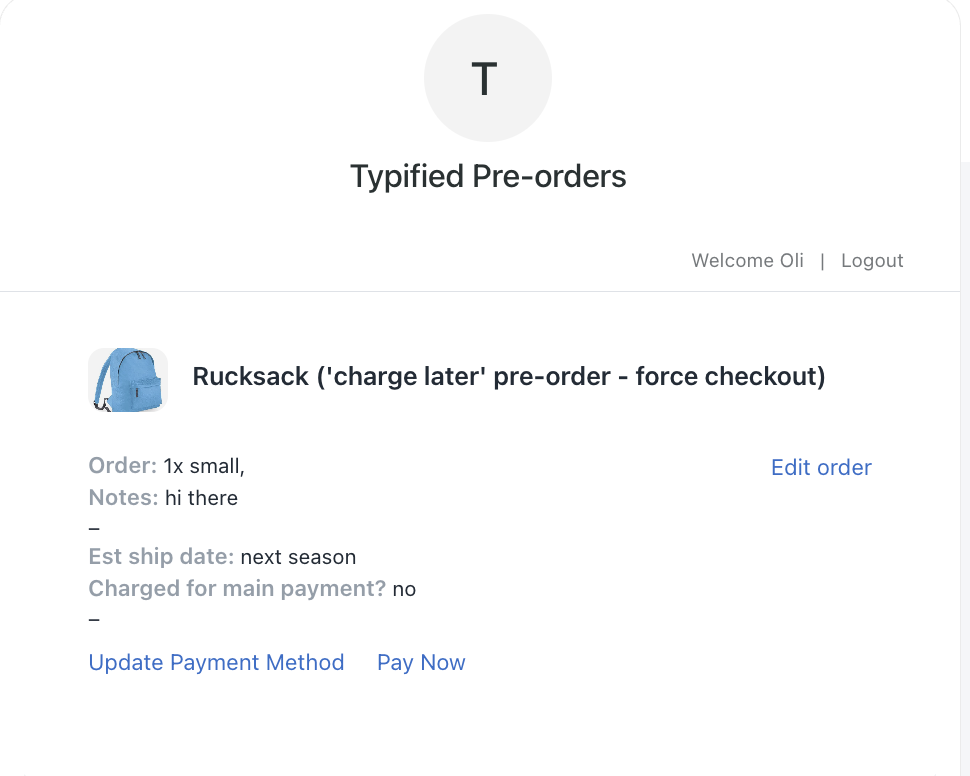
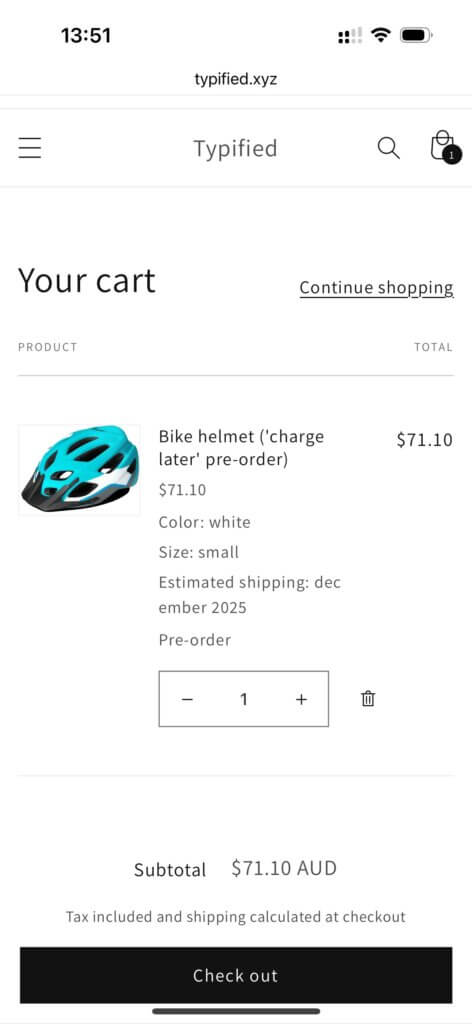
1. Charge-Later (Vaulted Card)
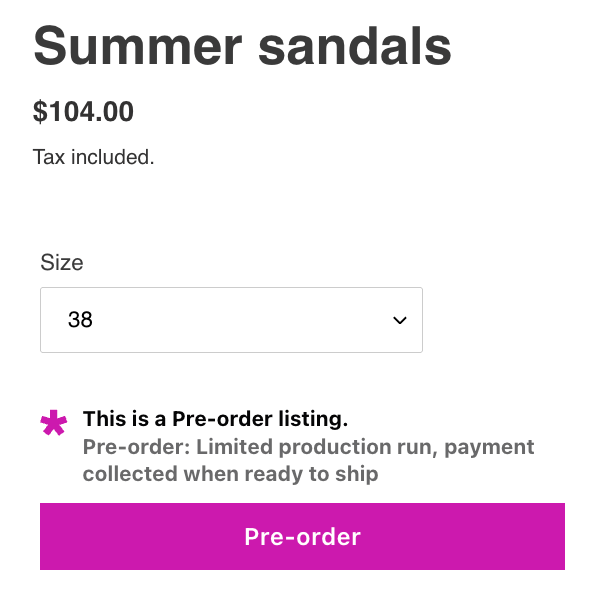
What It Is: Customers complete checkout without paying anything upfront. Their payment method is securely stored (vaulted), and you charge them when the product is ready to ship.
Market Adoption: 43.8% of pre-order listings use charge-later, making it the most popular payment model for pre-orders.
Best For:
- Products with long lead times (3+ months)
- New product launches where you want maximum conversion
- Situations where you’re validating demand before committing to production
- Customers hesitant to pay for something they won’t receive for months
Technical Requirement: Only works with payment gateways that support vaulted cards, which means Shopify Payments or PayPal. Other payment providers don’t offer the ability to securely store card details and charge them later without customers re-entering information.
Why It Works: Removing the upfront payment barrier maximizes conversion rates. Customers commit to the purchase without the psychological friction of paying today for something that ships in four months. You validate demand before investing in inventory.
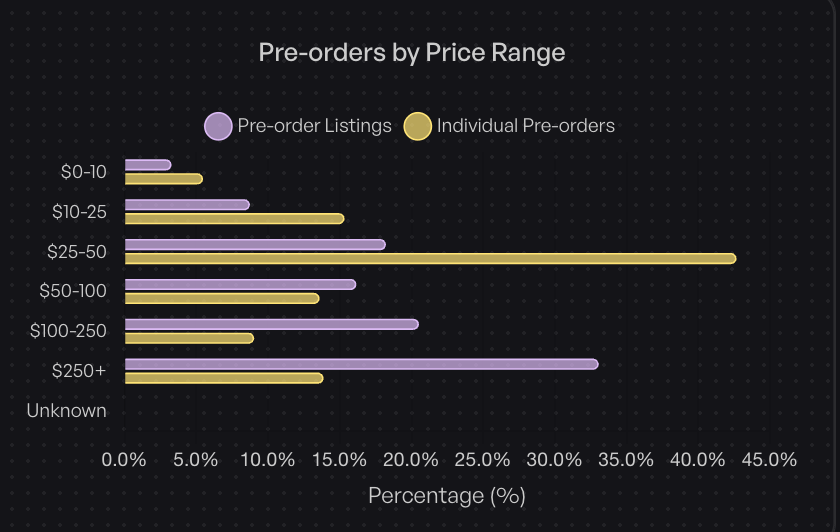
Data Insight: 75,781 pre-order listings in our dataset used charge-later. The vaulted card option wasn’t available until 2022, explaining its rapid adoption in recent years as merchants discovered its benefits.
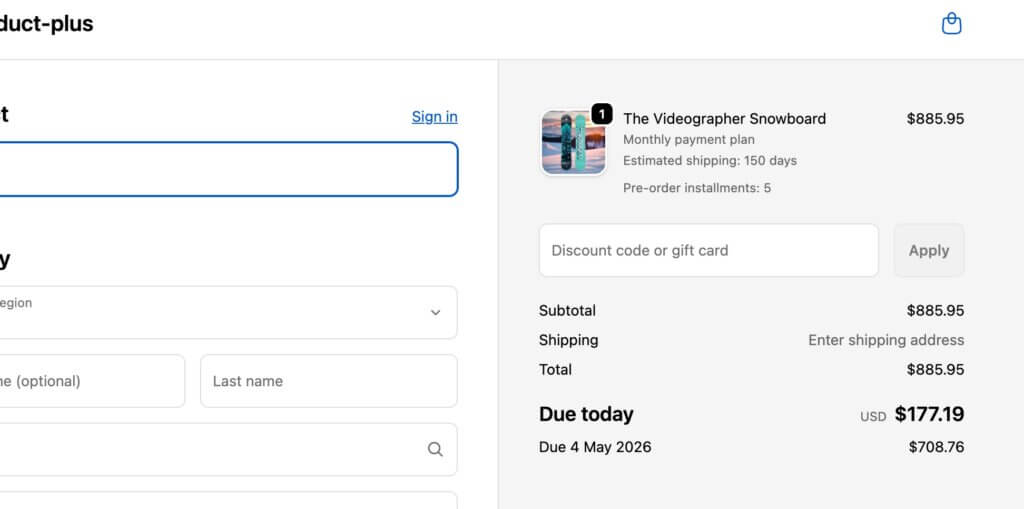
With Payment Plans: You can split the final charge into multiple installments instead of charging the full amount when ready to ship. For example, charge 50% when stock arrives, then 50% one month later.
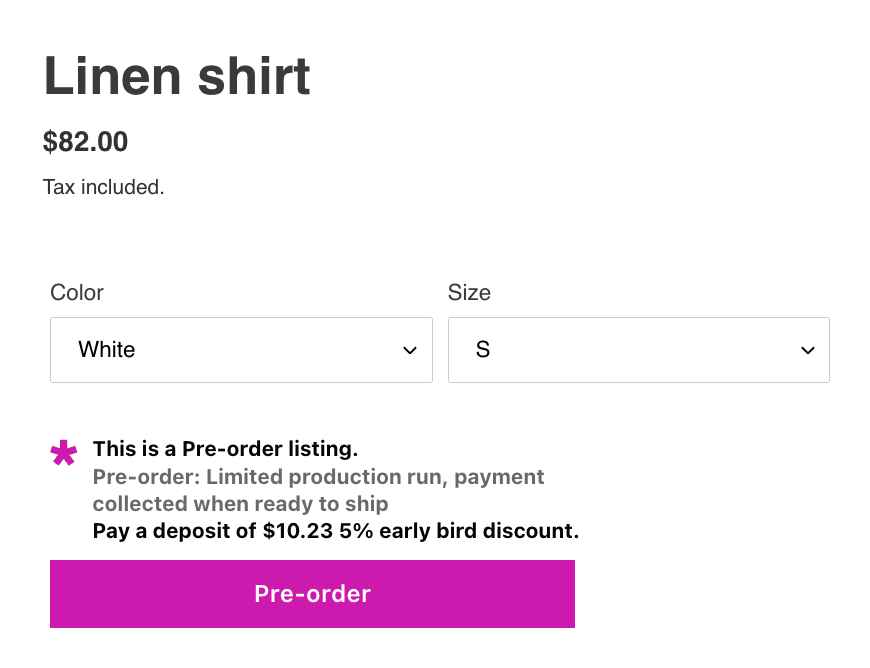
2. Deposit Upfront (Partial Payment)
What It Is: Collect a partial payment during checkout, typically 10-50% of the product price, then automatically charge the remaining balance when items are ready to ship.
Market Adoption: 12.6% of pre-order listings use deposits.
Best For:
- High-ticket items ($500 and above)
- Custom or made-to-order products
- Situations where you need cash flow to start production
- Products where customer commitment matters more than maximizing conversion
Why It Works: Deposits secure customer commitment and provide working capital to fund production. A 30% deposit on a $1,000 item gives you $300 per order to invest in materials or manufacturing before the product ships.
Example: A furniture maker selling custom pieces for $2,500 collects a 40% deposit ($1,000) at order time. This covers materials and commits the customer. The remaining $1,500 is charged when the piece is completed three months later.

With Payment Plans: You can split either the deposit or the remaining balance into installments. For example, take 25% upfront, then charge the remaining 75% across three monthly payments.
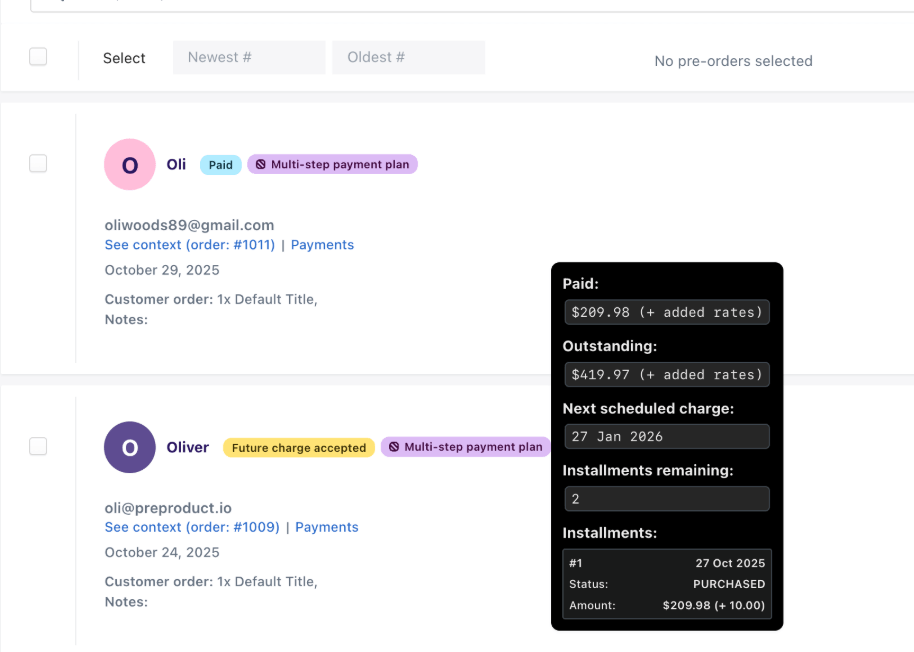
Multi-Step Installment Plans for Pre-orders
Beyond the above pre-order models, you can offer customers the option to split pre-order payments into multiple installments that trigger automatically on a schedule you define. The payment method is vaulted at checkout, so no further customer actions are required.
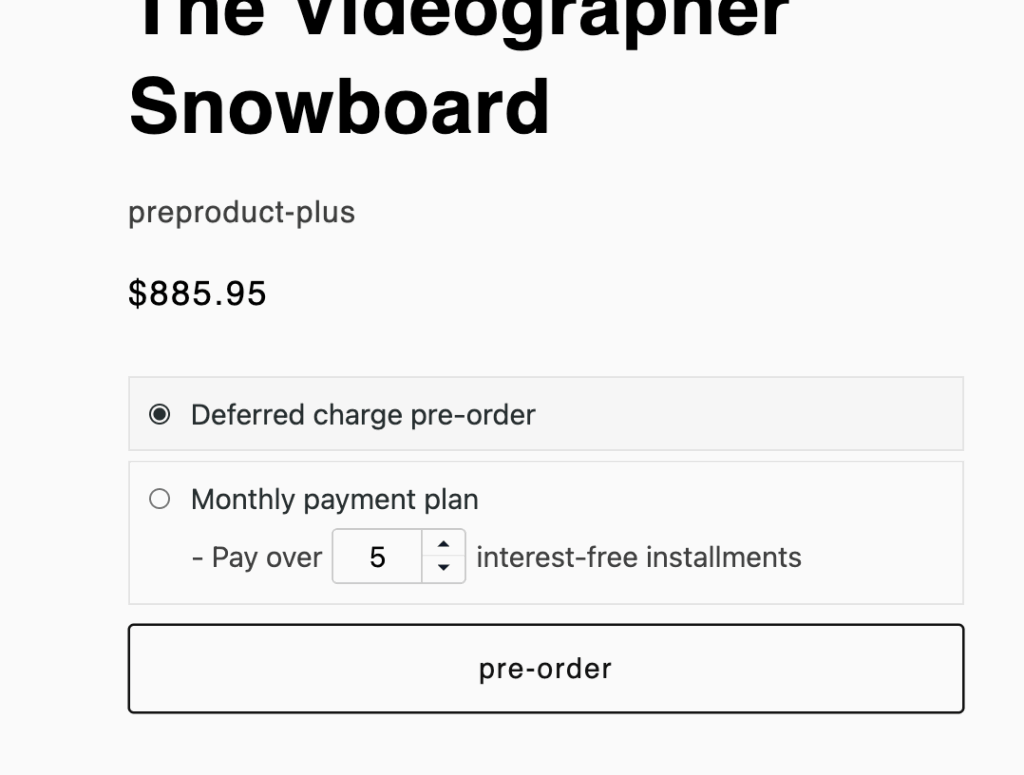
How It Works: Customers pay in 2, 3, 4, or more installments. The system automatically processes charges based on your configured frequency: daily, weekly, or monthly intervals.
Example Schedule:
- Order placed: $250 deposit (25%)
- 30 days later: $250 payment
- 60 days later: $250 payment
- 90 days later: $250 final payment
- Total: $1,000 product paid over three months
Customer Experience: Customers see their full payment schedule upfront. A customer portal shows payment history, upcoming charges, and estimated shipping dates. They can also opt to pay early for a discount if you enable that feature.
Technical Requirement: Multi-step payment plans require more sophisticated payment infrastructure. On Shopify, this functionality is available for Shopify Plus stores. PreProduct also offers this for non-Shopify platforms.
Best For: High-ticket items ($1,000+) where even a 30-40% deposit is a significant amount, or alternatively for price sensitive customers who prefer to spread the cost over time.
Choosing Between Charge-Later and Deposits
Here’s how to decide which primary pre-order payment model fits your situation:
Choose Charge-Later When:
- ✅ Lead times are 1+ months (long wait for customers)
- ✅ You want maximum on-site conversion (no upfront payment barrier)
- ✅ You’re validating demand before committing to production
- ✅ Cash flow for production isn’t needed immediately
- ✅ You’re comfortable with vaulted card technology (Shopify Payments or PayPal)
Example: New product launch with 4-month lead time. You want to validate demand without asking customers to pay today for something that ships in the fall.
Choose Deposits When:
- ✅ High-ticket items ($500+) where commitment matters
- ✅ You need working capital to start production
- ✅ Made-to-order or custom products
- ✅ You want to reduce refund/cancellation risk
- ✅ Lead times are 1+ months and you need cash flow before shipping
Example: Custom furniture at $2,500. A 40% deposit ($1,000) covers materials and commits the customer. You charge the remaining $1,500 when the piece is completed three months later.
Offer multi-step payment plans When:
- ✅ Order values exceed $1,000
- ✅ You want to split charges across multiple dates
- ✅ Customers request installment options
- ✅ You’re on Shopify Plus or using an app that supports this
Technical Considerations for Shopify Payment Plans
Understanding the technical requirements behind payment plans helps you avoid implementation issues and choose solutions that actually work with your stack.
Vaulted Card Technology Explained
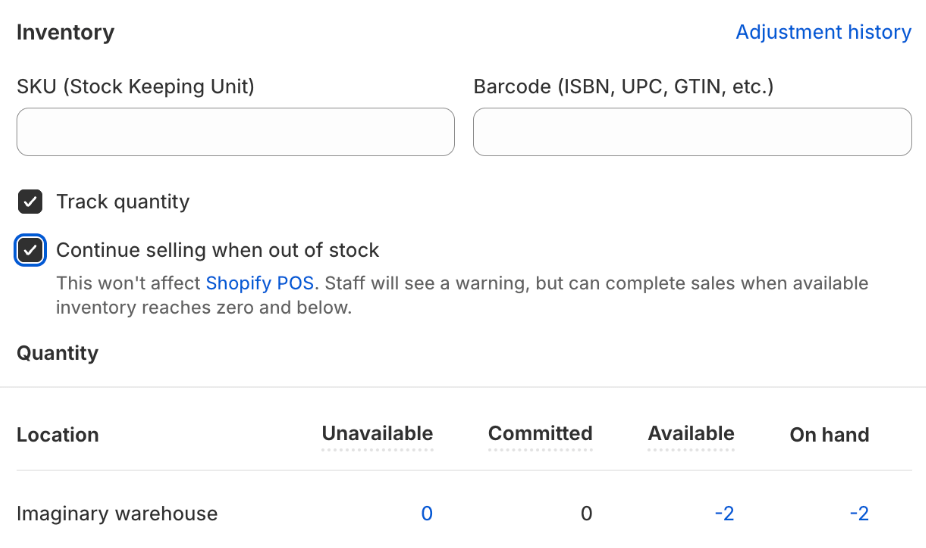
A vaulted card is a securely stored payment method that can be charged at any future date without the customer re-entering their information. This is in contrast to traditional authorization holds, which have a 7-30 day expiration window.
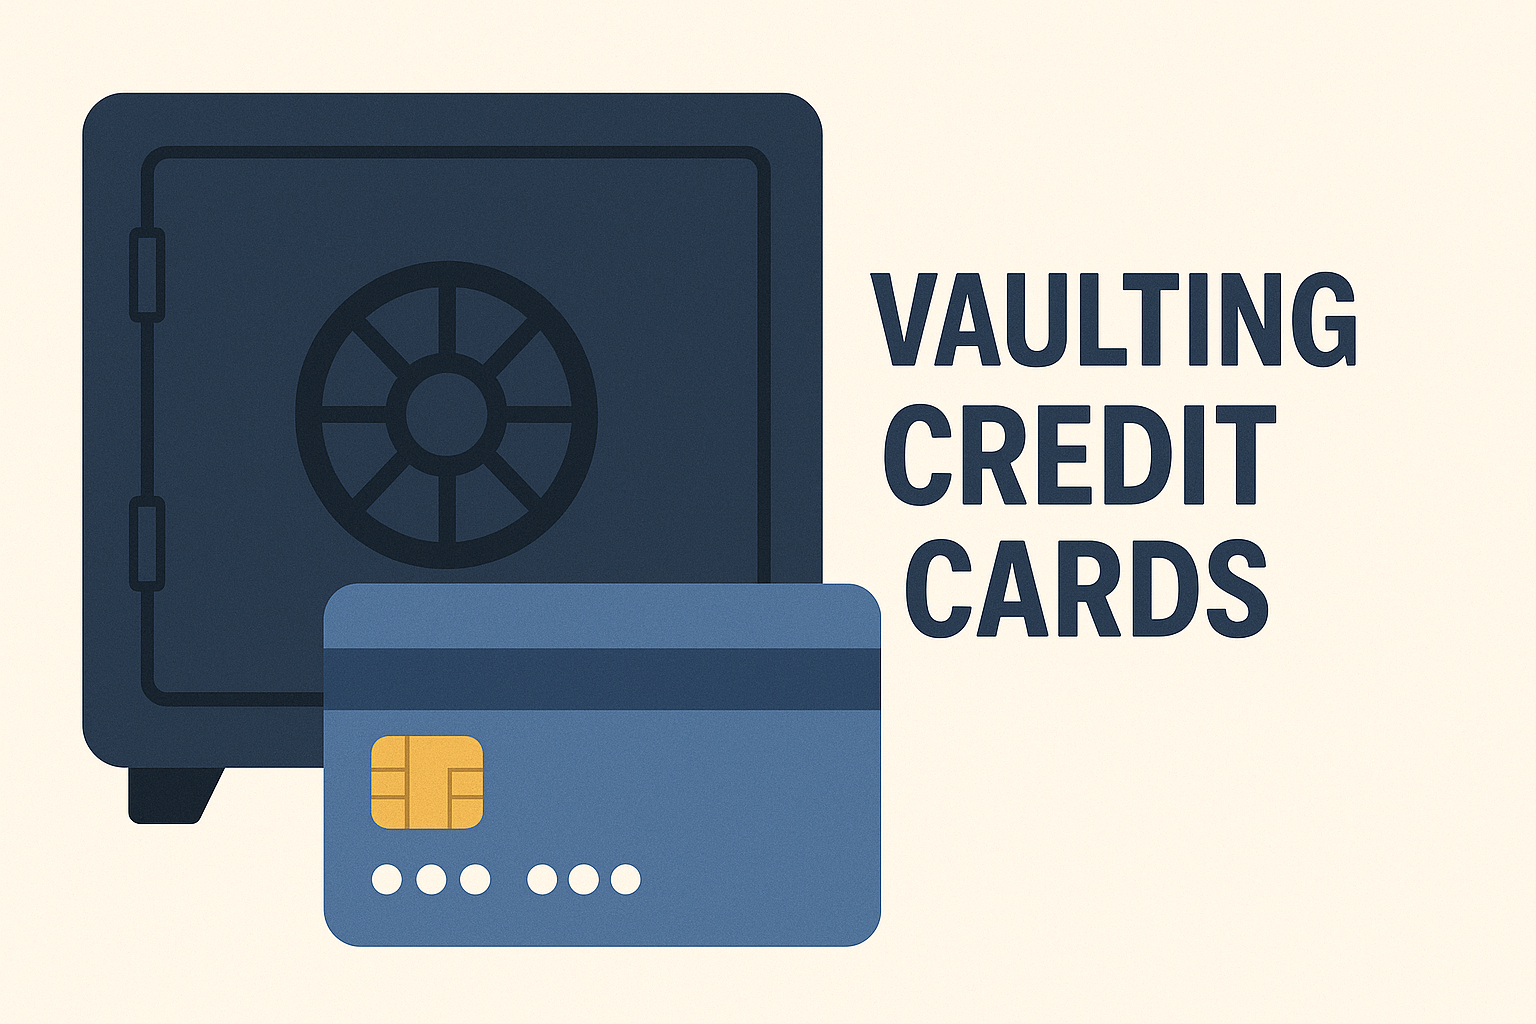
How It Works:
- Customer enters payment details at checkout
- The payment gateway securely stores (vaults) those details
- You trigger charges against the vaulted payment method up until the product is paid off.
- Once ready to ship or when all of the product is paid for, you fulfill the order.
Which Gateways Support It: Only Shopify Payments and PayPal offer vaulted card functionality for Shopify merchants. Other payment providers don’t support storing card details and charging them later.
Why It’s Critical: This is the only way to implement true deferred-charge pre-orders without authorization window limitations on native Shopify.
Alternative Approach: If your payment gateway doesn’t support vaulted cards, use invoices or payment links. Customers receive a link to pay when you’re ready to charge them, which lets them use any payment method.
Failed Payment Recovery
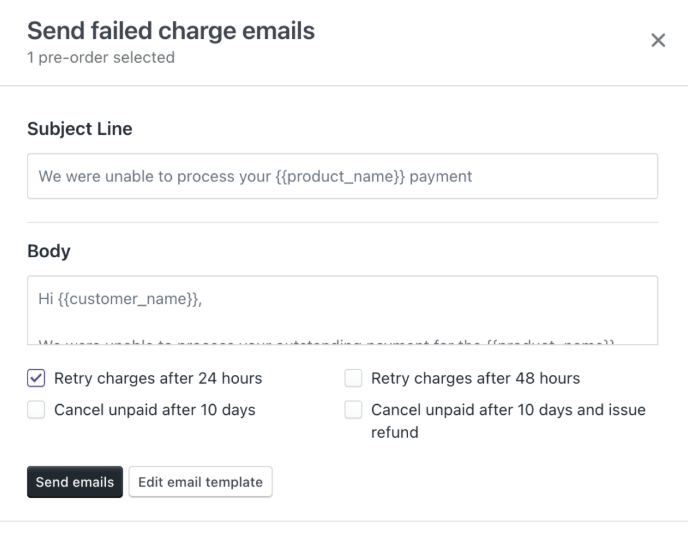
When you charge vaulted cards or process installment payments, some will fail due to expired cards, insufficient funds, or closed accounts.
Best-in-class payment-plan apps let you trigger a dunning flow that emails customers, retries the charge, and cancels only after clear notice and a grace period. This protects revenue while keeping ops lightweight. At PreProduct, are flow is comprised of an email sequence that emails customers, retries the charge, and cancels only after clear notice and a grace period.
What customers receive: The default failed charge email includes the specific decline reason (expired card, insufficient funds, etc.) and asks customers to update their payment details so the deferred charge can be retried.
Expected Failure Rates: For deferred charges, expect 5-10% of charges to fail initially. Most resolve after retry or customer update, but plan for 2-3% permanent failures.
Comparing Shopify Payment Plan Solutions: Which Is Right for You?
Now that you understand the potential approaches to Shopify payment plans, here’s how to decide which approach fits your business.
Shop Pay Installments – Best For:
✅ US, Canada, or UK-based stores with Shopify Payments activated
✅ Want a hands-off buy now, pay later solution
✅ Is happy with a schedule of 2 – 4 installments, either bi-weekly or monthly.
✅ Selling in-stock products with immediate shipping
✅ Orders between $50 and $1,000 (or up to $30,000 with premium)
✅ Want to increase average order value without complexity
Cost: Free for merchants (Affirms handle financing)
Setup Time: Minutes (toggle in Shopify Payments settings)
Complexity: Minimal
Third party payment gateway apps – Best For:
✅ Need custom installment schedules beyond Shop Pay’s options
✅ Don’t use Shopify Payments or need more payment gateway flexibility
✅ Want merchant control over payment terms and timing
Cost: $17.95/month OR 2% transaction fees depending on app
Setup Time: 15-30 minutes for most apps
Complexity: Moderate (more configuration options)
Third-party invoicing apps – Best For:
✅ Using a gateway that can’t vault cards but still need to collect later payments
✅ Long or uncertain lead times where you’ll charge only when you’re ready to ship
✅ B2B or high-touch orders that need custom payment schedules per customer
✅ Want to accept any payment method supported by your invoice provider (cards, ACH, wallets)
Cost: Typically standard payment processing fees per invoice (no extra app fee)
Setup Time: Minutes (configure invoicing in your payment gateway or app)
Complexity: Low to Moderate (more manual follow-up unless automated reminders are enabled)
Shopify Purchase Options apps (like PreProduct) – Best For:
✅ Running pre-orders which offer an option to go on a payment plan
✅ Want to maintain Shopify’s native checkout experience
✅ Want to take advantage of Shopify’s ability to ‘vault’ the customer’s payment method, so no further customer actions are required.
✅ Want to offer customisable plans with a range of payment frequencies and intervals.
Cost: Both Fixed and commission only pricing options available
Setup Time: 20-40 minutes for full customisation
Complexity: Moderate (native Shopify integration)
Architecture: Uses Shopify purchase options API, fully native
Best Practices for Implementing Shopify Payment Plans
Once you’ve chosen your Shopify payment plan approach, following these best practices ensures smooth operations and happy customers.
Customer Communication
Set Clear Expectations on Product Pages:
- State whether the product is in-stock or pre-order
- Show estimated shipping or fulfillment dates
- Explain the payment structure (when they’ll be charged)
- Display the payment schedule for installments
Show Payment Details Before Checkout:
- For deposits, show both the deposit amount and remaining balance
- For installments, display the full payment schedule
- Include total cost (never hide fees or final price)
- Explain when each charge will occur
Send Automated Reminders for Upcoming Charges:
- Email customers 1-2 days before charging their vaulted card
- Include the charge amount, date, and reason (product shipping soon)
- Provide a link to cancel or update payment information when needed
- Set expectations for when they’ll receive the product
Provide a Customer Portal for Self-Service:
- Show order status and current fulfillment stage
- Display payment history and upcoming charges
- Allow customers to update payment information
- Enable self-serve cancellations within your policy window
Operational Considerations
Test Manually Before Automating: Start by manually managing your payment plans. Understand how payments flow, when charges trigger, and how your fulfillment process handles holds. Once you’re confident in the process, look into automating the payment plan process.
Set Up Failed Payment Workflows: Before you launch, configure dunning sequences for failed charges. Automate retry logic, notification emails, and eventual cancellation. Don’t handle these manually or you’ll drown in customer service tickets.
Monitor Payment Success Rates: Track what percentage of charges succeed, fail temporarily, or fail permanently. If your failure rate exceeds 10%, investigate whether customers are receiving proper notification about upcoming charges.
Have Clear Refund Policies: Define your refund and cancellation terms upfront. Example: “If you cancel before [production date], we’ll refund your deposit in full. After [date], deposits are non-refundable but can be applied to other products.”
Compliance & Policies
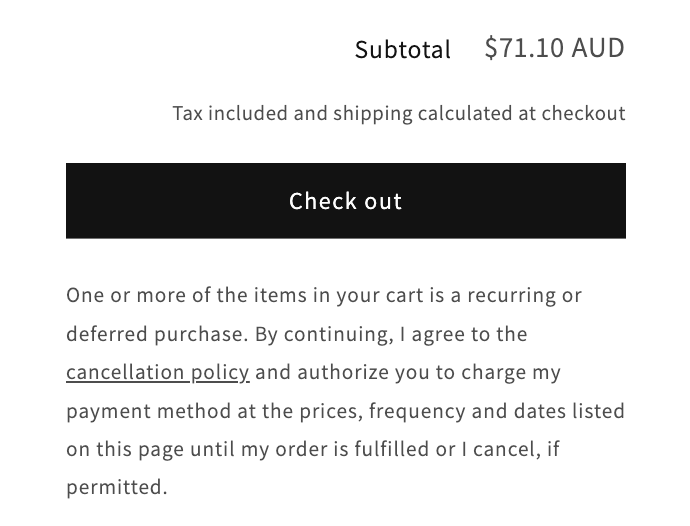
Transparent Terms and Conditions: Your payment plan terms should be visible before customers commit. Include information about when charges occur, refund policies, and what happens if payment fails.
Clear Refund/Cancellation Policies: Make it easy for customers to understand their options. Can they cancel before production starts? Is the deposit refundable? What if the product is delayed?
State-Specific Regulations: Some states have specific laws about payments for products not received straight away. Check regulations in states where you have significant customer bases.
Conversion Optimization
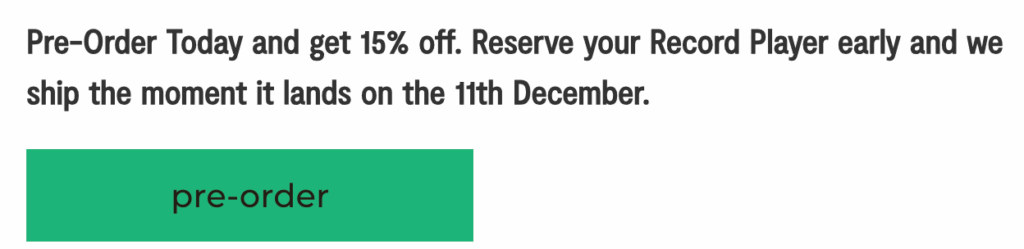
Display Payment Plan Options Prominently: Don’t hide installment options in small text. Feature them near the price on product pages. “Pay in 4 interest-free payments of $75” can boost conversion significantly.
Use “As Low As $X/Month” Messaging: Psychology matters. “$240 per month” sounds more accessible than “$2,880 total price.” Show both, but lead with the monthly amount.
Show Total Cost and Payment Schedule: Transparency builds trust. Always show the full price, how many payments, and when each payment occurs. Never surprise customers with hidden fees or unclear terms.
Reduce Friction with One-Click Payment Plan Selection: Let customers choose installment options with a single click or toggle. The easier you make it, the more customers will use payment plans.
Conclusion
Shopify payment plans give you multiple ways to make purchases more accessible while maintaining control over cash flow. The key is understanding the architectural differences between solutions and choosing the approach that fits your products, checkout requirements, and business goals.
Here are the key takeaways:
Four architectural approaches exist:
- BNPL Installments apps (such as Shopify’s Shop Pay Installments)
- Third-party invoicing apps that send invoice emails on a schedule
- Third-party apps that use Shopify’s native purchase options API to vault the customer’s payment method and trigger charges on an ad-hoc or scheduled basis.
- Third-party apps that use a third-party payment gateway and checkout, such as Stripe.
Native integration matters: If you want to maintain Shopify’s checkout experience with orders flowing directly to your admin, choose Shop Pay Installments or a solution built on Shopify’s purchase options API (like PreProduct for pre-orders) rather than an external checkout system.
Payment plans are optional add-ons: Both regular buy-now orders and pre-orders can support multi-step payment plans if needed, letting you split charges across multiple dates for high-ticket items.
Technical requirements matter: Vaulted card support (Shopify Payments or PayPal only) enables charge-later functionality. Without it, you’ll need invoicing apps that send payment links via email.
Ready to implement Shopify payment plans in your store? For pre-order specific payment plans with charge-later, deposits, and multi-step installments, explore PreProduct’s pre-order solution.
Pre-sell With PreProduct
7 day free trial with all plans