Managing pre-orders manually drains time small teams don’t have. Tracking inventory thresholds, sending customer emails, coordinating fulfillment, updating product availability, these repetitive tasks consume hours each week. Shopify Flow pre-order automation eliminates this operational overhead, letting merchants build sophisticated pre-order systems without developers or ongoing maintenance costs.
Whether you’re running simple restock campaigns or complex charge-later pre-orders with deposits, automation transforms manual processes into hands-free workflows that scale with your business. This guide shows you how to automate pre-orders using native Shopify Flow, then extend functionality with PreProduct’s 15 custom actions and 16 custom triggers for complete pre-order lifecycle management.
Why Use Shopify Flow for Pre-orders?
Pre-order operations involve multiple interconnected processes: inventory monitoring, product availability updates, customer communications, pricing adjustments, and fulfillment coordination. Without automation, merchants manually check inventory levels, toggle product settings, send emails, and track when to charge customers or release orders.
Shopify Flow automates these touchpoints, creating intelligent workflows that:
- Save operational time. Instead of manually enabling pre-orders when items sell out, Flow does it automatically within seconds of inventory hitting zero.
- Reduce human error. Automated workflows execute consistently every time, eliminating forgotten steps or missed communications.
- Scale without headcount. Small teams can manage hundreds of pre-orders with the same efficiency as large operations departments.
- Enable sophisticated logic. Combine multiple conditions to create nuanced workflows that adapt to different scenarios (product type, customer segment, inventory status).
For merchants running pre-orders, Flow transforms a labor-intensive process into a hands-free operation that runs 24/7 without intervention.
Shopify Flow Pre-order Automation: Key Benefits
Before diving into specific workflows, understanding the strategic advantages helps you design automation that aligns with your operational goals.
- Instant pre-order activation. When high-demand products sell out, Flow can activate pre-order mode within seconds, capturing demand instead of losing sales to “out of stock” messages.
- Automatic inventory management. Flow monitors inventory levels continuously and toggles between buy-now and pre-order modes based on stock availability, eliminating manual threshold monitoring.
- Coordinated customer communication. Trigger email sequences, update customer segments, or send notifications based on pre-order events, keeping buyers informed throughout the pre-order journey.
- Flexible fulfillment control. Automatically apply fulfillment holds to charge-later pre-orders, then release orders when stock arrives or you manually tag items as ready-to-ship.
- Conditional logic for complex scenarios. Build workflows that behave differently based on product tags, metafields, inventory levels, or customer attributes, handling exceptions without manual intervention.
These capabilities compound when combined, creating end-to-end automation that manages pre-orders from stockout detection through final fulfillment release.
What Flow offers small teams:
- Automation across products, inventory, orders, customers, and more.
- No need for manual scripts or recurring app maintenance.
- The ability to scale smarter, not just headcount.
- Qualified stores can use the HTTP request action to call out to third party services like ERP’s, marketing services or AI context aggregators.
In essence, Flow gives you the building blocks to operate like a much larger team – without hiring.

Part 1: Native Shopify Flow Pre-order Automation (Free)
You can build functional pre-order automation using only Shopify Flow’s native capabilities, no apps required. This approach works well for basic scenarios and helps you understand Flow’s fundamentals before adding advanced features.
Example Workflow: Activate Pre-order When Inventory Reaches Zero
This workflow automatically enables pre-orders when variants sell out, then reverses the process when stock is replenished.
➡️ Trigger: Product variant inventory equals 0
Flow monitors all product variants in your store. When any variant’s available inventory hits exactly zero, this trigger fires.
➡️ Condition: Product has tag “can-pre-order”
Not every product should become available for pre-order when it sells out. This condition checks if the product has been tagged “can-pre-order” by your team, giving you manual control over which items are pre-order eligible.
You might tag seasonal items, bestsellers, or products with predictable restock timelines as “can-pre-order” while excluding one-off or discontinued items.
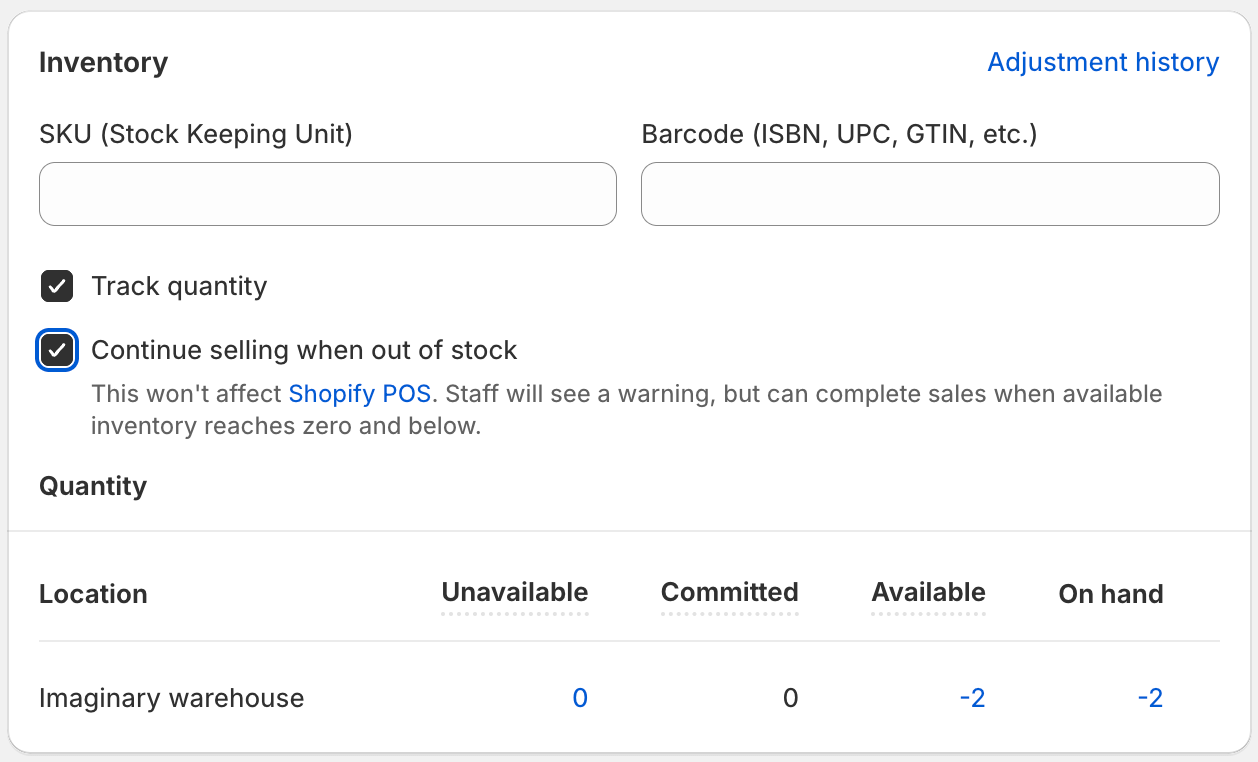
➡️ Action 1: Enable “Continue selling when out of stock”
Using an HTTP request action (Shopify Plus) or manual product setting update, enable the “continue selling when out of stock” option for the variant. This allows customers to add the item to their cart and checkout even though inventory is zero.
➡️ Action 2: Update product metafield with pre-order messaging
Set a metafield on the product (e.g., custom.pre_order_message) with customer-facing text like “Ships mid-March” or “Pre-order now, shipping in 4-6 weeks.” Your theme reads this metafield to display pre-order information on product pages.
Reversal Workflow: Disable Pre-order When Stock Returns
When inventory is replenished, automatically disable pre-order mode and return to normal buy-now behavior.
➡️ Trigger: Product variant inventory is greater than 0
This trigger fires when stock levels increase above zero (restock occurs).
➡️ Condition: Product has tag “can-pre-order” AND metafield custom.pre_order_message exists
Only reverse products that were previously in pre-order mode (indicated by the presence of the pre-order metafield).
➡️ Action 1: Disable “Continue selling when out of stock”
Turn off overselling so the product returns to standard inventory behavior.
➡️ Action 2: Remove pre-order metafield
Delete the custom.pre_order_message metafield to stop displaying pre-order messaging on the product page.
Limitations of Native Flow for Pre-orders
While native Shopify Flow handles basic scenarios, it has constraints for sophisticated pre-order operations:
- No pre-order-specific triggers. Native Flow doesn’t know when a pre-order is created, charged, or fulfilled, it only sees standard Shopify events (inventory changes, order creation, product updates).
- Limited charge control. Flow can’t trigger deferred charges for charge-later pre-orders or coordinate payment timing with inventory arrival.
- No fulfillment hold management. Native Flow can’t automatically apply or release fulfillment holds to prevent premature shipping of charge-later pre-orders.
- Manual pre-order listing creation. You need to manage pre-order configurations (deposit amounts, ship dates, customer limits) outside of Flow.
- These limitations create the case for extending Flow with pre-order-specific capabilities, which is where PreProduct’s custom triggers and actions come in.
Part 2: Extending Shopify Flow with PreProduct (31 Custom Capabilities)
PreProduct adds 31 specialized triggers and actions specifically designed for pre-order automation. While native Flow handles general Shopify events, PreProduct’s extensions give you granular control over the entire pre-order lifecycle, from listing creation through charge initiation and fulfillment release.
Why PreProduct Extends Flow
Native Shopify Flow provides infrastructure but lacks pre-order domain knowledge. PreProduct bridges this gap by introducing events and actions that understand charge-later pre-orders, deposits, customer limits, shipping notifications, and fulfillment holds.
For example, native Flow can detect when inventory hits zero, but it can’t create a pre-order listing with specific deposit amounts, ship dates, and customer limits. PreProduct’s “Create listing” action handles this complexity in a single step.
Similarly, native Flow can trigger when an order is created, but it can’t distinguish between regular orders and charge-later pre-orders, or trigger charges when inventory arrives. PreProduct’s “Charge created” trigger and “Trigger charges and/or fulfilment” action provide this pre-order-specific logic.
15 Custom Actions
PreProduct’s actions let you programmatically manage pre-order operations from within Flow workflows:
Listing Management
- Create listing: Programmatically create pre-order listings with all configuration (deposit, ship date, limits, discounts)
- Get listing: Retrieve listing details to use in conditional logic
- Get all listings: Access multiple listings for bulk operations
Variant Control
- Add variants to pre-order: Enable pre-orders for specific variants within a listing
- Remove variants from pre-order: Disable pre-orders for variants (e.g., when discontinuing)
Configuration Updates
- Update customer limit: Adjust maximum quantity per customer during campaigns
- Update deposit amount: Modify deposit pricing dynamically
- Update discount: Change pre-order discounts based on conditions
- Update shipping: Adjust estimated ship dates as timelines shift
Charge & Fulfillment
- Trigger charges and/or fulfilment: Initiate simultaneous payment capture and fulfillment release for ready-to-ship pre-orders
- Apply listing template: Use saved templates for consistent pre-order configuration
Status Checks
- Check if variant is on pre-order: Conditional logic to determine variant status
- Synchronise listing: Ensure PreProduct and Shopify stay in sync
16 Custom Triggers
PreProduct’s triggers detect pre-order-specific events that native Flow doesn’t recognize:
Listing Lifecycle
- Listing created: Fires when a new pre-order listing is created
- Listing finished: Triggers when a listing ends (time-based or manual)
- Listing shipping in 5 days: Notification trigger for upcoming ship dates
Capacity & Limits
- Listing at 90% capacity: Alert when approaching customer or quantity limits
- Listing limit reached: Triggers when pre-order cap is hit
Pre-order Events
- Pre-order created: Fires when a customer places a pre-order
- Pre-order cancelled: Triggers on customer-initiated or admin cancellations
Payment Events
- Charge succeeded: Fires after successful deferred charge capture
- Charge failed: Triggers when payment attempts fail (for dunning workflows)
Fulfillment
- Fulfillment released: Fires when orders are released for shipping
Communication Events
- Confirmation email sent: Triggers after order confirmation
- Update email sent: Fires when you send campaign updates
- Charge notification sent: Triggers before deferred charges attempt
- Payment link sent: Fires when capture-only payment links are emailed
These triggers enable workflows like:
- Send Klaviyo events when charges fail (for email recovery campaigns)
- Tag products when listings reach 90% capacity (for marketing urgency)
- Update internal spreadsheets when listings finish (for reporting)
- Notify 3PL systems when fulfillment is released (for warehouse coordination)

Combining Triggers and Actions
The power emerges when you chain PreProduct triggers and actions together in sophisticated workflows.
Example: Auto-create pre-order listing when inventory depletes, then monitor capacity
- Native trigger: Product variant inventory = 0
- Native condition: Product has tag “auto-pre-order”
- PreProduct action: Create listing (using template with deposit, ship date, limit)
- PreProduct trigger: Listing at 90% capacity
- Native action: Tag product “high-demand-pre-order”
- Native action: Add product to “Trending” collection (for homepage visibility)
This workflow automatically launches pre-order campaigns, then alerts you when demand is high so you can increase production quantities.
Real Workflow Examples: Shopify Flow Templates
Let’s walk through detailed implementations of common pre-order automation scenarios.
Workflow 1: Automatic Pre-order Activation on Stockout
Business Scenario: You sell seasonal products that frequently sell out between restocks. Instead of losing sales, you want to automatically offer pre-orders and notify customers of the estimated ship date.
➡️ Trigger: Variant inventory quantity = 0
➡️ Conditions:
- Product has tag “auto-pre-order-enabled”
- Product does NOT have metafield
preproduct.listing_id(prevents duplicate listings)
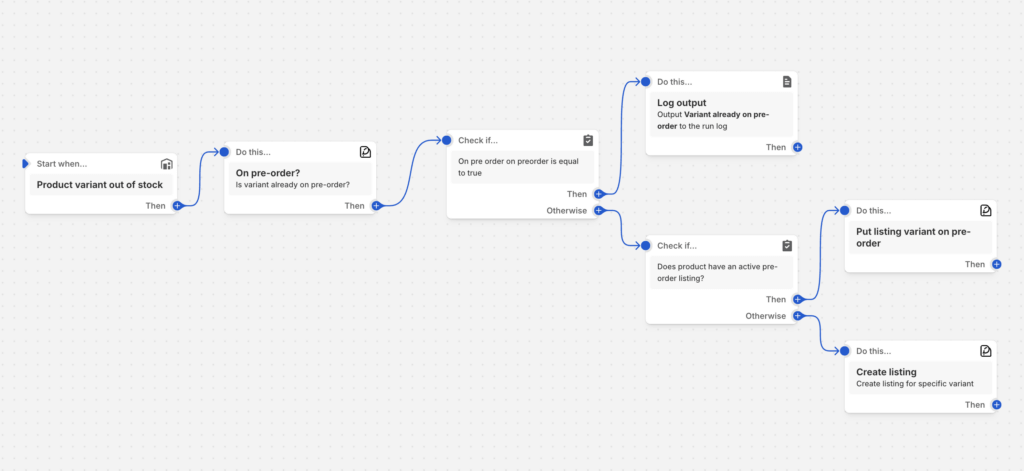
➡️ Actions:
- Check if variant is on pre-order (PreProduct action)
- If already on pre-order, end workflow (prevent duplicates)
- Create listing (PreProduct action)
- Use template: “Standard restock pre-order”
- Deposit: 0% (charge-later)
- Ship date: +30 days from today
- Customer limit: 5 units
- Add product to collection (Native action)
- Collection: “Pre-order Items”
- Makes pre-orders discoverable on your site
- Send Klaviyo event (Integration action)
- Event: “Product on pre-order”
- Triggers email campaign to waitlist subscribers
Result: When bestsellers sell out, they automatically become available for pre-order with a 30-day estimated ship date. Customers on your waitlist receive notification emails, and the product appears in your “Pre-order Items” collection.
Workflow 2: Charge & Fulfill When Inventory Arrives
Business Scenario: You’re running charge-later pre-orders. When inventory arrives, you want to automatically trigger charges for all waiting pre-orders and release orders for fulfillment simultaneously.
➡️ Trigger: Product tagged “inventory-arrived”
Your team applies this tag when stock hits the warehouse, initiating the charge and fulfillment process.
➡️ Conditions:
- Product has metafield
preproduct.listing_id(confirms active listing exists)
➡️ Actions:
- Get listing (PreProduct action)
- Retrieve listing details using
preproduct.listing_id
- Trigger charges and/or fulfilment (PreProduct action)
- Target: All pre-orders for this listing
- Action: Charge + release fulfillment
- This action attempts to charge all vaulted cards and simultaneously releases fulfillment holds
- Send internal Slack notification (HTTP request action, Shopify Plus)
- Message: “Charges initiated for [Product Name] pre-orders. Monitor charge success rate.”
- Remove tag (Native action)
- Remove “inventory-arrived” tag (prevents workflow re-triggering)
Result: A single tag application bulk-processes all pre-orders for a product, charging customers and releasing orders for shipment. Your team receives Slack confirmation and can monitor charge success rates.

Workflow 3: VIP Customer Priority Fulfillment
Business Scenario: You want to manually prioritize certain pre-orders for early fulfillment (VIP customers, influencers, early bird orders).
➡️ Trigger: Order tagged “priority-fulfillment”
Your team manually applies this tag to orders that should be fulfilled first.
➡️ Conditions:
- Order has tag “priority-fulfillment”
- Order line items include products with metafield
preproduct.listing_id
➡️ Actions:
- Trigger charges and/or fulfilment (PreProduct action)
- Target: This specific order only
- Action: Charge + release fulfillment
- Add customer tag (Native action)
- Tag: “VIP-early-access”
- Flags customer for future priority treatment
- Send customer email (Native action)
- Template: “Your pre-order is shipping early!”
- Builds loyalty and excitement
Result: You maintain granular control over who gets pre-orders first, while still using automation to handle the charge and fulfillment mechanics.
Workflow 4: Metafield-Based Conditional Pre-orders
Business Scenario: You want fine-grained control over which products become pre-orders, using metafields to define eligibility rules (minimum price, specific vendors, certain product types).
➡️ Trigger: Variant inventory quantity = 0
➡️ Conditions (All must be true):
- Product metafield
custom.pre_order_eligible= “true” - Product price > $50
- Product vendor = “House Brand”
➡️ Actions:
- Create listing (PreProduct action)
- Template varies by product type:
- If product type = “Apparel”: Use “Apparel pre-order template” (30% deposit)
- If product type = “Electronics”: Use “Electronics template” (50% deposit)
- Ship date pulled from metafield
custom.expected_restock_date
- Update metafield (Native action)
- Set
custom.pre_order_active= “true” - Your theme uses this to display “Pre-order” badges
Result: Only high-value, house-brand products automatically become pre-orders, with deposit amounts tailored to product category and ship dates sourced from your internal restock planning metafields.
Advanced Shopify Flow Automation Strategies
Once you’re comfortable with basic workflows, these advanced strategies unlock additional operational leverage.
🤖 Multi-Condition Logic for Targeted Automation
Combine multiple conditions to create nuanced automation that handles different scenarios appropriately.
Example: Deposit amount varies by product price tier
- Products $0-$100: 0% deposit (pure charge-later)
- Products $101-$300: 25% deposit
- Products $301+: 50% deposit
Build conditional branches in Flow:
- If product price ≤ $100 then create listing with 0% deposit template
- Else if product price ≤ $300 then create listing with 25% deposit template
- Else create listing with 50% deposit template
This tailors payment structure to product value without manual intervention.
📫 Marketing Integration via Klaviyo & Shopify Flow
Trigger sophisticated email campaigns based on pre-order events, keeping customers engaged throughout extended lead times.
Example: Automated pre-order nurture sequence
- Trigger: Pre-order created (PreProduct trigger)
- Action: Send Klaviyo event “pre_order_placed”
- Klaviyo flow triggered with 3-email sequence:
- Day 0: Order confirmation + what to expect
- Day 14: Production update + behind-the-scenes content
- Charge date – 3 days: “Charge coming soon, update payment method if needed”
- Trigger: Listing shipping in 5 days (PreProduct trigger)
- Action: Send Klaviyo event “pre_order_shipping_soon”
- Klaviyo flow: Excitement-building email with tracking info preview
- Trigger: Charge failed (PreProduct trigger)
- Action: Send Klaviyo event “charge_failed”
- Klaviyo flow: Dunning sequence with payment update link
This creates a hands-free communication strategy that maintains customer excitement and recovers failed payments automatically.
📦 Operations Integration: ERP & 3PL Coordination
For merchants with external systems, Flow can orchestrate data between Shopify and your operations stack.
Example: ERP notification when pre-order capacity reached
- Trigger: Listing hit max limits (PreProduct trigger)
- Action: HTTP request to ERP (Shopify Plus)
- Endpoint:
https://your-erp.com/api/production-alert - Payload:
{ "product_id": "...", "pre_orders": 450, "message": "Increase production run" } - Your ERP alerts procurement to order more materials
- Endpoint:
Example: 3PL hold release coordination
- Trigger: Fulfillment released (PreProduct trigger)
- Action: HTTP request to 3PL
- Endpoint:
https://your-3pl.com/api/release-hold - Payload:
{ "order_ids": [...], "ship_date": "..." } - Your 3PL receives notification to start picking/packing
- Endpoint:
These integrations prevent pre-order information silos, keeping all systems synchronized.
⏰ Scheduled Workflows for Recurring Tasks
While most workflows are event-triggered, some pre-order operations benefit from time-based automation.
Example: Weekly pre-order capacity report
- Trigger: Every Monday at 9am
- Action: HTTP request to Google Sheets API
- Appends row: [Date, Total active pre-orders, Revenue committed, Capacity used]
- Result: Automatic weekly reporting without manual data pulls
Example: Abandoned cart recovery for pre-orders
- Trigger: Cart abandoned (with pre-order item)
- Wait: 2 hours
- Condition: Cart not converted
- Action: Send email highlighting pre-order benefits
- “Reserve your spot, only X units left”
- “Lock in early access pricing”

Troubleshooting Shopify Flow Pre-order Automation
Even well-designed workflows occasionally need debugging. Here’s how to troubleshoot common issues.
Flow Not Triggering as Expected
Symptom: Workflow should fire but doesn’t appear in Flow activity logs.
Common Causes:
- Trigger condition not met: Double-check that the exact conditions exist (e.g., inventory hit exactly 0, not 1)
- Workflow disabled: Verify workflow status is “Active” not “Paused”
- Condition logic error: Review “AND” vs “OR” logic in complex conditions
- Tag spelling mismatch: Flow is case-sensitive; “pre-order” ≠ “Pre-Order”
Debugging:
- Check Flow activity logs (Apps → Flow → [Workflow name] → Activity)
- Look for “Skipped” entries with reason explanations
- Temporarily remove conditions to isolate which filter is blocking
- Create test product meeting all conditions to verify trigger works
Charge Failures After Triggering
Symptom: Flow triggers “Trigger charges and/or fulfilment” action but charges fail.
Common Causes:
- Expired vaulted cards (lead time exceeded card expiration)
- Insufficient funds in customer accounts
- Payment method removed by customer
Resolution:
PreProduct can send ‘failed charge’ emails that can be used as a dunning process, but you can enhance this with Flow:
- Trigger: Charge failed (PreProduct trigger)
- Wait: 24 hours
- Action: Send customer email
- Subject: “Update payment method for your pre-order”
- Include link to customer portal for card updates
- Wait: 48 hours
- Action: Send internal Slack notification
- Alert team to manually follow up with high-value orders
Testing Workflows Without Affecting Customers
Challenge: You want to test workflows before enabling them for real traffic.
Best Practices:
- Use test products: Create duplicate products tagged “test-product” and build test-specific conditions:
- Condition: Product title contains “TEST”
- This prevents test workflows from affecting live products
- Disable email actions temporarily: While testing, comment out or disable email/SMS actions so customers don’t receive test notifications.
- Run manually: Flow lets you manually trigger workflows. Create test data (test product, test inventory level), then click “Run workflow” to see results without waiting for real events.
- Check activity logs: After manual runs, review step-by-step execution in activity logs to verify each action completed successfully.
Performance Optimization for Complex Workflows
Symptom: Workflows run slowly or time out with many actions.
Solutions:
- Split complex workflows: Instead of one 20-action workflow, create multiple smaller workflows chained via triggers:
- Workflow 1: Detect stockout → Create listing → Trigger “listing_created” event
- Workflow 2: Trigger on “listing_created” → Send emails, update collections
- Avoid unnecessary HTTP requests: HTTP actions are slower than native actions. Only use them when necessary for external integrations.
- Use conditional early exits: Place most restrictive conditions first to exit workflows quickly when conditions aren’t met.
FAQ: Shopify Flow Pre-order Automation
Do I need Shopify Plus to use Flow for pre-orders?
No, Shopify Flow is available on all plans (Basic, Grow, Advanced, and Plus). However, HTTP request actions, which enable integration with external services like ERPs, 3PLs, or custom APIs, are Shopify Plus exclusive.
For basic pre-order automation (creating listings, triggering charges, updating products), standard Flow actions work on any plan. HTTP requests are only needed for advanced integrations beyond Shopify’s ecosystem.
Can Shopify Flow automate charge-later pre-orders?
Yes, when combined with PreProduct’s Flow actions. Native Flow can’t trigger deferred charges because it doesn’t have pre-order-specific payment actions. PreProduct’s “Trigger charges and/or fulfilment” action enables automatic charge initiation based on inventory arrival, manual tags, or scheduled timing.
For example, you can build a workflow:
Result: Automatic bulk charging when stock lands
– Trigger: Product tagged “inventory-arrived”
– Action: Trigger charges for all waiting charge-later pre-orders
How do I test Flow workflows without affecting real orders?
Create a test workflow using duplicate products and restrictive conditions:
Disable customer-facing actions (emails, SMS) during testing to prevent notifications.
What’s the difference between native Shopify Flow and PreProduct’s extensions?
Native Shopify Flow provides general ecommerce automation: inventory changes, order creation, product updates, customer actions. It understands Shopify events but not pre-order concepts like charge-later, deposits, fulfillment holds, or listing lifecycle.
PreProduct extends Flow with 31 pre-order-specific capabilities:
Use native Flow for basic stockout detection and product updates. Use PreProduct extensions for sophisticated pre-order operations like automated charge timing, customer limit management, and fulfillment coordination.
How do I troubleshoot workflows that don’t trigger?
Here are some solutions to common issues:
If still stuck, temporarily remove all conditions except the trigger to isolate which filter is blocking execution.
Does Shopify Flow work with other pre-order apps besides PreProduct?
Shopify Flow works with any app that provides custom triggers and actions. Some pre-order apps offer basic Flow integration (e.g., “Pre-order placed” trigger), but the depth varies significantly.
PreProduct provides the most comprehensive pre-order integration with 31 total capabilities. Most other apps offer 2-5 basic triggers/actions without support for charge-later workflows, fulfillment holds, or deposit management.
If you’re using a different pre-order app, check their documentation for available Flow triggers and actions, then build workflows using those events combined with native Shopify actions.
What are Shopify Flow’s limitations for pre-orders?
Native Flow (without pre-order apps) can’t:
– Create pre-order listings with deposits, ship dates, or customer limits
– Trigger deferred charges for charge-later pre-order
– Automatically apply or release fulfillment holds
– Distinguish between regular orders and pre-orders
– Track pre-order capacity or notify when limits are reached
These limitations are why merchants serious about pre-orders use apps like PreProduct to extend Flow with pre-order domain expertise. The combination of native Flow infrastructure + pre-order-specific triggers/actions creates powerful automation that neither tool achieves alone.
Conclusion
Shopify Flow pre-order automation transforms time-consuming manual processes into intelligent, hands-free workflows. Native Flow provides free foundational capabilities, perfect for basic stockout-to-pre-order scenarios using tags and metafields.
For merchants running sophisticated pre-order programs (charge-later, deposits, multi-step payment plans, fulfillment coordination), PreProduct’s 15 actions and 16 triggers unlock automation native Flow alone can’t achieve. Automatically create listings when inventory depletes, trigger charges when stock arrives, release fulfillment in bulk, and coordinate customer communications throughout extended lead times.
The result: small teams operate at enterprise scale, capturing demand automatically instead of losing sales to stockouts, and delivering exceptional customer experiences without expanding headcount.
Pre-sell With PreProduct
7 day free trial with all plans