How to Write a Shopify Pre-order Policy (+ Free Templates)

Just want to generate a pre-order policy? Click here.

Pre-orders vary dramatically between stores. Some charge upfront and ship within 30 days. Others vault customer cards but don’t charge until fulfillment, sometimes 120+ days later. Some take deposits, others require full payment. Lead times range from weeks to months. Your pre-order policy is how you communicate these differences to customers, and without one, you risk disputes, payment failures and refund headaches that could have been avoided with transparent terms.

Setting up Pre-orders on Shopify opens opportunities to capture demand early, validate new products and improve cash flow. But taking payment before you ship comes with legal obligations and customer expectations you need to manage carefully. A well-written Shopify pre-order policy protects your store while building trust with customers who are committing to products that aren’t yet in their hands.

This guide walks you through everything you need to create a compliant, customer-friendly pre-order policy for your Shopify store. You’ll learn about FTC requirements and guidelines, what to include based on your payment model, and get free copy-paste templates tailored to charge-upfront, charge-later and deposit pre-orders.

Why Your Shopify Store Needs a Pre-order Policy

Legal Requirements You Can’t Ignore

The FTC Mail, Internet, or Telephone Order Merchandise Rule sets clear requirements for Pre-orders. (Learn more from the FTC) If you advertise a shipping timeframe, you must have a reasonable basis to ship within that window. If you don’t specify a date, you’re required to ship within 30 days of receiving payment. Other countries have similar requirements, although Europe can be stricter with payment and stock certainty.

When you can’t meet the promised timeline, you must notify customers promptly and explain their right to cancel or receive a full refund. If the customer cancels due to delay, you have seven business days to process the refund. These are federal requirements that generally apply to US-based ecommerce stores taking Pre-orders, though specific circumstances may vary.

Beyond federal rules, some states have additional disclosure requirements. Your Shopify pre-order policy should clearly state when payment occurs, when shipping happens and what customer rights exist if delays occur.

Customer Trust and Transparency

Clear policies reduce disputes and set realistic expectations. When customers understand exactly when they’ll be charged, when their order will ship and how to cancel if needed, you reduce support tickets and payment failures.

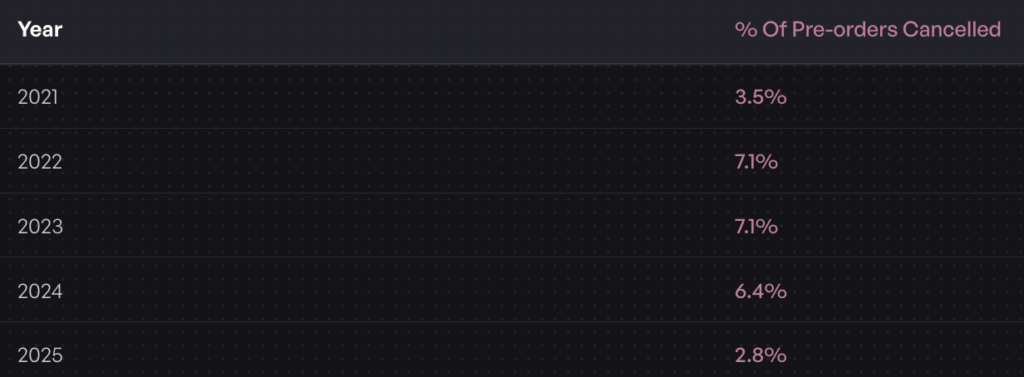
The average pre-order cancellation rate sits at 5.4% across the data we’ve collected. A transparent policy that explains your process upfront helps you maintain that baseline rather than seeing cancellations spike due to confusion or unmet expectations.

Pre-orders require more customer patience than standard purchases. Your policy is where you earn that patience by being upfront about timelines, payment terms and what happens if things change.

Platform-Specific Requirements

Shopify has technical requirements that affect your pre-order policy language. Pre-orders currently work only with Shopify Payments or PayPal Express. Customers can’t use accelerated checkouts like Shop Pay, Apple Pay or Google Pay, nor local payment methods like Klarna or Sofort for pre-order purchases.

If you’re using charge-later or deposit pre-orders, you’ll need Shopify Payments enabled and a Shopify pre-order app that supports vaulted card payments. These technical requirements should be disclosed in your policy so customers understand any checkout limitations.

Your policy also needs to address Shopify’s authorization period if you’re charging upfront and holding fulfillment. Payment authorizations typically expire after seven days, which matters for stores with longer lead times using charge-upfront models.

What to Include in Your Shopify Pre-order Policy

Essential Policy Components

1. Estimated Shipping and Delivery Dates

You must provide realistic estimated delivery dates and have a reasonable basis for those dates. Avoid vague language like “ships soon” in favor of specific windows: “Estimated to ship by March 15, 2025” or “Ships within 30-60 days of order placement.”

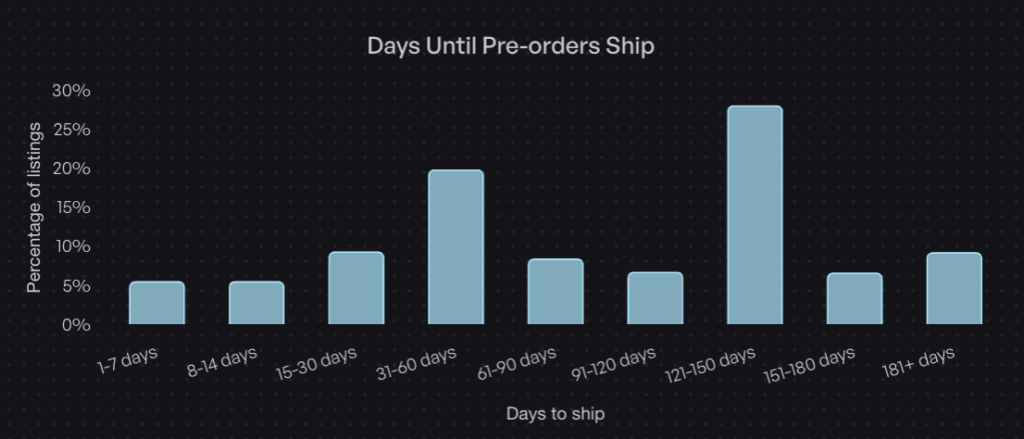
Data from over one million Pre-orders shows that 28.1% of pre-orders have fulfillment windows between 121-150 days, the most common lead time range. If your product has a longer timeline, communicate that clearly and explain why (custom manufacturing, overseas production, etc.).

Include language about what happens if the estimated date changes. Specify how you’ll notify customers and what options they have if the new timeline doesn’t work for them.

2. Payment Terms and Timing

This is where your policy must be crystal clear about when and how customers will be charged. The language varies significantly based on whether you’re using charge-upfront, charge-later or deposit models.

For charge-upfront pre-orders, state that payment is collected immediately at checkout. For charge-later pre-orders (our most popular pre-order type), explain that you’ll vault the customer’s payment method with your payment processor, but won’t capture funds until you’re ready to ship. Include information about card vaulting and that the customer’s payment method will be securely stored.

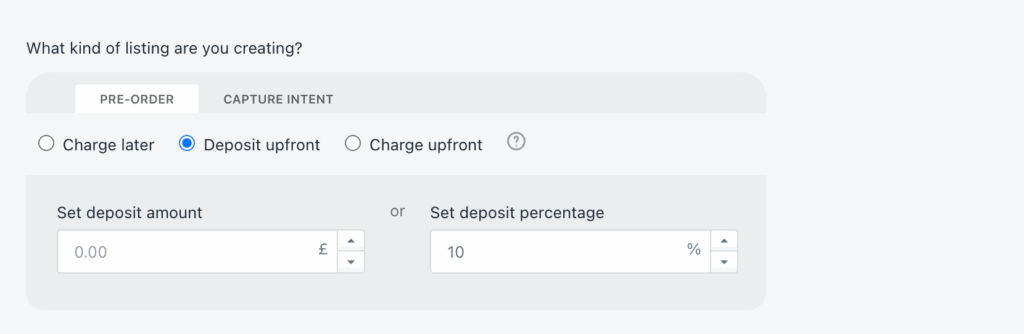
For deposit-based pre-orders, specify the percentage or amount taken upfront, when the balance will be charged and how customers will be notified before the balance charge occurs.

Include language about payment failures and what happens if a deferred charge or balance payment doesn’t go through. This protects you operationally and sets expectations with customers.

3. Refund and Cancellation Rights

Your policy must explain customer rights to cancel before shipping and how to receive refunds. Under FTC rules, if you can’t ship within the promised timeframe and the customer chooses to cancel, you must issue a full refund within seven business days. It’s also a good idea to mention if customers should cancel via a customer portal or your email support.

Specify whether customers can cancel after you’ve charged them but before you’ve shipped. Many stores allow cancellations up until the point of dispatch, which builds goodwill and reduces friction.

For deposit-based pre-orders, clarify whether deposits are refundable and under what circumstances. Some stores make deposits non-refundable after a certain point to manage production commitments, while others offer full refunds until shipping.

Address partial refunds for situations where you can only fulfill part of an order or need to substitute products.

4. Shipping and Fulfillment

Explain what happens once your pre-order stock arrives. Will orders ship immediately or will there be additional processing time? If you’re fulfilling pre-orders in the order they were placed, state that clearly.

If you allow mixed carts (pre-order items with buy-now items), explain how shipping works. Will you split the shipment and send in-stock items first, or hold everything until the pre-order is ready? Note that 62.1% of stores prohibit mixed carts to keep operations simple, but if you allow them, your policy needs to address the logistics.

Include information about shipping costs, international orders and any fulfillment holds that prevent accidental early shipping.

5. Delay and Communication Procedures

Supply chain disruptions happen. Your policy should outline what you’ll do if shipping dates change and how you’ll communicate updates to customers.

Specify how customers will be notified (email is standard), how much advance notice you’ll provide and what options customers have if they don’t agree to the new timeline. Include language about significant delays (typically four weeks or more beyond the original estimate) and customer rights to cancel with full refunds in those situations.

Consider adding a force majeure clause that addresses circumstances beyond your control, manufacturing delays, shipping disruptions or supply chain issues. This sets realistic expectations while maintaining your commitment to transparency.

6. Customer Rights and Contact Information

Make it easy for customers to reach you with questions about their pre-order. Include your support email, phone number if applicable and typical response times.

For US customers, reference their rights under the FTC Mail Order Rule. For EU customers, disclose the 14-day cooling-off period and their right to cancel for any reason within that window. For Australian customers, reference Australian Consumer Law protections.

Provide clear instructions on how to cancel a pre-order, request a refund or update payment information if needed.

Region-Specific Considerations

US Market

Your policy must comply with the FTC Mail, Internet, or Telephone Order Merchandise Rule. This means clear shipping timelines (or the default 30-day window), prompt delay notifications and seven-day refund processing when customers cancel due to delays.

Some states require additional disclosures. California, for example, has specific requirements around subscription-like charges. If your pre-order involves multiple payments over time, check state-level regulations.

EU Market

EU customers have a 14-day cooling-off period under the Consumer Rights Directive. They can cancel for any reason within 14 days of receiving the product and receive a full refund. Your policy must explicitly state this right.

As of December 2024, the EU’s General Product Safety Regulation (GPSR) requires you to appoint an EU-based Authorized Representative and provide comprehensive product safety information. If you’re selling pre-orders to EU customers, your policy should reference compliance with GPSR.

You must proactively inform EU customers of any changes to expected delivery dates and clearly explain their rights if delays occur. The communication requirements are more formal than in the US.

Other Markets

Australian Consumer Law provides strong protections for customers, including guarantees about product quality and delivery timelines. Your policy should acknowledge these rights without trying to limit them.

Canadian requirements are similar to US rules but reference the Competition Act and provincial consumer protection laws. If you ship to Canada, note any differences in processing times or returns.

Free Shopify Pre-order Policy Generator

Use this generator to create a pre-order policy template based on your store:

Pre-order Policy Generator

Generate a customized pre-order policy for your store.

How to Display Your Pre-order Policy on Shopify

Create a Dedicated Policy Page

Add your pre-order policy as a dedicated page in your Shopify admin:

  1. Go to Online Store > Pages in your Shopify admin
  2. Click Add Page
  3. Title it “Pre-order Policy” or “Pre-order Terms”
  4. Paste your policy content into the page editor
  5. Set the visibility to visible and save

Alternatively, add it to your existing policies:

  1. Go to Settings > Policies in Shopify admin
  2. Scroll to the bottom and look for custom policy options
  3. Select the pre-existing “Purchase options cancellation policy” policy
  4. Paste your template and customize
  5. Save changes

Link From Product Pages

Make your pre-order policy easy to find from product pages where Pre-orders are available:

  • Add a line in your product description: “This is a pre-order item. Please review our Pre-order Policy before purchasing.”
  • Optionally, you can also add terms and conditions at checkout requiring customers to acknowledge pre-order terms. Optin in Shopify’s “Online store” -> click 3 dots -> “Edit default theme content” -> search for “pre-order” -> edit the “Purchase options agreement label” field -> click “Save”

Email Communication Touchpoints

Your policy should be reflected in automated emails:

Order Confirmation Email
Include a reminder that this is a pre-order with a link to full terms:
“Thank you for your pre-order! Your payment [will be charged when ready to ship / has been collected]. Review our [Pre-order Policy] for details on estimated shipping dates and cancellation rights.”

Upcoming charge notification email (for charge-later and deposit balance)
Optionally sent 24 hours before charging:
“Your pre-order for [PRODUCT] is almost ready! We’ll charge your payment method on [DATE]. If you need to update payment information or cancel, please do so by [DEADLINE]. Full details in our [Pre-order Policy].”

Best Practices for Pre-order Customer Communication

Setting Expectations Early

Clear communication starts on the product page. Your pre-order button, product description and estimated delivery date should all align with your policy.

Examples of effective product page copy:

  • “Pre-order: Ships by March 15, 2025”
  • “Pre-order: Estimated delivery 90-120 days from order date”
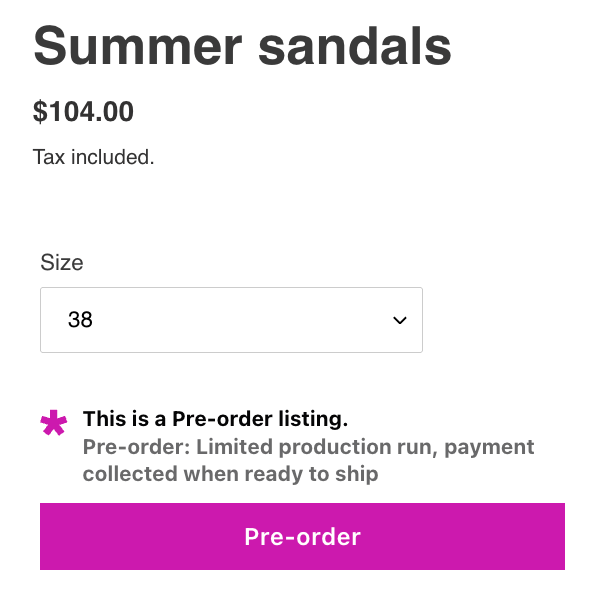
  • “Pre-order: Limited production run, payment collected when ready to ship”

Customize your add-to-cart button text to say “Pre-order Now” instead of “Add to Cart” so customers understand what they’re buying. Most Shopify pre-order apps, including PreProduct, let you customize front-end wording across the storefront to match your brand and set clear expectations.

Proactive Updates During Lead Time

Don’t wait for customers to ask for updates. Communication reduces anxiety, support tickets and cancellations.

Send emails when something changes, plus the initial order confirmation:

  • Order confirmation: Immediate (standard)
  • Upcoming charge notification: 24 hours before charging (for charge-later/deposit)
  • Shipping update: When item ships with tracking
  • Delay notification: Immediately when you learn of delays or timeline changes

Let customers know they can check their customer portal anytime for up-to-date information on their order status, estimated delivery dates and payment schedules. This reduces the need for frequent email updates while keeping customers informed.

PreProduct offers customizable email templates and customer portals where pre-order customers can check their order status, estimated delivery dates and payment schedules anytime without contacting support.

Managing Delays and Changes

Delays happen. How you handle them determines whether customers stay committed or cancel.

When you learn of a delay:

  1. Calculate the new estimated timeline with buffer
  2. Draft clear notification email explaining what happened and new date
  3. Explain customer options (keep order with new date or cancel for refund)
  4. Set a deadline for customers to respond if they want to cancel
  5. Send the notification immediately, don’t wait

Email template for delay notifications:

“Subject: Update on Your Pre-order: New Estimated Ship Date

Hi [NAME],

We’re reaching out about your pre-order for [PRODUCT] (Order #[NUMBER]).

Due to [BRIEF REASON: manufacturing delays / shipping disruptions / supplier issues], the estimated ship date has changed from [ORIGINAL DATE] to [NEW DATE].

We understand this is disappointing. Here are your options:

Option 1: Keep your order with the new ship date of [NEW DATE]
No action needed. We’ll proceed with your order and notify you when it ships.

Option 2: Cancel for a full refund
Email us at [SUPPORT EMAIL] by [DEADLINE DATE] to cancel. [Refunds are processed within 7 business days / No payment will be collected if you cancel].

We sincerely apologize for this delay and appreciate your patience. If you have questions, please reply to this email or contact [SUPPORT EMAIL].

Thank you,
[YOUR STORE NAME]”


Common Pre-order Policy Mistakes to Avoid

Being Vague About Shipping Times

“Ships soon” or “available later this year” probably doesn’t meet your local legal requirements and frustrate customers. If you genuinely don’t know when a product will ship, it’s better to use a date range with clear caveats: “Estimated to ship between April and June 2025, subject to manufacturing timeline” is better than vague promises.

If production schedule is uncertain, use charge-later or deposit models rather than collecting full payment upfront. This reduces your refund risk and keeps customers committed without their money tied up indefinitely.

Not Disclosing Payment Timing

Customers need to know exactly when they’ll be charged. “Payment will be processed” is too vague. Your policy should state:

  • Charge-upfront: “Your card is charged immediately when you place your order”
  • Charge-later: “Your payment method will be vaulted with our processor now but won’t be charged until we’re ready to ship, approximately [TIMEFRAME] from now”
  • Deposit: “You’ll pay [AMOUNT/PERCENTAGE] now and the remaining [AMOUNT/PERCENTAGE] when we’re ready to ship, approximately [TIMEFRAME] from now”

Also disclose if there are limitations on payment methods (no Shop Pay, Apple Pay, etc.) so customers aren’t surprised at checkout.

Ignoring Regional Requirements

If you sell internationally, your policy can’t be US-only. EU customers have 14-day cooling-off periods. Australian customers have strong consumer guarantees. Canadian provinces have their own consumer protection laws.

Include a section that acknowledges regional rights:
“For EU customers: You have a 14-day righxt to cancel under the Consumer Rights Directive. See our full returns policy for details.”

“For Australian customers: Nothing in these terms limits your rights under Australian Consumer Law.”

Don’t try to write separate policies for each region unless you have a legal team. A single comprehensive policy that acknowledges major regional differences is sufficient for most stores.

Incomplete Refund Policies

Your refund section must address:

  • Timeline for processing refunds (FTC requires seven business days)
  • What triggers a refund (cancellation before ship, failure to meet timeline, etc.)
  • How refunds are issued (back to original payment method)
  • What happens to deposits if order is cancelled
  • Partial refunds if you can only fulfill part of an order

Don’t leave customers guessing about whether they can get their money back and how long it takes.

No Delay Contingency Plans

Your policy should have clear language about what happens when shipping dates slip. Include:

  • How you’ll notify customers of delays
  • How much advance notice you’ll provide
  • Definition of “significant delay” (typically four weeks or more)
  • Customer options when delays occur
  • How long customers have to decide whether to keep or cancel

Consider adding a force majeure clause:
“If delays occur due to circumstances beyond our reasonable control (natural disasters, pandemics, shipping disruptions, trade restrictions, etc.), we will notify you as soon as possible and provide updated timelines. You will have the option to cancel for a full refund if the delay exceeds [NUMBER] weeks.”

Technical Requirements for Shopify Pre-orders

Payment Gateway Setup

To offer deferred-charge Pre-orders on Shopify, you must use either Shopify Payments or PayPal automatic payments. Other payment gateways don’t support the vaulting and capture workflows needed for charge-later pre-orders. Most payment gateways support charge-upfront pre-orders.

For charge-later and deposit Pre-orders specifically, you need:

  • Shopify Payments enabled
  • A pre-order app that supports vaulted card payments (storing payment details to charge later)
  • Note: Charge-later pre-orders use card vaulting, not authorization holds, so there’s no expiration window to manage

PreProduct and similar apps handle the technical complexity of vaulting cards and managing deferred charges so you don’t have to build custom checkout flows. The app securely stores customer payment details with Shopify Payments, PayPal or Stripe and charges them when you trigger the fulfillment release. For deposit-based Pre-orders, check out Shopify deposit payments for detailed setup guidance.

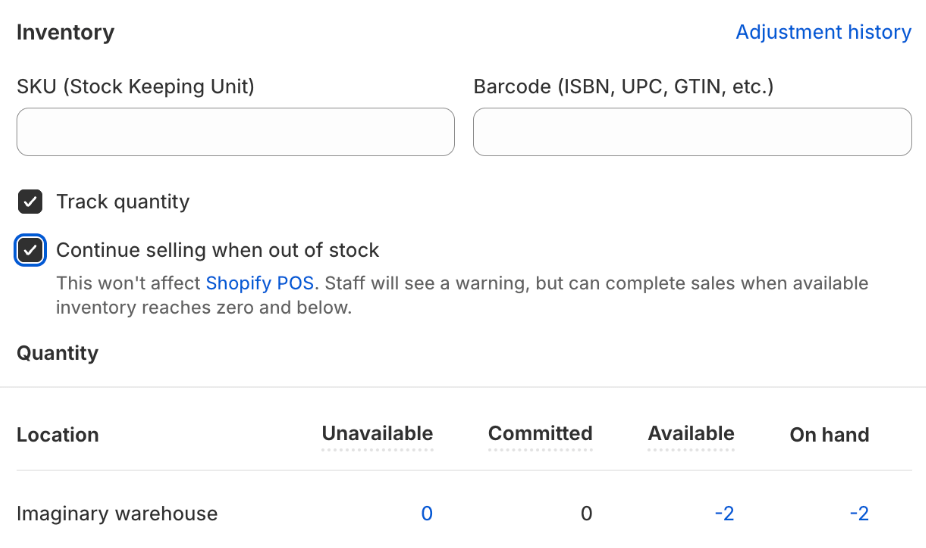
Inventory and Fulfillment Settings

Enable the “Continue selling when out of stock” for pre-order products so customers can purchase even when inventory is at zero. Most pre-order apps toggle this setting automatically when you create a listing.

For Shopify stores, make sure that your pre-order app implements fulfillment holds to prevent pre-orders from flowing automatically to your 3PL or warehouse management system. When you’re ready to fulfill, you can release them, either manually or via automation.

For BigCommerce and WooCommerce stores using PreProduct, orders are kept entirely separate from your platform admin until you release fulfillment. This prevents premature shipping and keeps pre-orders out of your normal fulfillment workflows.

Track pre-order inventory separately from regular inventory if you’re managing both simultaneously. Use separate SKUs or variants to prevent overselling and maintain accurate reporting.

Pre-order App Integration

Shopify’s native pre-order functionality is limited. To offer charge-later, deposit or multi-step payment plans, you’ll need a dedicated pre-order app.

Look for apps that offer:

  • Multiple payment models (charge-upfront, charge-later, deposit)
  • Customizable front-end wording for product pages and checkout
  • Fulfillment holds or order management
  • Automated email notifications for charges and shipping updates
  • Customer portals where customers can view order status and payment schedules
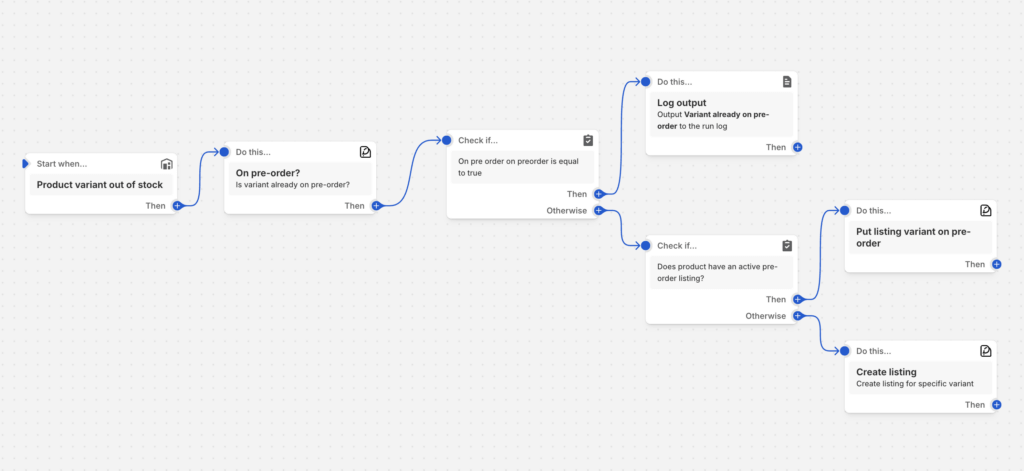
  • Integration with Shopify Flow for automation

PreProduct offers all of these features plus deep Shopify Flow integration with 15 custom Flow actions and 16 triggers. This lets you automate pre-order listing creation, charge triggering and fulfillment releases based on inventory changes and other conditions in your Shopify store.

Real-World Pre-order Policy Examples

Example 1: Short Lead Time (30-60 Days)

A fashion brand is restocking a popular jacket. Lead time is 45 days from manufacturer. They use a charge-upfront model because the timeline is short and predictable.

Their policy focuses on:

  • Clear estimated ship date: “Ships by April 15, 2025”
  • Immediate payment collection
  • Simple cancellation: “Cancel any time before shipment for full refund”
  • Standard return policy applies after delivery

This straightforward approach works because the short timeline minimizes complexity. Customers know exactly when to expect their order and when they’ll be charged.

Example 2: Long Lead Time (120+ Days)

A custom furniture maker takes pre-orders for made-to-order pieces. Production takes 120-150 days. They use a deposit model: 30% upfront, balance charged when ready to ship.

Their policy emphasizes:

  • Detailed production timeline explanation
  • Deposit amount and balance payment schedule
  • Mid-production email update at 60-day mark
  • Clear communication about delays (custom manufacturing is unpredictable)
  • Deposit refund policy: Full refund before balance charge, non-refundable after balance charged

The longer timeline requires more detailed communication and a payment structure that commits customers without tying up all their money for months. This matches the 28.1% of pre-orders with 121-150 day windows, the most common extended lead time range.

Example 3: Mixed Cart Approach

An outdoor gear store allows customers to buy in-stock items with pre-order items. They default to shipping everything together but offer split shipment for an additional fee.

Their policy clarifies:

  • Default: All items ship together when pre-order is ready
  • Split shipment available for $15 additional
  • In-stock items charged immediately
  • pre-order items (charge-later model) charged when ready to ship
  • Separate return windows for items that ship separately

This approach increases average order value but requires clear policy language to prevent customer confusion about why in-stock items haven’t shipped yet.

Note that 62.1% of stores using PreProduct prohibit mixed carts specifically to avoid this operational complexity. Whether you allow mixed carts depends on your fulfillment setup and customer service capacity.

Conclusion

A well-written Shopify pre-order policy protects your store legally while building customer trust. The key is transparency: clear payment terms, realistic shipping estimates and straightforward cancellation rights reduce disputes and support tickets.

Remember these essentials:

  1. Include all required components: shipping timelines, payment terms, refund procedures, delay protocols and customer contact information
  2. Comply with local laws and regulations (30-day default, delay notifications, seven-day refunds) and regional requirements (EU 14-day cooling-off, GPSR compliance, etc.)
  3. Tailor your policy to your payment model (charge-upfront needs different language than charge-later or deposit)
  4. Display policy clearly on product pages, checkout and confirmation emails
  5. Communicate proactively throughout the pre-order lifecycle with scheduled updates and immediate delay notifications

Use the free templates in this guide as starting points. Customize them with your specific terms, timelines and contact information. Consider having legal counsel review your policy, especially if you’re taking deposits or operating across multiple regions.

Ready to set up pre-orders with built-in policy compliance? PreProduct helps Shopify stores manage pre-orders from listing to fulfillment, with customizable policy language, automated customer communications and fulfillment controls that keep operations clean. Start taking pre-orders today and capture demand before products hit your warehouse.

Pre-sell With PreProduct

7 day free trial with all plans

Understanding Shopify Authorization Periods: What Pre-order Merchants Need to Know

Launched a pre-order with a 60-day ship date, only to realize Shopify’s payment authorization expires in seven days? You’re not alone. The Shopify authorization period is one of the most common operational challenges pre-order merchants face, especially when lead times stretch beyond a week or two.

In this guide, we’ll break down how Shopify’s authorization period works, why it matters for pre-orders, and how to handle pre-orders with lead times that exceed the standard seven-day window. Whether you’re running restock campaigns, made-to-order launches, or seasonal pre-sales, understanding authorization periods helps you choose the right payment strategy for your business.

We’ll cover extended authorization options for Shopify Plus merchants, vaulted card solutions that eliminate time constraints entirely, and the cost implications of each approach. By the end, you’ll know exactly which payment method fits your pre-order model.

shopify auth periods

What is a Shopify authorization period?

Payment authorization basics

A payment authorization is essentially a hold placed on a customer’s credit card. When someone enters their card details at checkout, the card issuer verifies that funds are available and reserves that amount. The merchant can then capture (collect) those funds later, within a specific timeframe.

This system exists for several reasons. It protects customers from unauthorized charges, reduces fraud risk for card issuers, and gives merchants flexibility in when they collect payment. For example, a merchant might authorize payment immediately but wait to capture until the product ships.

The authorization period is the window during which a merchant can capture an authorized payment. Once this period expires, the hold is released, funds return to the customer’s available balance, and the merchant can no longer collect payment through that original authorization.

Shopify Payments standard authorization period

For most Shopify merchants using Shopify Payments, the standard authorization period is seven days. This means you have seven days from the moment a payment is authorized to capture those funds. If you don’t capture within this window, the authorization expires.

After expiration, the customer’s card is released and you cannot collect payment. The order remains in your Shopify admin, but you’ll need to contact the customer to arrange new payment, either through a new order or by sending a payment link.

This seven-day standard isn’t unique to Shopify. It’s an industry-wide norm set by major card networks like Visa and Mastercard. Most payment processors, regardless of platform, operate under similar constraints.

What happens when an authorization expires

When a Shopify authorization period expires, several things occur. First, the hold on the customer’s card is automatically released by their card issuer. No charge goes through, and the customer sees the pending amount disappear from their statement.

In your Shopify admin, the order status remains but shows that payment wasn’t captured. You’ll see a notification that the authorization has expired. At this point, you have two main options: cancel the order and create a new one with fresh payment details, or contact the customer directly to collect payment through alternative means.

This creates friction for both you and your customer. The customer may be confused about whether their order is still valid. Your team needs to spend time following up, and there’s a risk the customer decides not to complete the purchase. For pre-order merchants with longer lead times, this scenario becomes inevitable unless you plan ahead.

Authorization periods and pre-orders: The core challenge

Why authorization periods matter for pre-orders

Pre-orders often involve lead times that extend well beyond seven days. Whether you’re manufacturing custom products, waiting on supplier shipments, or running seasonal campaigns, 30 to 90-day lead times are common.

The standard seven-day Shopify authorization period simply doesn’t align with these timelines. If you authorize payment at checkout for a product that won’t ship for two months, that authorization will expire 53 days before you’re ready to fulfill.

This creates operational complexity. You either need to charge customers upfront (potentially months before they receive anything) or find an alternative payment method that accommodates your timeline. Neither option is ideal without careful planning.

pre-orders

Common merchant scenarios

Consider a fashion brand producing made-to-order pieces with a six-week production cycle. Customers place orders in early September for items shipping in late October. With standard authorization, payment would need to be captured within seven days, forcing the brand to collect funds more than a month before fulfillment.

Or take a furniture maker offering build-to-order pieces with 90-day lead times. Standard authorization is completely incompatible with this model. The authorization would expire 83 days before the product is ready to ship.

Seasonal products present similar challenges. A brand taking holiday pre-orders in September for November delivery faces a 60-day gap between order placement and fulfillment. The seven-day authorization window closes long before products are ready.

Restock pre-orders can work with standard authorization if the restock arrives within a week, but supplier delays are common. A planned seven-day restock can easily stretch to two or three weeks, causing authorization issues.

Extended authorization periods for Shopify Plus merchants

How extended authorization works

Shopify Plus merchants have access to extended authorization periods, a feature that extends the payment capture window from seven days to up to 30 days. This feature launched in October 2020, specifically to address fulfillment delays and give merchants more flexibility.

Extended authorization is available for specific card types: Visa, Mastercard and American Express. Not all cards support extended holds, so even on Shopify Plus, you may encounter cards that revert to the standard seven-day period.

To use extended authorization, manual payment capture must be enabled in your payment settings. Shopify sends automatic notifications one day before an authorization expires, giving you time to capture before losing the hold.

extended authorization period

Setting up extended authorization

Navigate to Settings, then Payments in your Shopify admin. Under Payment authorization, select “Manually capture payment for orders.” This enables you to control when payments are captured rather than collecting automatically at checkout.

Once manual capture is enabled, Shopify Plus stores using Shopify Payments automatically gain access to extended authorization for supported card types. There’s no additional setup required beyond enabling manual capture.

You’ll receive email notifications when authorizations are approaching expiration, typically 24 hours before the 30-day window closes. This gives you a final opportunity to capture payment before the hold releases.

Extended authorization fees and limitations

While extended authorization provides more time, it comes with an additional cost. Shopify charges a 1.75% fee when you capture payment after the standard seven-day period. This fee applies on top of your regular credit card processing rates.

For example, if you capture a $100 payment on day 15 (after the seven-day window), you’ll pay your standard Shopify Payments rate (typically 2.9% + 30¢ for online stores) plus the additional 1.75% extended authorization fee. The total comes to $4.95 in fees instead of $3.20.

The 30-day maximum still presents limitations. For pre-orders with longer lead times (60, 90, or 120+ days), even extended authorization isn’t sufficient. You’ll need a different solution.

Card type dependency is another limitation. If a customer’s card doesn’t support extended authorization, you’re back to the seven-day window regardless of being on Shopify Plus.

Vaulted cards: The better solution for long lead time pre-orders

What are vaulted cards and how do they work

Vaulted cards, also called deferred payments, offer a fundamentally different approach. Instead of authorizing payment and racing against a countdown, vaulted card payments securely store customer payment details for future use, with no time limit.

Here’s how it works: At checkout, the customer enters their card details and agrees to a future charge. Shopify or your payment provider (like Stripe) securely stores (vaults) these payment details in a PCI-compliant manner. Later, when you’re ready to fulfill the order, you trigger the charge. The customer’s card is processed at that point.

This eliminates the authorization period problem entirely. Whether your lead time is 30 days, 90 days, or six months, you can charge the customer when it makes sense for your operations and their expectations.

Vaulted card payments became widely available on Shopify in 2022, transforming pre-order operations for merchants who needed charge-later flexibility without authorization period stress.

Vaulted cards vs authorization periods

The differences between standard authorization, extended authorization, and vaulted cards are significant:

FeatureStandard AuthorizationExtended Authorization (Plus)Vaulted Cards
Time Limit7 days30 daysUnlimited
Additional FeeStandard rates+1.75% after day 7Standard rates
Plan RequiredAll plansShopify Plus onlyAll plans with Shopify Payments
Card Type SupportAllVisa, MC, AmexAll
Best For1-week lead times2-4 week lead times30+ day lead times

Standard authorization works fine for quick turnarounds. Extended authorization suits Shopify Plus merchants with moderate lead times who can absorb the extra fee. Vaulted cards are the most flexible and cost-effective option for longer timelines.

Why 56.4% of pre-orders use vaulted cards

According to data from one million pre-orders, 56.4% of pre-order listings use the charge-later (vaulted card) method, making it the single most popular pre-order payment approach. This isn’t surprising given the flexibility it provides.

Merchants choose vaulted cards because they eliminate authorization expiration anxiety. You’re not watching the clock or manually tracking when to capture payments. The payment details are safely stored until you’re ready.

Customers often prefer charge-later arrangements too. Being charged when the product ships (rather than weeks or months before) feels fairer and builds trust. They know their money isn’t tied up for an extended period before receiving anything.

The data shows 47.8% of pre-orders are charged within 30 days of the order being placed. This means nearly half of all pre-order merchants need a solution that extends beyond the standard seven-day authorization period. Vaulted cards provide that solution without additional fees.

When to use vaulted cards for your pre-orders

Vaulted cards make the most sense when your lead times regularly exceed 30 days. If you’re manufacturing products to order, sourcing from overseas suppliers, or running seasonal campaigns with multi-month gaps, vaulted cards eliminate timing stress.

They’re also ideal when lead times are uncertain or variable. If you’re not confident about exact ship dates, you don’t want to be racing against an authorization deadline. Vaulted cards let you charge when you’re actually ready to fulfill.

Customer expectations matter too. If your audience prefers to pay when products ship rather than months in advance, charge-later pre-orders align with that preference. This is particularly common in sustainable fashion and made-to-order categories where customers understand production takes time.

From a cost perspective, vaulted cards are more economical than extended authorization for longer timelines. You pay standard Shopify Payments rates regardless of when you charge, whereas extended authorization adds 1.75% after day seven.

vaulted cards

Alternative payment capture strategies for pre-orders

Charge upfront pre-orders

Charging upfront means capturing payment immediately at checkout. This eliminates any authorization period concerns because you’re not deferring the charge at all.

According to the one million pre-order dataset, 14.9% of pre-orders use the charge-upfront method. This works best when you have high customer trust, shorter lead times (even if beyond seven days), or strong cash flow needs that justify collecting payment early.

The trade-off is customer experience. Charging someone in August for a product arriving in November can feel uncomfortable for customers, particularly if they’re unfamiliar with your brand. Clear communication about payment timing is essential.

Charge-upfront pre-orders work well for restock scenarios where customers are familiar with the product, limited edition launches with high demand, or when you’re offering significant discounts that justify early payment.

Deposit-based pre-orders

Deposit pre-orders capture a portion of the payment upfront (typically 10-50%) and collect the balance later via vaulted card. This approach accounts for 12.6% of pre-orders based on PreProduct’s dataset.

Deposits work particularly well for high-ticket items where you want to secure customer commitment without charging the full amount months in advance. The upfront deposit reduces cancellation risk while the deferred balance maintains goodwill.

For example, you might take a 30% deposit at checkout and charge the remaining 70% when the product is ready to ship. The deposit is processed immediately (no authorization period issue), and the balance uses vaulted card technology.

This approach balances cash flow needs with customer experience. You get some revenue upfront to fund production or offset supplier costs, while customers appreciate not paying the full amount until fulfillment is imminent.

Payment links and capture-only pre-orders

The capture-only method, used by 28.7% of pre-orders, involves collecting payment information without any upfront charge. You then send a payment link or invoice when ready to fulfill.

This approach offers maximum flexibility for merchants but requires more manual work. You’re essentially managing payment collection separately from the initial order, which can lead to customer drop-off if they don’t complete the payment when invoiced.

Capture-only makes sense for lower-volume merchants, custom orders, or situations where you want to give customers maximum flexibility. It works well when you have strong customer relationships and low risk of non-payment.

The downside is operational complexity and potential revenue loss if customers don’t respond to payment requests. You also need systems in place to track which orders are awaiting payment vs. fully paid.

Third-party payment gateways and authorization periods

Do third-party gateways have longer authorization periods?

One common question is whether switching to a third-party payment gateway (instead of Shopify Payments) provides longer authorization periods. Unfortunately, the answer is generally no.

Authorization period lengths are set by card networks (Visa, Mastercard, etc.), not by Shopify or individual payment processors. The seven-day standard is an industry-wide rule that applies across most processors and platforms.

Certain industries get exceptions. Lodging, car rentals, and cruise lines can hold authorizations for up to 30 days because of the nature of their business. Ecommerce pre-orders don’t fall into these exception categories.

This means whether you use Shopify Payments, Stripe, Authorize.net, or another gateway, you’re generally working within the same seven-day authorization window (with some card-specific variations of 5-10 days).

When third-party gateways make sense

Third-party gateways can still be valuable if they offer vaulted card capabilities or flexible payment capture workflows that suit your needs better than Shopify Payments.

For example, Stripe offers robust APIs for storing payment methods and charging them later, similar to Shopify’s vaulted card functionality. If you’re building custom checkout flows or need specific payment features, a gateway like Stripe or Braintree might provide more flexibility.

The trade-off is that using a third-party gateway instead of Shopify Payments means you lose some Shopify-native features, potentially pay higher transaction fees, and may need more technical setup.

For most merchants, Shopify Payments with vaulted card support provides the simplest solution. But if you have specific requirements or already use a preferred gateway with deferred payment capabilities, that can work too.

How to set up charge-later pre-orders with vaulted cards

Requirements for vaulted card payments

To use vaulted card payments on Shopify, you need Shopify Payments enabled as your payment processor (or PayPal automatic payments). This feature isn’t available with third-party gateways through Shopify’s native checkout.

You’ll need a pre-order app that supports deferred payment functionality. Not all pre-order apps offer charge-later capabilities, so ensure your chosen solution integrates with Shopify’s vaulted card system.

Clear customer communication is essential. Your product pages, checkout flow, and confirmation emails should clearly explain when payment will be collected and what customers can expect.

Step-by-step setup process

Start by enabling Shopify Payments if you haven’t already. Go to Settings > Payments and complete the Shopify Payments setup process.

Next, enable manual payment capture. In Settings > Payments > Payment authorization, select “Manually capture payment for orders” and save your changes.

Install a pre-order app with vaulted card support, such as PreProduct. Configure your app to create charge-later pre-order listings for the products you want to offer on pre-order.

Customize your front-end messaging to clearly indicate payment timing. Your product page should state something like: “Your card details will be securely saved. We’ll charge you one week before your estimated ship date of [DATE].”. We have a post here on legal compliance for pre-orders and minimum communication requirements for pre-orders.

Test the entire customer experience. Place a test order, go through checkout, and confirm that payment details are vaulted properly and that you can trigger the charge from your admin when ready.

Ensure your product has the “Continue selling when out of stock” setting enabled in Shopify. This allows customers to purchase even when inventory shows zero, which is necessary for most pre-order setups.

PreProduct’s approach to authorization periods

PreProduct handles vaulted card setup automatically for charge-later and deposit-upfront pre-orders. When you create a pre-order listing, PreProduct configures the necessary settings to vault customer payment details without authorization period limitations.

You can trigger charges individually or set up inventory-based automation. For example, when stock is added to a product in your Shopify admin, PreProduct can automatically charge customers and release fulfillment holds.

Failed payment handling is built in. If a customer’s card declines when you attempt to charge, PreProduct can send dunning emails with clear instructions for updating payment methods, reducing lost revenue from expired cards or insufficient funds.

PreProduct also places automatic fulfillment holds on pre-order items, preventing them from being prematurely shipped before you trigger the charge. This keeps operations clean and prevents the nightmare scenario of shipping products before collecting payment.

pre-order type

Customer communication and authorization periods

Setting clear expectations upfront

Product page messaging is your first opportunity to set expectations. Include clear, specific language about when payment will occur. For example: “Pre-order now, pay when it ships. We’ll charge your card one week before your estimated ship date.”

At checkout, reiterate payment timing in your terms or checkout instructions. Customers should explicitly understand they’re agreeing to a future charge, not an immediate one.

Order confirmation emails should reinforce these details. State clearly: “Your order is confirmed. Your card ending in [######] will be charged on approximately [DATE], one week before your estimated ship date of [DATE].”

The estimated ship date should be visible throughout the customer experience. Consider using date ranges if exact timing is uncertain: “Estimated shipping: Late November 2025” rather than committing to a specific day you might miss.

Handling authorization expirations and failed charges

If you’re using standard authorization and it expires, proactive communication is critical. Contact the customer immediately to explain the situation and request updated payment information.

For vaulted card payments, failed charges are a different challenge. The card might have expired, been canceled, or have insufficient funds. Your pre-order system should offer dunning email flows when charges fail.

Effective failed charge emails include a clear subject line (“Action needed: Update payment for your order”), explanation of what happened, and a simple link to update payment details. Customer portals where buyers can self-serve payment updates reduce support burden significantly.

Set a clear policy for how long you’ll attempt to collect payment before canceling the order. Some merchants try for seven days, others for 14-30 days. Communicate this timeline to customers so they know the urgency.

Email sequence best practices

A solid email sequence for charge-later pre-orders includes three potential touchpoints:

Order confirmation: “Thank you for your pre-order. Your card will be charged on approximately [DATE] when your order is ready to ship.”

Charge notification: “Your payment of $[AMOUNT] has been processed and your order is now preparing to ship.” Include tracking information if available, or an estimated ship date.

Failed charge follow-up: If the charge fails, send immediate notification with clear instructions for updating payment details and a deadline for action before the order is canceled.

Authorization periods and your tech stack

How authorization timing affects fulfillment integrations

Pre-orders shouldn’t flow through to your 3PL or fulfillment center until you’ve collected payment and are ready to ship. This is where fulfillment holds become critical.

Shopify’s fulfillment hold status prevents orders from syncing to connected fulfillment systems. For charge-later pre-orders, this hold should remain in place until you trigger the charge and release fulfillment simultaneously.

PreProduct automatically manages this workflow. When you create a charge-later listing, fulfillment holds are applied. When you trigger charges (individually or via automation), PreProduct releases those holds at the same time, allowing orders to flow to your 3PL integration.

Without proper hold management, you risk shipping products before collecting payment, which creates accounting headaches and potential losses if payments subsequently fail.

ecom tech stack

ERP and inventory management considerations

If you use an ERP or inventory management system connected to Shopify, pre-order status and payment timing should be reflected accurately. Some ERPs only pull “paid” orders, which means charge-later pre-orders won’t appear until payment is captured.

This can be beneficial for cash flow tracking (you only see paid orders in your ERP) or problematic for demand planning (you can’t see full pre-order demand). Understand how your specific ERP integration handles unpaid orders.

PreProduct provides visibility into pre-order demand regardless of payment status. You can view all pre-orders, filter by charge status, and export data for demand planning and ERP integration purposes.

When setting up integrations, test how pre-orders flow through your system. Place test orders with different payment types and verify they appear correctly in your ERP, inventory system, and fulfillment platform at the appropriate times.

Shopify Flow automation and authorization periods

Shopify Flow allows you to build automated workflows based on events in your store. For pre-orders, you can create flows that trigger actions based on payment capture timing.

For example, you might build a flow that automatically tags orders when payment is captured, triggering a fulfillment workflow or customer notification sequence. Or you could create flows that alert your team when authorizations are approaching expiration.

PreProduct offers 15+ Shopify Flow actions specifically for pre-orders, allowing you to automate charge triggers, fulfillment releases, customer notifications, and more based on inventory changes or custom conditions.

Flow integration lets you connect pre-order events to the rest of your Shopify ecosystem. Tag customers who complete pre-orders, trigger email campaigns in Klaviyo when charges succeed, or update inventory systems when pre-order limits are reached.

Cost analysis: Authorization strategies compared

Standard 7-day authorization costs

If you can fulfill within seven days and capture payment within the standard authorization period, you’ll pay Shopify Payments’ standard rates with no additional fees. For most merchants, this is 2.9% + 30¢ per transaction for online orders.

On a $100 order, standard fees total $3.20. There’s no additional cost for authorization, as long as you capture within the seven-day window.

The risk with standard authorization isn’t financial (if you meet the deadline), it’s operational. Miss that seven-day window and you lose the authorization, requiring manual follow-up and potentially losing the sale entirely.

Extended authorization costs (Shopify Plus)

Shopify Plus merchants capturing payment between days 8-30 pay an additional 1.75% fee on top of standard credit card processing fees. This fee only applies to the capture amount, not to refunds or partial captures.

For a $100 order captured on day 15, you’d pay the standard 2.9% + 30¢ ($3.20) plus the 1.75% extended authorization fee ($1.75), totaling $4.95 in payment processing fees.

For a $500 order captured on day 20, standard fees are $14.80 (2.9% + 30¢) plus $8.75 (1.75%), totaling $23.55 in fees.

Extended authorization makes financial sense if you’re on Shopify Plus, need the 8-30 day window, and the 1.75% fee is acceptable for your margins. For lower-margin products or longer timelines, vaulted cards are more cost-effective.

Shopify Plus

Vaulted card costs

Vaulted card payments using Shopify Payments incur only the standard credit card processing fees, regardless of when you trigger the charge. There’s no authorization period fee, no extended authorization fee, no time-based penalty.

A $100 order charged via vaulted card on day 60 costs exactly the same as one charged on day 1: 2.9% + 30¢ = $3.20 in fees.

A $500 order charged via vaulted card 90 days after the initial order costs: 2.9% + 30¢ = $14.80 in fees, compared to $23.55 if you’d used extended authorization beyond day 7.

The cost advantage of vaulted cards increases as your lead time extends. For timelines beyond 30 days, vaulted cards are the only option that doesn’t require upfront payment or manual reinvoicing.

Choosing the right payment strategy for your pre-orders

Decision framework

Choosing the right payment approach depends on several factors: your typical lead times, whether you’re on Shopify Plus, your cash flow needs, customer expectations, and operational preferences.

Use standard 7-day authorization when your lead time is consistently under seven days, you can fulfill quickly and predictably, and you want to avoid additional setup complexity.

Use extended authorization (Shopify Plus) when your lead time falls between 8-30 days, you’re already on Shopify Plus and have access to this feature, and you’re comfortable paying the 1.75% fee for the convenience of a longer capture window.

Use vaulted cards (charge-later) when your lead time regularly exceeds 30 days, your lead time is uncertain or variable, you want to charge customers closer to ship date rather than months in advance, your customers prefer “pay when ships” models, or you want the most cost-effective option for long timelines.

Use charge-upfront when you need cash flow immediately to fund production, you have high customer trust and brand familiarity, you’re offering significant discounts that justify early payment, or you’re running limited edition or restock campaigns where customers expect immediate charges.

Use deposits when you’re selling high-ticket items where full upfront payment feels like too much, you want to secure customer commitment while maintaining goodwill, or you need some cash flow upfront but want to defer the bulk of payment until closer to fulfillment.

Real merchant examples

A fashion brand with six-week production cycles uses vaulted cards to charge one week before shipping. Customers appreciate not paying months in advance, and the brand avoids authorization period stress. Cash flow is predictable because they charge in batches as production completes.

A made-to-order furniture maker with 90-day lead times uses deposit pre-orders, collecting 30% upfront to secure commitment and fund materials, then charging the remaining 70% via vaulted card when pieces are ready to ship. This balances cash flow needs with customer experience.

A Shopify Plus merchant running seasonal products with 30-day lead times uses extended authorization. The 1.75% fee is acceptable for their margins, and the convenience of a longer capture window without needing to set up vaulted card workflows fits their operations.

A fast-moving restock campaign with 10-day lead times uses standard 7-day authorization paired with expedited fulfillment. Products typically ship within six days, allowing them to capture within the authorization window without issues.

Conclusion

The Shopify authorization period is a fundamental constraint that affects how you structure pre-order payments. The standard seven-day window works fine for quick fulfillment, but becomes a significant challenge as lead times extend.

Shopify Plus merchants gain access to extended authorization periods up to 30 days, though this comes with an additional 1.75% fee after day seven. For moderate lead times (8-30 days) and merchants already on Plus, this can be a convenient solution.

Vaulted cards represent the most flexible and cost-effective approach for longer pre-order timelines. With no authorization period limitations and no additional fees, charge-later pre-orders let you collect payment when it makes sense for your operations and your customers. The data backs this up: 56.4% of pre-orders use a vaulted card pre-order method, making it the most popular choice among merchants.

Understanding these options helps you choose the payment strategy that aligns with your lead times, cash flow needs, customer expectations, and operational complexity tolerance. There’s no single right answer, only the right answer for your specific business model.

Take stock of your typical pre-order lead times, evaluate the costs of different approaches, consider what your customers prefer, and test your chosen method end-to-end before launching. Pre-orders are powerful for capturing demand early and reducing inventory risk. Don’t let authorization period confusion hold you back from leveraging them effectively.

PreProduct handles charge-later, deposit, and charge-upfront pre-orders natively on Shopify, with built-in vaulted card support and no authorization period limitations. If you’re ready to start taking pre-orders on Shopify without worrying about authorization windows, explore how PreProduct can help streamline your pre-order operations.

Video

Pre-sell With PreProduct

7 day free trial with all plans

5 Ways to Put Products on Pre-Order in Shopify: Fine-Grained Control to Mass Automation

Introduction

Putting products on pre-order in Shopify is a great way to build hype, improve cash flow, and validate demand before you commit to inventory. But many merchants run into the same question: what’s the best way to incorporate pre-orders into my business?

That’s where PreProduct comes in. PreProduct gives you multiple ways to put products on pre-order in Shopify — from quick manual listings to fully automated workflows. Each approach has its own strengths and trade-offs, depending on how many products you’re managing and how hands-on you want to be.

In this post, we’ll walk through five different ways of putting a product on pre-order in Shopify with PreProduct.


1. Manual Listing

The most straightforward way of putting a product on pre-order is to create a listing manually in PreProduct. You can set deposits, lead times, and customize variant availability. It’s perfect if you want complete control over the details of each pre-order.

The trade-off? It’s slower when managing more than a handful of products.

👉 Full guide: Listing a new product on pre-order


2. Bulk Lister

If you want to put multiple products on pre-order at once, PreProduct’s bulk product lister makes it simple. You can apply pre-order settings across batches of products in just a few clicks.

This is ideal for mid-sized catalogs where setting each product individually would be too time-consuming.

👉 Full guide: Bulk Product Lister


3. Listing Manager

For stores managing hundreds or even thousands of products, templates are the best way to scale pre-orders. Instead of configuring each product, you define rules — for example: “apply deposit upfront pre-orders to all products tagged ‘Pre-Sale’.”

PreProduct’s Listing Manager builds on templates to deliver full automation. Once your templates are in place, the Listing Manager will automatically apply them to new or updated products as variants go in and out of stock.

This is ideal for large catalogs where products frequently go in and out of stock, saving hours of repetitive admin work.

👉 Learn more: Templates


4. API

If you need complete flexibility, PreProduct’s Admin API is the most powerful way to put products on pre-order. It allows developers to programmatically create, edit, or remove listings, integrate with your backend, and sync pre-order data with external systems like ERPs or custom apps.

This route is for teams with technical resources who want pre-orders deeply embedded in their existing workflows.

👉 Full guide: PreProduct Admin API


5. Shopify Flow

Shopify Flow is a free Shopify app that allows you to build automation workflows across your store. PreProduct integrates directly with Flow, enabling over 30 pre-order related triggers and actions:

  • “Put listing variant on pre-order”
  • “Link listing to template”

This opens up powerful automation without needing to write code, though it does require a system-thinking approach to set up correctly.

👉 Full guide: Pre-order Shopify Flow Actions & Triggers


Which Method Should You Choose?

When it comes to putting products on pre-order in Shopify with PreProduct, the right method depends on your stage and scale:

  • Best for getting started: Manual listing
  • Best for 10–100 products on pre-order: Bulk lister or listing manager
  • Best for automation: Start with Listing Manager, then add Shopify Flow if needed

Wrap-Up

Putting products on pre-order is a low-risk way to improve cash flow and capture demand before stock arrives. Whether you’re just listing a single product manually or building full-scale automations, PreProduct supports every workflow — from fine-grained control to mass automation.

Want to learn more? Check out the PreProduct docs for step-by-step guides on putting products on pre-order in Shopify.

Pre-sell With PreProduct

7 day free trial with all plans

How to Create Urgency for Pre-Orders (3 Psychological Triggers)

Want to see a video? Skip to the bottom of the post to see Oli talk about creating urgency for pre-orders.

Did you know humans are roughly 2.5 times more sensitive to losses than we are to gains of similar size? In this article, we’ll cover three psychology-backed ways to generate urgency for your pre-order campaigns — and why they work.

Core Idea

Urgency in pre-order campaigns can boost conversions when it’s rooted in psychology and applied ethically, not through manipulative pressure. The goal is to help customers make decisions with confidence, not to trick or overwhelm them.

Why Urgency Works (Psychology)

Loss Aversion

  • Quote: “We are roughly 2.5 times more sensitive to losses than we are to gains of similar size. A message framed as a potential loss might therefore be more persuasive.”
  • Ref: Daniel Kahneman (pioneer of loss aversion in behavioral economics) Link
  • What is it: Loss aversion is the tendency to prefer avoiding a loss over acquiring an equivalent gain. The pain of losing $100 feels stronger than the pleasure of gaining $100. Customers are motivated to avoid missing out.
  • Application: Frame your pre-order incentives around what customers might lose if they delay. For example, offer a limited-time discount or bonus for pre-ordering. Countdown timers or showing a limited quantity available reinforce the idea that the opportunity is slipping away.
  • Example: Many Kickstarter campaigns use early-bird pricing tiers available only to the first X backers or for a limited period. This taps into buyers’ fear of missing out on a better deal, driving a surge of early pledges.
    Another example of Loss Aversion is Booking.com, who often displays messages like “Only 2 rooms left for your dates”.
Kickstarter tier limits

Scarcity Principle

E-commerce deal pages often highlight limited time and quantity to trigger urgency. When customers see a ticking countdown or low-stock warning, they perceive the product as more valuable and feel pressure to act before it’s too late.

  • Quote: “Simply put, people want more of those things they can have less of.”
  • Ref: Robert Cialdini, Influence: The Psychology of Persuasion Link
  • What is it: The scarcity principle says that limited availability increases perceived value. Easily available products feel like commodities; rare products seem special and desirable.
  • Application: Launch your next pre-order as a limited drop with a finite number of units or a clear deadline. Communicate that only a certain number of customers will get the product. Just make sure the scarcity is real — fake sell-outs can damage trust.
  • Example: Streetwear brand Supreme mastered scarcity by releasing limited quantities that fans would line up for hours to buy. You can create your own version of this hype by positioning your product as a limited-edition pre-order drop.
Supreme limited edition drop
Supreme limited edition drop (ref: story.capetown)

Social Proof and Trends

Crowds lining up for a new iPhone release are a powerful example of social proof. If so many people are eager to buy, it signals that the product must be good. In e-commerce, you can mimic this by showing indicators of high demand — like “500 customers already pre-ordered” or live purchase notifications.

  • Quote: “Especially when they are uncertain, people will look to the actions and behaviors of others to determine their own.”
  • Ref: Robert Cialdini, Influence Link
  • What is it: Social proof is when people look to others’ behavior to guide their own decisions. A popular product feels safer and more appealing.
  • Application: Highlight activity and reviews to show that others are buying. Use live notifications, customer photos, or counters (“Over 500 pre-orders so far!”) to reinforce demand.
  • Example: This combines social proof with scarcity. Similarly, you might highlight “Join 300 others who have pre-ordered this item.” Even McDonald’s classic “Over 100 million served” is social proof in action.
Mila UGC reviews
Mila UGC reviews

Summary

Creating urgency for pre-orders is about tapping into three core psychological triggers: loss aversion (we hate missing out), scarcity (we want what’s rare), and social proof (we follow the crowd).

When used authentically, these tactics can significantly boost your pre-order conversions. The key is to apply them transparently and ethically:

  • Clearly communicate limits or timeframes.
  • Back up popularity claims with real evidence.
  • Build trust by delivering on promises.

By using urgency as a positive force, you can generate excitement, prompt faster action, and increase pre-orders — all while strengthening customer trust.


Oli Woods

Co-founder @PreProduct

Pre-sell With PreProduct

7 day free trial with all plans

Shopify Flow Pre-order Automation: Complete Guide + 31 Triggers & Actions

Managing pre-orders manually drains time small teams don’t have. Tracking inventory thresholds, sending customer emails, coordinating fulfillment, updating product availability, these repetitive tasks consume hours each week. Shopify Flow pre-order automation eliminates this operational overhead, letting merchants build sophisticated pre-order systems without developers or ongoing maintenance costs.

Whether you’re running simple restock campaigns or complex charge-later pre-orders with deposits, automation transforms manual processes into hands-free workflows that scale with your business. This guide shows you how to automate pre-orders using native Shopify Flow, then extend functionality with PreProduct’s 15 custom actions and 16 custom triggers for complete pre-order lifecycle management.

Why Use Shopify Flow for Pre-orders?

Pre-order operations involve multiple interconnected processes: inventory monitoring, product availability updates, customer communications, pricing adjustments, and fulfillment coordination. Without automation, merchants manually check inventory levels, toggle product settings, send emails, and track when to charge customers or release orders.

Shopify Flow automates these touchpoints, creating intelligent workflows that:

  • Save operational time. Instead of manually enabling pre-orders when items sell out, Flow does it automatically within seconds of inventory hitting zero.
  • Reduce human error. Automated workflows execute consistently every time, eliminating forgotten steps or missed communications.
  • Scale without headcount. Small teams can manage hundreds of pre-orders with the same efficiency as large operations departments.
  • Enable sophisticated logic. Combine multiple conditions to create nuanced workflows that adapt to different scenarios (product type, customer segment, inventory status).

For merchants running pre-orders, Flow transforms a labor-intensive process into a hands-free operation that runs 24/7 without intervention.

Shopify Flow Pre-order Automation: Key Benefits

Before diving into specific workflows, understanding the strategic advantages helps you design automation that aligns with your operational goals.

  • Instant pre-order activation. When high-demand products sell out, Flow can activate pre-order mode within seconds, capturing demand instead of losing sales to “out of stock” messages.
  • Automatic inventory management. Flow monitors inventory levels continuously and toggles between buy-now and pre-order modes based on stock availability, eliminating manual threshold monitoring.
  • Coordinated customer communication. Trigger email sequences, update customer segments, or send notifications based on pre-order events, keeping buyers informed throughout the pre-order journey.
  • Flexible fulfillment control. Automatically apply fulfillment holds to charge-later pre-orders, then release orders when stock arrives or you manually tag items as ready-to-ship.
  • Conditional logic for complex scenarios. Build workflows that behave differently based on product tags, metafields, inventory levels, or customer attributes, handling exceptions without manual intervention.

These capabilities compound when combined, creating end-to-end automation that manages pre-orders from stockout detection through final fulfillment release.

What Flow offers small teams:

  • Automation across products, inventory, orders, customers, and more.
  • No need for manual scripts or recurring app maintenance.
  • The ability to scale smarter, not just headcount.
  • Qualified stores can use the HTTP request action to call out to third party services like ERP’s, marketing services or AI context aggregators.

In essence, Flow gives you the building blocks to operate like a much larger team – without hiring.

automation

Part 1: Native Shopify Flow Pre-order Automation (Free)

You can build functional pre-order automation using only Shopify Flow’s native capabilities, no apps required. This approach works well for basic scenarios and helps you understand Flow’s fundamentals before adding advanced features.

Example Workflow: Activate Pre-order When Inventory Reaches Zero

This workflow automatically enables pre-orders when variants sell out, then reverses the process when stock is replenished.

➡️ Trigger: Product variant inventory equals 0

Flow monitors all product variants in your store. When any variant’s available inventory hits exactly zero, this trigger fires.

➡️ Condition: Product has tag “can-pre-order”

Not every product should become available for pre-order when it sells out. This condition checks if the product has been tagged “can-pre-order” by your team, giving you manual control over which items are pre-order eligible.

You might tag seasonal items, bestsellers, or products with predictable restock timelines as “can-pre-order” while excluding one-off or discontinued items.

➡️ Action 1: Enable “Continue selling when out of stock”

Using an HTTP request action (Shopify Plus) or manual product setting update, enable the “continue selling when out of stock” option for the variant. This allows customers to add the item to their cart and checkout even though inventory is zero.

➡️ Action 2: Update product metafield with pre-order messaging

Set a metafield on the product (e.g., custom.pre_order_message) with customer-facing text like “Ships mid-March” or “Pre-order now, shipping in 4-6 weeks.” Your theme reads this metafield to display pre-order information on product pages.

Reversal Workflow: Disable Pre-order When Stock Returns

When inventory is replenished, automatically disable pre-order mode and return to normal buy-now behavior.

➡️ Trigger: Product variant inventory is greater than 0

This trigger fires when stock levels increase above zero (restock occurs).

➡️ Condition: Product has tag “can-pre-order” AND metafield custom.pre_order_message exists

Only reverse products that were previously in pre-order mode (indicated by the presence of the pre-order metafield).

➡️ Action 1: Disable “Continue selling when out of stock”

Turn off overselling so the product returns to standard inventory behavior.

➡️ Action 2: Remove pre-order metafield

Delete the custom.pre_order_message metafield to stop displaying pre-order messaging on the product page.

Limitations of Native Flow for Pre-orders

While native Shopify Flow handles basic scenarios, it has constraints for sophisticated pre-order operations:

  • No pre-order-specific triggers. Native Flow doesn’t know when a pre-order is created, charged, or fulfilled, it only sees standard Shopify events (inventory changes, order creation, product updates).
  • Limited charge control. Flow can’t trigger deferred charges for charge-later pre-orders or coordinate payment timing with inventory arrival.
  • No fulfillment hold management. Native Flow can’t automatically apply or release fulfillment holds to prevent premature shipping of charge-later pre-orders.
  • Manual pre-order listing creation. You need to manage pre-order configurations (deposit amounts, ship dates, customer limits) outside of Flow.
  • These limitations create the case for extending Flow with pre-order-specific capabilities, which is where PreProduct’s custom triggers and actions come in.

Part 2: Extending Shopify Flow with PreProduct (31 Custom Capabilities)

PreProduct adds 31 specialized triggers and actions specifically designed for pre-order automation. While native Flow handles general Shopify events, PreProduct’s extensions give you granular control over the entire pre-order lifecycle, from listing creation through charge initiation and fulfillment release.

Why PreProduct Extends Flow

Native Shopify Flow provides infrastructure but lacks pre-order domain knowledge. PreProduct bridges this gap by introducing events and actions that understand charge-later pre-orders, deposits, customer limits, shipping notifications, and fulfillment holds.

For example, native Flow can detect when inventory hits zero, but it can’t create a pre-order listing with specific deposit amounts, ship dates, and customer limits. PreProduct’s “Create listing” action handles this complexity in a single step.

Similarly, native Flow can trigger when an order is created, but it can’t distinguish between regular orders and charge-later pre-orders, or trigger charges when inventory arrives. PreProduct’s “Charge created” trigger and “Trigger charges and/or fulfilment” action provide this pre-order-specific logic.

15 Custom Actions

PreProduct’s actions let you programmatically manage pre-order operations from within Flow workflows:

Listing Management

  • Create listing: Programmatically create pre-order listings with all configuration (deposit, ship date, limits, discounts)
  • Get listing: Retrieve listing details to use in conditional logic
  • Get all listings: Access multiple listings for bulk operations

Variant Control

  • Add variants to pre-order: Enable pre-orders for specific variants within a listing
  • Remove variants from pre-order: Disable pre-orders for variants (e.g., when discontinuing)

Configuration Updates

  • Update customer limit: Adjust maximum quantity per customer during campaigns
  • Update deposit amount: Modify deposit pricing dynamically
  • Update discount: Change pre-order discounts based on conditions
  • Update shipping: Adjust estimated ship dates as timelines shift

Charge & Fulfillment

  • Trigger charges and/or fulfilment: Initiate simultaneous payment capture and fulfillment release for ready-to-ship pre-orders
  • Apply listing template: Use saved templates for consistent pre-order configuration

Status Checks

  • Check if variant is on pre-order: Conditional logic to determine variant status
  • Synchronise listing: Ensure PreProduct and Shopify stay in sync

16 Custom Triggers

PreProduct’s triggers detect pre-order-specific events that native Flow doesn’t recognize:

Listing Lifecycle

  • Listing created: Fires when a new pre-order listing is created
  • Listing finished: Triggers when a listing ends (time-based or manual)
  • Listing shipping in 5 days: Notification trigger for upcoming ship dates

Capacity & Limits

  • Listing at 90% capacity: Alert when approaching customer or quantity limits
  • Listing limit reached: Triggers when pre-order cap is hit

Pre-order Events

  • Pre-order created: Fires when a customer places a pre-order
  • Pre-order cancelled: Triggers on customer-initiated or admin cancellations

Payment Events

  • Charge succeeded: Fires after successful deferred charge capture
  • Charge failed: Triggers when payment attempts fail (for dunning workflows)

Fulfillment

  • Fulfillment released: Fires when orders are released for shipping

Communication Events

  • Confirmation email sent: Triggers after order confirmation
  • Update email sent: Fires when you send campaign updates
  • Charge notification sent: Triggers before deferred charges attempt
  • Payment link sent: Fires when capture-only payment links are emailed

These triggers enable workflows like:

  • Send Klaviyo events when charges fail (for email recovery campaigns)
  • Tag products when listings reach 90% capacity (for marketing urgency)
  • Update internal spreadsheets when listings finish (for reporting)
  • Notify 3PL systems when fulfillment is released (for warehouse coordination)
Shopify Flow actions
PreProduct Shopify Flow actions

Combining Triggers and Actions

The power emerges when you chain PreProduct triggers and actions together in sophisticated workflows.

Example: Auto-create pre-order listing when inventory depletes, then monitor capacity

  1. Native trigger: Product variant inventory = 0
  2. Native condition: Product has tag “auto-pre-order”
  3. PreProduct action: Create listing (using template with deposit, ship date, limit)
  4. PreProduct trigger: Listing at 90% capacity
  5. Native action: Tag product “high-demand-pre-order”
  6. Native action: Add product to “Trending” collection (for homepage visibility)

This workflow automatically launches pre-order campaigns, then alerts you when demand is high so you can increase production quantities.

Real Workflow Examples: Shopify Flow Templates

Let’s walk through detailed implementations of common pre-order automation scenarios.

Workflow 1: Automatic Pre-order Activation on Stockout

Business Scenario: You sell seasonal products that frequently sell out between restocks. Instead of losing sales, you want to automatically offer pre-orders and notify customers of the estimated ship date.

➡️ Trigger: Variant inventory quantity = 0

➡️ Conditions:

  1. Product has tag “auto-pre-order-enabled”
  2. Product does NOT have metafield preproduct.listing_id (prevents duplicate listings)

➡️ Actions:

  1. Check if variant is on pre-order (PreProduct action)
  • If already on pre-order, end workflow (prevent duplicates)
  1. Create listing (PreProduct action)
  • Use template: “Standard restock pre-order”
  • Deposit: 0% (charge-later)
  • Ship date: +30 days from today
  • Customer limit: 5 units
  1. Add product to collection (Native action)
  • Collection: “Pre-order Items”
  • Makes pre-orders discoverable on your site
  1. Send Klaviyo event (Integration action)
  • Event: “Product on pre-order”
  • Triggers email campaign to waitlist subscribers

Result: When bestsellers sell out, they automatically become available for pre-order with a 30-day estimated ship date. Customers on your waitlist receive notification emails, and the product appears in your “Pre-order Items” collection.

pre-order workflow template

Workflow 2: Charge & Fulfill When Inventory Arrives

Business Scenario: You’re running charge-later pre-orders. When inventory arrives, you want to automatically trigger charges for all waiting pre-orders and release orders for fulfillment simultaneously.

➡️ Trigger: Product tagged “inventory-arrived”

Your team applies this tag when stock hits the warehouse, initiating the charge and fulfillment process.

➡️ Conditions:

  1. Product has metafield preproduct.listing_id (confirms active listing exists)

➡️ Actions:

  1. Get listing (PreProduct action)
  • Retrieve listing details using preproduct.listing_id
  1. Trigger charges and/or fulfilment (PreProduct action)
  • Target: All pre-orders for this listing
  • Action: Charge + release fulfillment
  • This action attempts to charge all vaulted cards and simultaneously releases fulfillment holds
  1. Send internal Slack notification (HTTP request action, Shopify Plus)
  • Message: “Charges initiated for [Product Name] pre-orders. Monitor charge success rate.”
  1. Remove tag (Native action)
  • Remove “inventory-arrived” tag (prevents workflow re-triggering)

Result: A single tag application bulk-processes all pre-orders for a product, charging customers and releasing orders for shipment. Your team receives Slack confirmation and can monitor charge success rates.

robot arm

Workflow 3: VIP Customer Priority Fulfillment

Business Scenario: You want to manually prioritize certain pre-orders for early fulfillment (VIP customers, influencers, early bird orders).

➡️ Trigger: Order tagged “priority-fulfillment”

Your team manually applies this tag to orders that should be fulfilled first.

➡️ Conditions:

  1. Order has tag “priority-fulfillment”
  2. Order line items include products with metafield preproduct.listing_id

➡️ Actions:

  1. Trigger charges and/or fulfilment (PreProduct action)
  • Target: This specific order only
  • Action: Charge + release fulfillment
  1. Add customer tag (Native action)
  • Tag: “VIP-early-access”
  • Flags customer for future priority treatment
  1. Send customer email (Native action)
  • Template: “Your pre-order is shipping early!”
  • Builds loyalty and excitement

Result: You maintain granular control over who gets pre-orders first, while still using automation to handle the charge and fulfillment mechanics.

Workflow 4: Metafield-Based Conditional Pre-orders

Business Scenario: You want fine-grained control over which products become pre-orders, using metafields to define eligibility rules (minimum price, specific vendors, certain product types).

➡️ Trigger: Variant inventory quantity = 0

➡️ Conditions (All must be true):

  1. Product metafield custom.pre_order_eligible = “true”
  2. Product price > $50
  3. Product vendor = “House Brand”

➡️ Actions:

  1. Create listing (PreProduct action)
  • Template varies by product type:
  • If product type = “Apparel”: Use “Apparel pre-order template” (30% deposit)
  • If product type = “Electronics”: Use “Electronics template” (50% deposit)
  • Ship date pulled from metafield custom.expected_restock_date
  1. Update metafield (Native action)
  • Set custom.pre_order_active = “true”
  • Your theme uses this to display “Pre-order” badges

Result: Only high-value, house-brand products automatically become pre-orders, with deposit amounts tailored to product category and ship dates sourced from your internal restock planning metafields.

Advanced Shopify Flow Automation Strategies

Once you’re comfortable with basic workflows, these advanced strategies unlock additional operational leverage.

🤖 Multi-Condition Logic for Targeted Automation

Combine multiple conditions to create nuanced automation that handles different scenarios appropriately.

Example: Deposit amount varies by product price tier

  • Products $0-$100: 0% deposit (pure charge-later)
  • Products $101-$300: 25% deposit
  • Products $301+: 50% deposit

Build conditional branches in Flow:

  1. If product price ≤ $100 then create listing with 0% deposit template
  2. Else if product price ≤ $300 then create listing with 25% deposit template
  3. Else create listing with 50% deposit template

This tailors payment structure to product value without manual intervention.

📫 Marketing Integration via Klaviyo & Shopify Flow

Trigger sophisticated email campaigns based on pre-order events, keeping customers engaged throughout extended lead times.

Example: Automated pre-order nurture sequence

  1. Trigger: Pre-order created (PreProduct trigger)
  2. Action: Send Klaviyo event “pre_order_placed”
    • Klaviyo flow triggered with 3-email sequence:
    • Day 0: Order confirmation + what to expect
    • Day 14: Production update + behind-the-scenes content
    • Charge date – 3 days: “Charge coming soon, update payment method if needed”
  3. Trigger: Listing shipping in 5 days (PreProduct trigger)
  4. Action: Send Klaviyo event “pre_order_shipping_soon”
    • Klaviyo flow: Excitement-building email with tracking info preview
  5. Trigger: Charge failed (PreProduct trigger)
  6. Action: Send Klaviyo event “charge_failed”
    • Klaviyo flow: Dunning sequence with payment update link

This creates a hands-free communication strategy that maintains customer excitement and recovers failed payments automatically.

📦 Operations Integration: ERP & 3PL Coordination

For merchants with external systems, Flow can orchestrate data between Shopify and your operations stack.

Example: ERP notification when pre-order capacity reached

  1. Trigger: Listing hit max limits (PreProduct trigger)
  2. Action: HTTP request to ERP (Shopify Plus)
    • Endpoint: https://your-erp.com/api/production-alert
    • Payload: { "product_id": "...", "pre_orders": 450, "message": "Increase production run" }
    • Your ERP alerts procurement to order more materials

Example: 3PL hold release coordination

  1. Trigger: Fulfillment released (PreProduct trigger)
  2. Action: HTTP request to 3PL
    • Endpoint: https://your-3pl.com/api/release-hold
    • Payload: { "order_ids": [...], "ship_date": "..." }
    • Your 3PL receives notification to start picking/packing

These integrations prevent pre-order information silos, keeping all systems synchronized.

⏰ Scheduled Workflows for Recurring Tasks

While most workflows are event-triggered, some pre-order operations benefit from time-based automation.

Example: Weekly pre-order capacity report

  • Trigger: Every Monday at 9am
  • Action: HTTP request to Google Sheets API
    • Appends row: [Date, Total active pre-orders, Revenue committed, Capacity used]
  • Result: Automatic weekly reporting without manual data pulls

Example: Abandoned cart recovery for pre-orders

  • Trigger: Cart abandoned (with pre-order item)
  • Wait: 2 hours
  • Condition: Cart not converted
  • Action: Send email highlighting pre-order benefits
    • “Reserve your spot, only X units left”
    • “Lock in early access pricing”
shopify flow logo

Troubleshooting Shopify Flow Pre-order Automation

Even well-designed workflows occasionally need debugging. Here’s how to troubleshoot common issues.

Flow Not Triggering as Expected

Symptom: Workflow should fire but doesn’t appear in Flow activity logs.

Common Causes:

  • Trigger condition not met: Double-check that the exact conditions exist (e.g., inventory hit exactly 0, not 1)
  • Workflow disabled: Verify workflow status is “Active” not “Paused”
  • Condition logic error: Review “AND” vs “OR” logic in complex conditions
  • Tag spelling mismatch: Flow is case-sensitive; “pre-order” ≠ “Pre-Order”

Debugging:

  1. Check Flow activity logs (Apps → Flow → [Workflow name] → Activity)
  2. Look for “Skipped” entries with reason explanations
  3. Temporarily remove conditions to isolate which filter is blocking
  4. Create test product meeting all conditions to verify trigger works

Charge Failures After Triggering

Symptom: Flow triggers “Trigger charges and/or fulfilment” action but charges fail.

Common Causes:

  • Expired vaulted cards (lead time exceeded card expiration)
  • Insufficient funds in customer accounts
  • Payment method removed by customer

Resolution:
PreProduct can send ‘failed charge’ emails that can be used as a dunning process, but you can enhance this with Flow:

  1. Trigger: Charge failed (PreProduct trigger)
  2. Wait: 24 hours
  3. Action: Send customer email
    • Subject: “Update payment method for your pre-order”
    • Include link to customer portal for card updates
  4. Wait: 48 hours
  5. Action: Send internal Slack notification
    • Alert team to manually follow up with high-value orders

Testing Workflows Without Affecting Customers

Challenge: You want to test workflows before enabling them for real traffic.

Best Practices:

  • Use test products: Create duplicate products tagged “test-product” and build test-specific conditions:
    • Condition: Product title contains “TEST”
    • This prevents test workflows from affecting live products
  • Disable email actions temporarily: While testing, comment out or disable email/SMS actions so customers don’t receive test notifications.
  • Run manually: Flow lets you manually trigger workflows. Create test data (test product, test inventory level), then click “Run workflow” to see results without waiting for real events.
  • Check activity logs: After manual runs, review step-by-step execution in activity logs to verify each action completed successfully.

Performance Optimization for Complex Workflows

Symptom: Workflows run slowly or time out with many actions.

Solutions:

  • Split complex workflows: Instead of one 20-action workflow, create multiple smaller workflows chained via triggers:
    • Workflow 1: Detect stockout → Create listing → Trigger “listing_created” event
    • Workflow 2: Trigger on “listing_created” → Send emails, update collections
  • Avoid unnecessary HTTP requests: HTTP actions are slower than native actions. Only use them when necessary for external integrations.
  • Use conditional early exits: Place most restrictive conditions first to exit workflows quickly when conditions aren’t met.

FAQ: Shopify Flow Pre-order Automation

No, Shopify Flow is available on all plans (Basic, Grow, Advanced, and Plus). However, HTTP request actions, which enable integration with external services like ERPs, 3PLs, or custom APIs, are Shopify Plus exclusive.

For basic pre-order automation (creating listings, triggering charges, updating products), standard Flow actions work on any plan. HTTP requests are only needed for advanced integrations beyond Shopify’s ecosystem.

Do I need Shopify Plus to use Flow for pre-orders?

Yes, when combined with PreProduct’s Flow actions. Native Flow can’t trigger deferred charges because it doesn’t have pre-order-specific payment actions. PreProduct’s “Trigger charges and/or fulfilment” action enables automatic charge initiation based on inventory arrival, manual tags, or scheduled timing.
For example, you can build a workflow:

Result: Automatic bulk charging when stock lands
– Trigger: Product tagged “inventory-arrived”
– Action: Trigger charges for all waiting charge-later pre-orders

Can Shopify Flow automate charge-later pre-orders?

Create a test workflow using duplicate products and restrictive conditions:

  1. Duplicate a real product and prefix the title with “TEST -“
  2. Build your workflow with an additional condition: “Product title contains ‘TEST'”
  3. Manually adjust the test product’s inventory or tags to trigger the workflow
  4. Review Flow activity logs to verify each step executes correctly
  5. Once validated, remove the “TEST” condition to enable for real products

Disable customer-facing actions (emails, SMS) during testing to prevent notifications.

How do I test Flow workflows without affecting real orders?

Native Shopify Flow provides general ecommerce automation: inventory changes, order creation, product updates, customer actions. It understands Shopify events but not pre-order concepts like charge-later, deposits, fulfillment holds, or listing lifecycle.

PreProduct extends Flow with 31 pre-order-specific capabilities:

  • 15 actions: Create listings, trigger charges, update deposits, release fulfillment
  • 16 triggers: Listing created, charge failed, capacity reached, shipping notifications

Use native Flow for basic stockout detection and product updates. Use PreProduct extensions for sophisticated pre-order operations like automated charge timing, customer limit management, and fulfillment coordination.

What’s the difference between native Shopify Flow and PreProduct’s extensions?

Here are some solutions to common issues:

  • Workflow status: Verify it’s “Active” not “Paused”
  • Trigger conditions: Ensure the event you expect actually occurred (check exact inventory level, tag spelling, metafield values)
  • Condition logic: Review “AND” vs “OR” logic, all “AND” conditions must be true
  • Activity logs: Flow logs all execution attempts. Navigate to the workflow and click “Activity” to see if it fired but was “Skipped” with a reason
  • Timing: Some triggers have slight delays (inventory updates may take 30-60 seconds to propagate)

If still stuck, temporarily remove all conditions except the trigger to isolate which filter is blocking execution.

How do I troubleshoot workflows that don’t trigger?

Shopify Flow works with any app that provides custom triggers and actions. Some pre-order apps offer basic Flow integration (e.g., “Pre-order placed” trigger), but the depth varies significantly.

PreProduct provides the most comprehensive pre-order integration with 31 total capabilities. Most other apps offer 2-5 basic triggers/actions without support for charge-later workflows, fulfillment holds, or deposit management.

If you’re using a different pre-order app, check their documentation for available Flow triggers and actions, then build workflows using those events combined with native Shopify actions.

Does Shopify Flow work with other pre-order apps besides PreProduct?

Native Flow (without pre-order apps) can’t:

– Create pre-order listings with deposits, ship dates, or customer limits
– Trigger deferred charges for charge-later pre-order
– Automatically apply or release fulfillment holds
– Distinguish between regular orders and pre-orders
– Track pre-order capacity or notify when limits are reached

These limitations are why merchants serious about pre-orders use apps like PreProduct to extend Flow with pre-order domain expertise. The combination of native Flow infrastructure + pre-order-specific triggers/actions creates powerful automation that neither tool achieves alone.

What are Shopify Flow’s limitations for pre-orders?

Conclusion

Shopify Flow pre-order automation transforms time-consuming manual processes into intelligent, hands-free workflows. Native Flow provides free foundational capabilities, perfect for basic stockout-to-pre-order scenarios using tags and metafields.

For merchants running sophisticated pre-order programs (charge-later, deposits, multi-step payment plans, fulfillment coordination), PreProduct’s 15 actions and 16 triggers unlock automation native Flow alone can’t achieve. Automatically create listings when inventory depletes, trigger charges when stock arrives, release fulfillment in bulk, and coordinate customer communications throughout extended lead times.

The result: small teams operate at enterprise scale, capturing demand automatically instead of losing sales to stockouts, and delivering exceptional customer experiences without expanding headcount.

Pre-sell With PreProduct

7 day free trial with all plans