Shopify Waitlist App or Pre-Order App: Which Captures More Revenue?

If you’re shopping for a Shopify waitlist app, you have a choice: capture emails and hope, or capture orders now, whether you charge upfront or later. PreProduct, the Smarter Shopify Pre-order App, lets you sell pre-orders the moment demand spikes, no waitlist, no chasing.

Waitlist app vs pre-order app: which captures more?

Shopify waitlist appShopify pre-order app (PreProduct)
What you captureAn email addressA paying order (or vaulted card)
When revenue is locked inOnly if the customer returns after the restock emailAt the moment of pre-order
Conversion at restock / launchDepends on email open + click-throughAlready converted, you just trigger fulfilment
Demand signalSoft (an opt-in)Hard (cash on the line)
Best forMarketing nurtures and brand list-buildingDrops, launches, replenishment, deposits and deferred-charge campaigns


Key Takeaways

  • A Shopify Waitlist can help Shopify stores grow their customer base, increase customer loyalty, manage inventory and drive sales growth. It can also be a useful technique for a new product launch.
  • Selecting the right app is essential.
  • Implement a waitlist strategy that can be improved and optimised over time. To do this you’ll need to setup integrations with your main email marketing tool, so you can leverage segmentation and personalization strategies.

The Power of Waitlists for Your Shopify Store

Waitlists can be a win-win addition to your Shopify store, if you’ve currently got live out-of-stock product pages on your storefront. By letting customers know when their chosen products come back in stock, you’re marketing to the ‘converted’, and this can encourage customers to complete a purchase.

Customer Retention and Loyalty

Waitlists are a great way to nurture loyal customers, increase customer satisfaction and retention. When products are unavailable, customers can join the product waitlists in order to get early access when it returns into stock. This sense of special treatment from early access, can help sales increase and by streamlining the waitlist experience, casual shoppers may be more inclined to purchase.

Inventory Management

Waitlists can be great tool by providing valuable data on your Shopify store products which aids in making informed choices for inventory management as well as product selection.

By reviewing this valuable data, you will be able to understand highly requested products better so they can be properly stocked according to demand.

This ensures there won’t be any overselling issues as well as preventing frustrating shopping experiences for buyers or inadvertently training shoppers to look elsewhere. Having a soundly-managed stock flow has the power to heighten customer commitment plus increase overall profits too.

Through more advanced techniques like referral marketing you can motivate individuals to recommend products to their friends, by offering them an exclusive incentive, such as securing a prime spot at the head of the waiting lists.

Sales optimisation and capturing intent

Waitlisting can be an important factor to help increase sales. Allowing customers to join waiting lists for out-of-stock items, as well as for new products pre-launch, is a huge buying signal. And one that you can and should take advantage of. Collecting customer interest will allow you to specifically market towards these potential customers, growing hype and converting this interest into sales, as well as assisting you to grow your customer base.


Choosing the Right Shopify Waitlist App

The Shopify app store has many different Shopify waitlist apps available for Shopify store owners. So when deciding which app to utilise for your Shopify store, it’s important to look into features, pricing and user reviews.

Essential Features

When you analyze a Shopify waitlist app, it is vital to ensure it has the following essential features:

  • Customer registration – Easy registration process for customers to join the waitlist, that captures all the details you need.
  • Notifications – Automated notifications via the method you choose (email, sms etc).
  • Customer engagement – Marketing features to allow you to engage with customers, and generate excitement.
  • Analytics and reporting – Insights into customer behaviour and preferences for better decision-making regarding future product selection.
  • Customization options – Important to allow you to customize the join waiting list button as well as the notifications/emails sent to customers.

Pricing and Reviews

When selecting a Shopify waitlist application, cost is an an important factor and one that can indicate to you the the level of support and extent of the features the app may offer.

App reviews also offer insight on the quality of service and other stores experiences using the app as well as positive and negative aspects of the app, so you can make an educated decision about which waitlist app best suits your Shopify store.


Top Shopify Waitlist Apps to Boost Sales

For merchants seeking to boost sales and improve inventory management, we’ve compiled a short list of some of the top waitlist apps in the Shopify app store that you can utilise in your online store.

Each application provides their own exclusive set of capabilities and benefits – from tracking who’s on your waiting list to automated emails when products become available – meaning it’s really important that stores find which suits them best before investing in any platform.

Appikon ‑ Back In Stock: Overview and Benefits

Appikon ‑ Back In Stock app states that it helps you automatically notify customers when previously out of stock products become available. Highlights of this app includes; Automatic back in stock notifications & back order reminders via email and 100% customizable SMS and Signup form is compatible with all themes.

Krtbite: Back in Stock|Restock

Krtbite: Back in Stock|Restock app states that it creates the out-of-stock & price drop waitlists to see products in demand. Highlights of this app are that they allow alerts/notifications for back-in-stock alerts, price drop alerts, abandoned cart alerts and is also fully customisable.



Setting Up Your Waitlist

Below is a step by step guide for setting up a waitlist app on your Shopify store:

  1. Choose a waitlist app from the app store.
  2. Install your chosen waitlist app: click the “Add app” button on the app’s page in the Shopify App Store. Follow the prompts to install the app on your Shopify store.
  3. Configure the app: access the app from your Shopify admin. Configure the app settings, including appearance, notification preferences, and integration with your store.
  4. Enable product waitlists, in the app settings, specify which products or variants should have waitlist functionality enabled. This is typically done by selecting products in your Shopify product catalogue.
  5. Customize the waitlist: customize the appearance and functionality of the waitlist to match your Shopify store’s branding and design. You can typically adjust colours, text, and notification templates.
  6. Customer sign up and notifications: set up the customer sign-up process. Ensure customers can easily join the waitlist by clicking a button or filling out a form. Configure the notification system to send alerts to customers when waitlisted items become available.
  7. Testing: Thoroughly test the waitlist functionality to ensure it’s working as intended. Place test orders and have friends/family join the waitlist to experience the process from a customer’s perspective.
  8. Promotion and communication: Promote the waitlist feature to your Shopify customers. Use various marketing channels, such as email, social media, and on-site banners, to inform them about the benefits of joining the waitlist.
  9. Monitor and optimize: Keep a close eye on the performance of your waitlist. Monitor customers engagement, conversion rates, and the impact on your sales. Make adjustments based on data and customer feedback.

Managing and Analyzing Shopify Waitlist Data



Monitoring waitlist sign-ups, conversions and engagement with the collected data enables businesses to make informed decisions when it comes to inventory management, product offerings and marketing.

The analysis of this info allows one to identify trends regarding high demand products, enabling companies to adjust their stock levels as well as sales approaches accordingly.

The usage of said data can facilitate more personalized email campaigns designed for particular audiences. This is really powerful when putting together a successful strategy to boost both user interaction and commercial transactions rates.


Leveraging Referral Waitlists

Referral-based waiting lists are an effective way to boost customer loyalty and engagement, while generating new leads.

By incentivizing customers for sharing your products and to invite friends to join the list, you can generate a buzz that attracts potential customers interested in what you offer.

To ensure success of this approach, strategies should be employed to motivate referrals as well as promote the referral program itself.



Integrating Waitlists with Email Marketing Campaigns

One way to engage and encourage customers which will result in more sales is by combining waitlist data with email marketing. Segmenting the subscriber list based on this information gives you an opportunity to personalize emails for your audience, using promotions or updates that are specific and relevant.

Below some of the techniques of segmentation are highlighted and how it can be used in personalized campaigns as well as providing helpful tips on best practices when connecting waitlists with email marketing initiatives, to assist with a seamless integration.



Segmentation and Personalization

Using waitlist information to segment and customize email marketing efforts is an effective way of heightening customer engagement as well as boosting sales.

By distinguishing your customers into smaller categories on the basis of their past activity, interests or place in the queue, you can refine what content reaches each group for maximum resonance. Including details such as a person’s name or favorite product preferences (based on past purchases) enhances engagement with emails resulting in great rewards.

We recommend using an email marketing software (such as Klaviyo) to collate and store all of your waitlist data. Centralized email marketing will allow you to gather and store all subscriber data in one place making it easier to analyze, segment, and use the data to tailor your email campaigns and marketing strategies effectively.

When subscribers are centralized, you can segment your email lists more accurately. This enables you to send targeted and relevant content to specific groups of subscribers, increasing engagement and conversion rates.

Centralized email marketing services often provide comprehensive analytics and reporting, giving you a unified view of email campaign performance. This can be beneficial for making data-driven decisions.

Best Practices for Email Marketing with Waitlists

For successful email marketing with waitlists, it’s essential to comply with relevant regulations such as CAN-SPAM Act and GDPR.

To help maximise sales conversions from your waiting lists, you should take steps like:

  • Sending emails/SMS about product availability or possible alternatives (if not planning to re-stock).
  • Extending promotional offers based on the data from waitlist customers’ preferences.
  • Creating personalized content that develops customer relationships.
  • A/B testing your waiting list front-end and email campaign wording for better conversion rates.

By using these best practices in conjunction with law compliance measures, you can put yourself in better stead for a successful Shopify waiting list setup.


Why you might opt for offering pre-order over using a waiting list app

What level of order intent do you want to capture?

While waiting list apps offer an avenue to notify customers when a product becomes available, the level of commitment from the customer tends to be relatively low. Enter pre-orders.

If your goal is to capture more genuine interest and initiate a transaction that remains flexible without charging upfront, offering pre-orders might be the best way forward.

How pre-orders are different?

By embracing a pre-order system that supports pay-later pre-orders, you can gauge a customer’s true intention to purchase even before a product becomes available.

This approach provides a more accurate measure of product demand compared to simple waiting list notifications. …and maybe more importantly, you’ve got everything ready to charge customers once you’re ready.

Benefits of offering pay later pre-orders

-High customer commitment; as the customer commits to the pre-order and enters their card details, they are less likely to cancel their order.

-Less risk; as customers have committed to the pre-order.

-Flexibility; as you choose when to trigger the charge.

How pre-orders work

Pay-later pre-orders allow customers to pre-order your out of stock, soon to launch, and limited availability products.

The customers pre-order and provides their personal details, and then at check-out they provide their card payment details and agree to be charged at a later date. Shopify then vaults these card details, and then at a later stage when you the store owner are ready you can trigger these deferred charges.

Notifying customers of any updates (such as shipping delays or when there card will be charged) is easy via fully customizable email campaigns offered by most apps.


Summary

In summary, a waitlist app can be an invaluable asset for Shopify store owners who are looking to collect customer feedback on out-of-stock products to improve inventory management while increasing the number of sales opportunities.

Before committing Shopify waitlist app it is important to consider the features, and ensure it will work well with your online store. You may also want to consider whether Shopify pre-orders may instead work better for your business.


Shopify Waitlist FAQs

Is there a waitlist option on Shopify?
How do I create a waiting list?

To create a waiting list you will need to download a waiting list app from the app store. You will then need to setup and configure the app to start collecting data.

How can waitlists improve customer satisfaction and loyalty?
What factors should I consider when choosing a Shopify waitlist app?

There are many factors to consider when choosing an app, some of the most factors include; customer registration, customization options, and analytics and reporti

How can customers join waiting lists

Customers join waitlists by clicking on the waitlist button and providing their details.

Pre-sell With PreProduct

7 day free trial with all plansMigrate pre-orders

How Merchants Can Leverage Shopify Deferred Payment and Vaulted Card Tech

What is a deferred payment order?

Understanding how you can leverage shopify deferred payment and vaulted card tech, can be very beneficial for business.

A deferred charge/payment method, allows a customer to place a pre-order, but instead of paying for the pre-order straight away, they accept a future charge and the associated payment terms. The card details are vaulted so it can be charged at a later stage.

Traditionally customers are charged for an order at the time of placing the order; whereas with deferred charge, the merchant can choose to either charge the full payment at a later time, or to take a deposit/partial payment at the time of the order, and then bill for the remaining amount later.

Using deferred payments can be really powerful when paired with pre-orders, especially when merchants are unsure how long manufacturing/freight may take.

Customers are less likely to be frustrated by delays as they have not yet paid for the item, this gives the merchant flexibility with which dates they choose to charge and fulfil the order.

Deferred payments are also convenient when customers have a change of mind, as no refund is needed.


How do deferred payments work on Shopify?

Shopify has the ability to set up a special ‘purchase option’ for selling products. When a product is purchased with this applied, the customer won’t be charged upfront. They’ll still go through checkout and enter their card details and review the order, but will accept a future deferred payment for the product, Shopify then vaults the card details with Stripe.

To use these special ‘purchase options’ and therefore offer deferred payments you will firstly need to install a Shopify app that offers and supports deferred payments.

Our app, PreProduct offers deferred payments and can be found here. The app will generate the purchase options (the technical name in Shopify’s APIs is ‘selling plan‘) on your behalf with any discounts/deposits/terms included, and communicate this to shoppers, with the approximate soonest due date shown. This can be edited as and when needed.

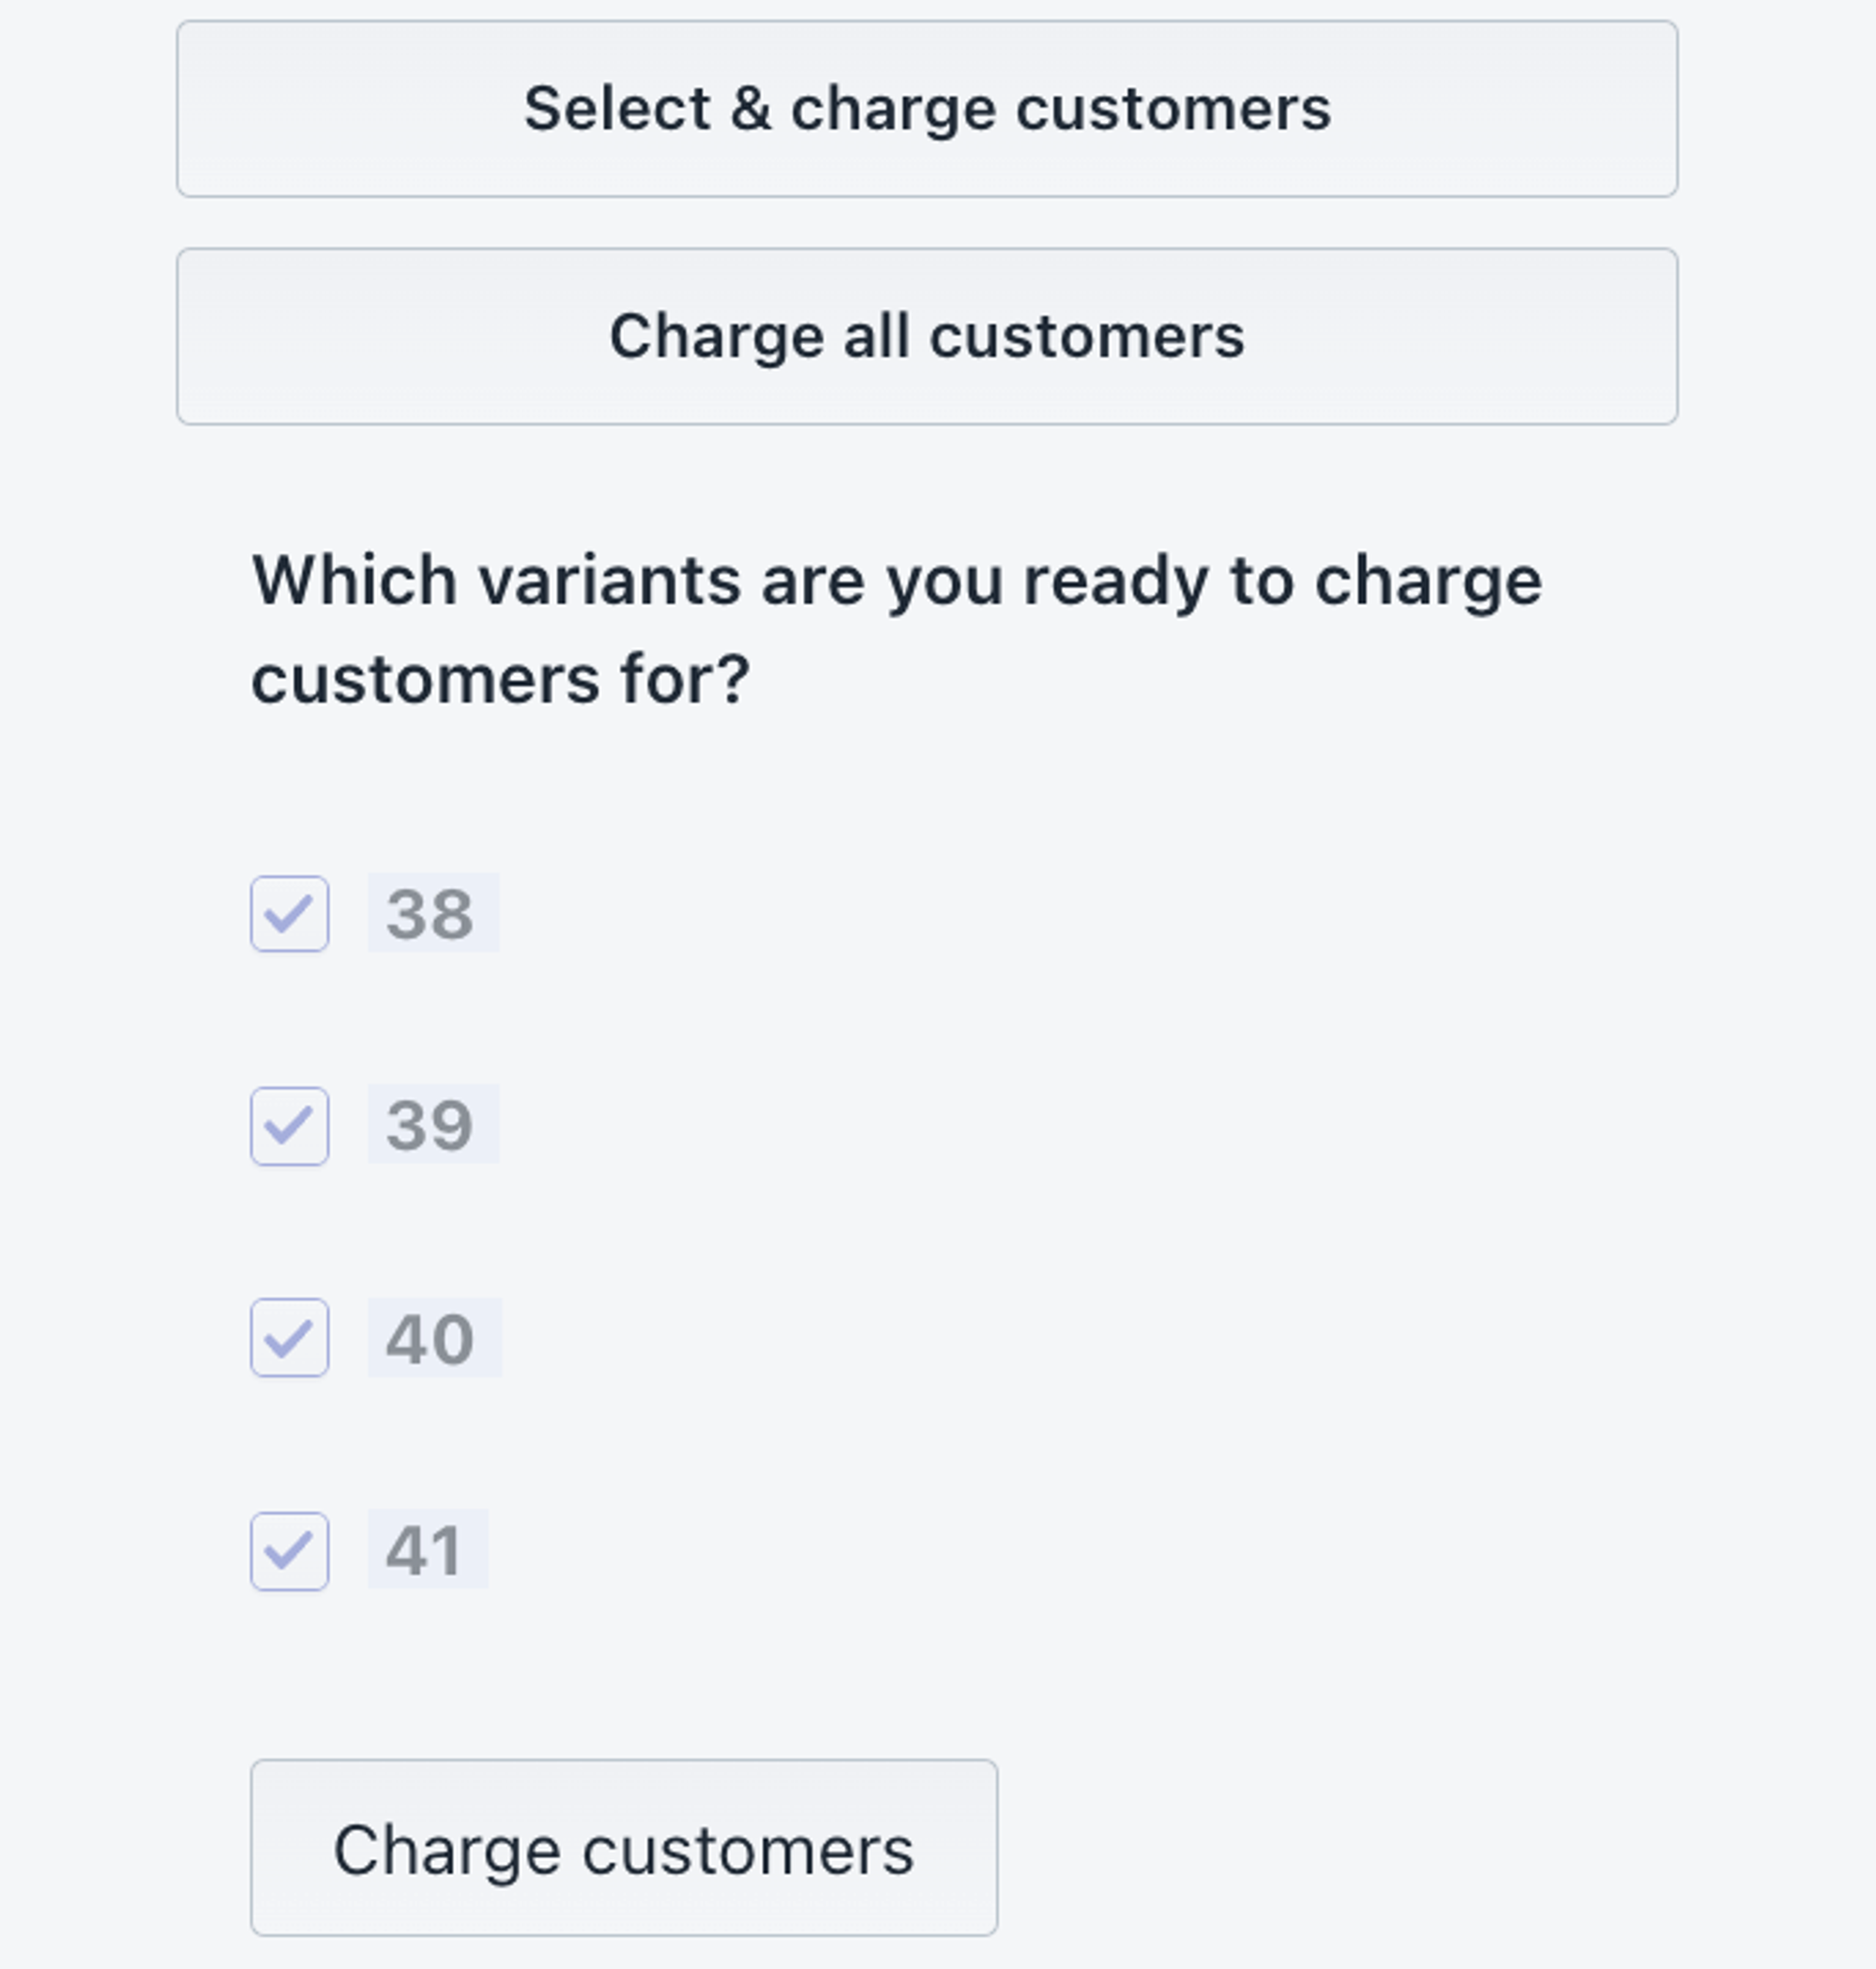
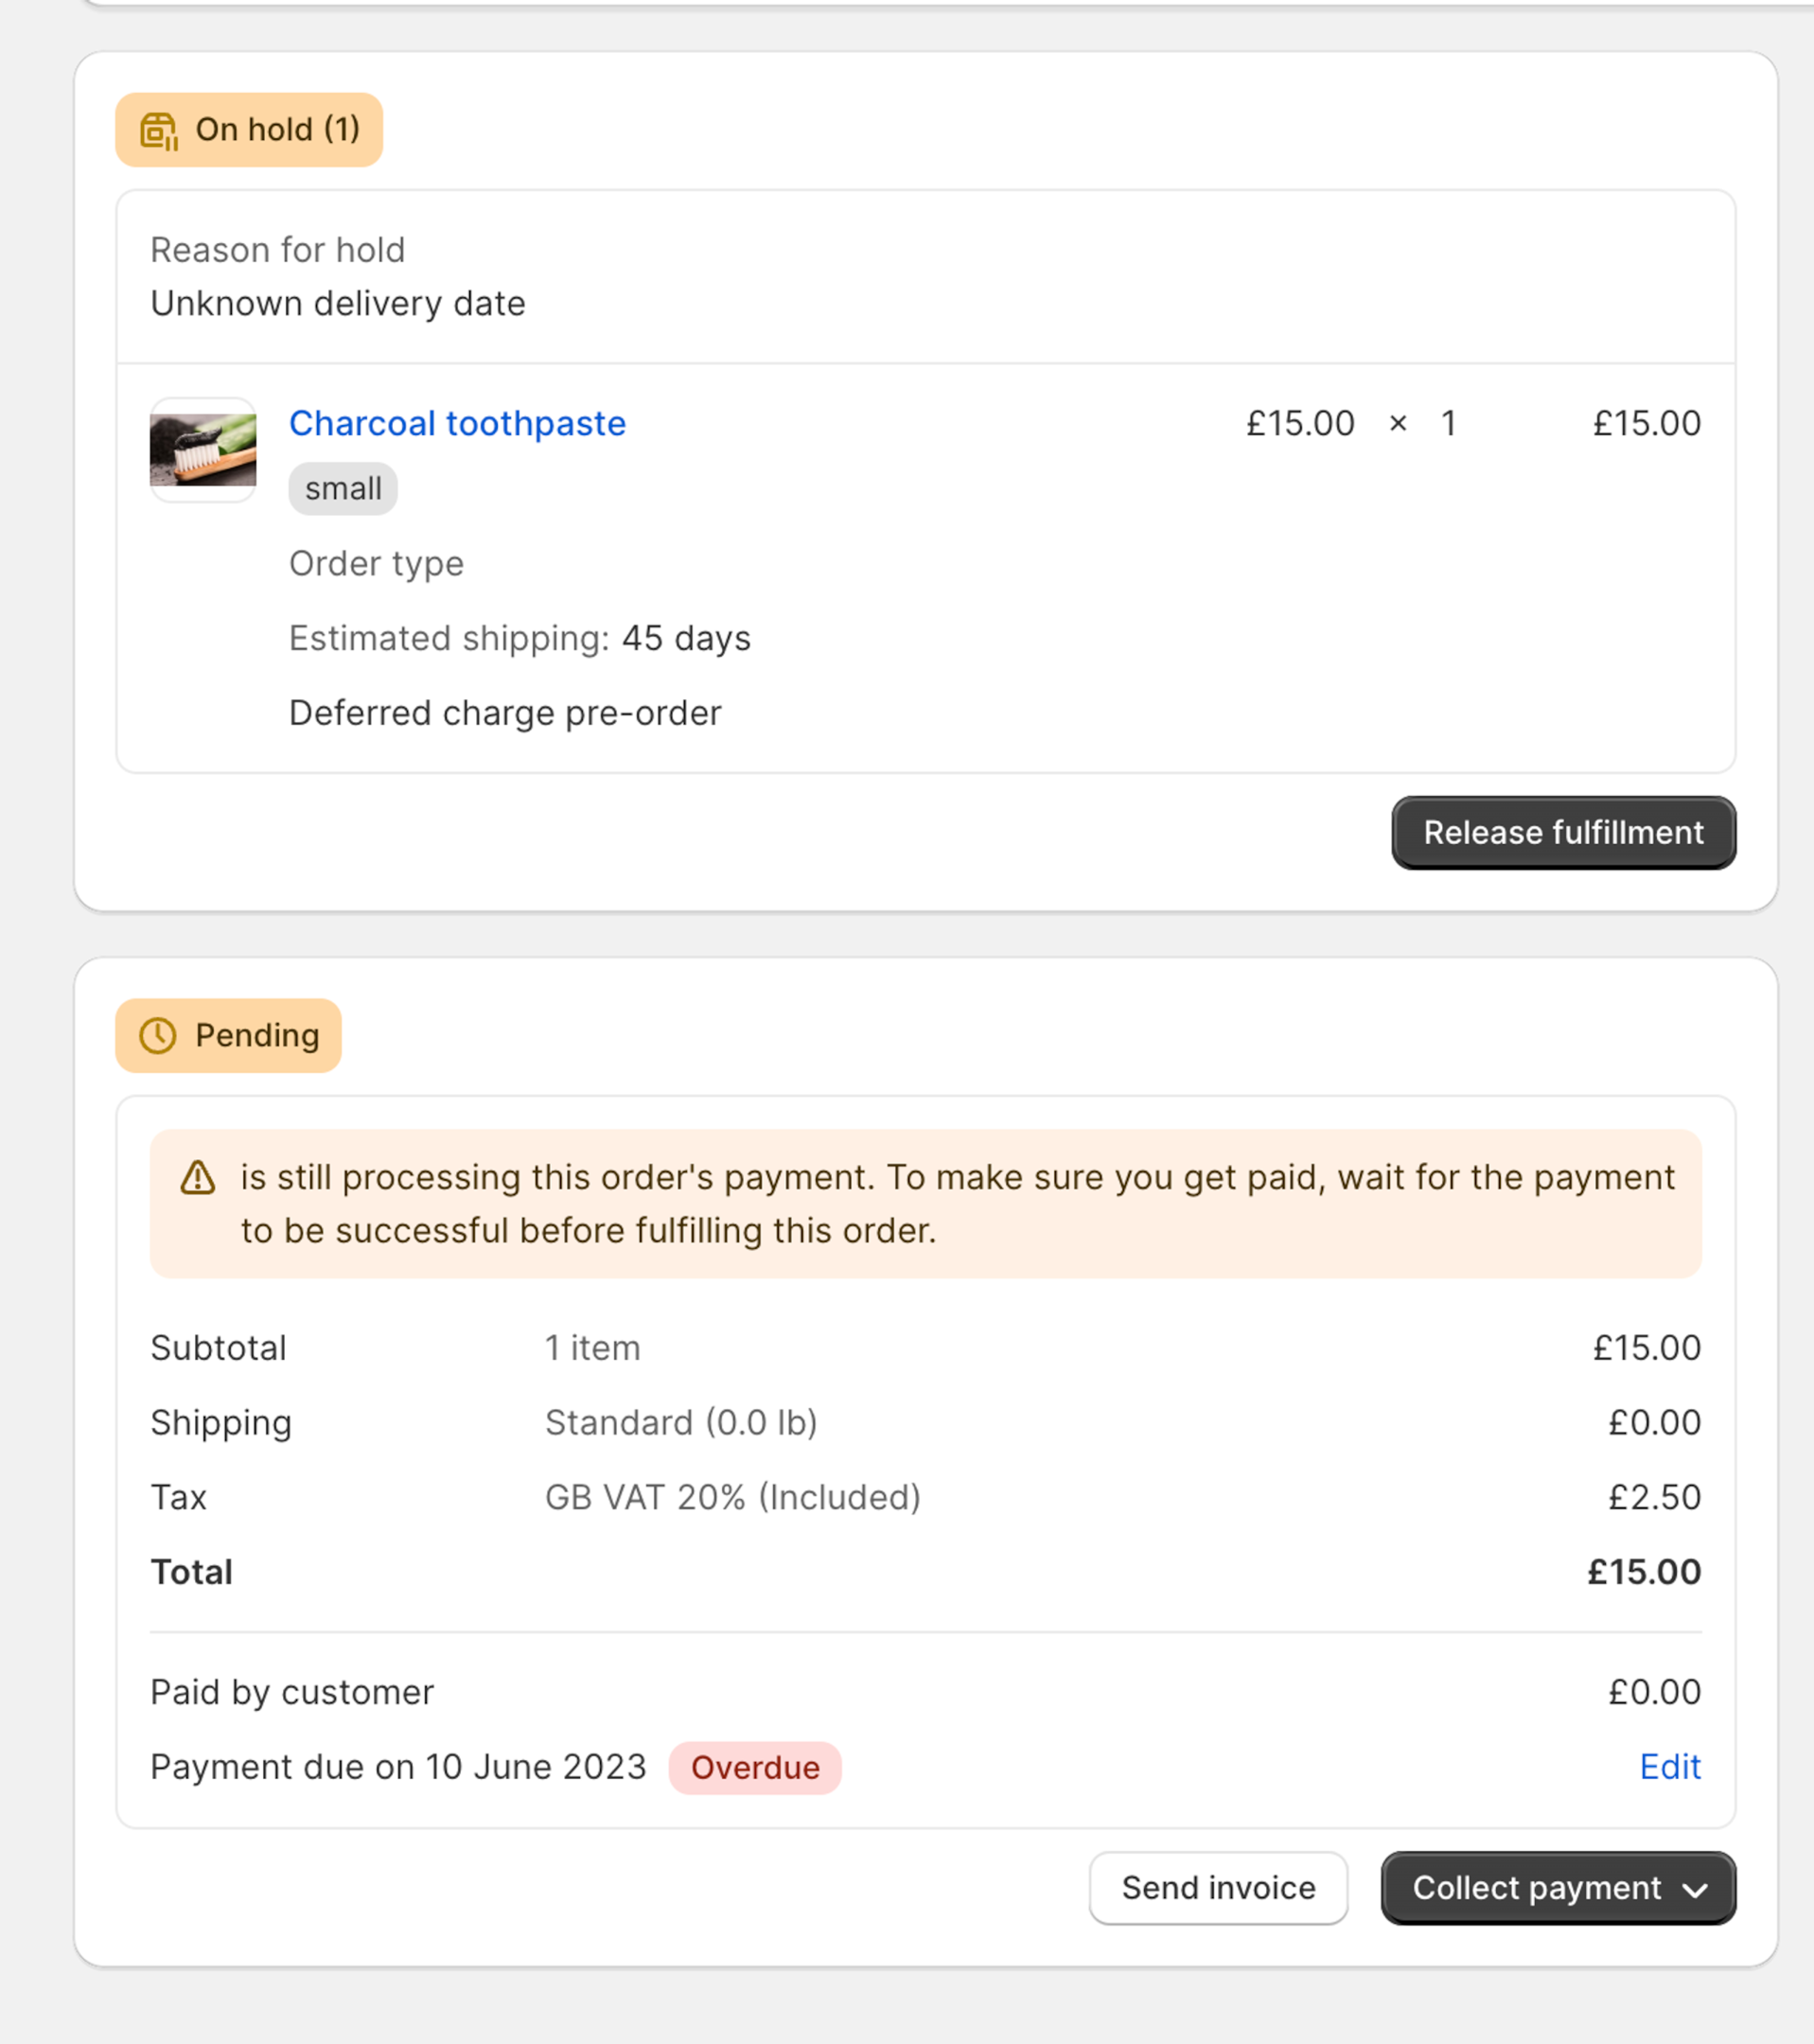
Then when you are ready to bill customers you have two options. You can either trigger the deferred charge in a one-by-one fashion from your Shopify admin in the orders section (like the screenshot below).


Or you can trigger the charges via the third party app you have installed. We recommend this option as it is a quicker and a simpler process, and can be done via the app without going into Shopify admin.

You can also keep customers updated on the payment schedule, and final payment due date via the fully customisable email campaign (as well as trigger dunning flows if cards fail)


Vaulted card VS card authorization periods VS invoice/draft-order

Vaulting card details is the process used by Shopify for deferred charges. The customers place a pre-order, and are taken to the store’s checkout. They will then enter their card details and accept a future charge. Then instead of being charged for the order, Shopify will vault and store the card details, so that they can be programatically run through checkout at a later date when the store is ready.


In comparison, the process of card ‘authorization’ is where the card issuer gives approval that the customer has sufficient funds available to meet the transaction and will accept the charge if it’s made in a certain window of time. Generally most authorisation periods will last for 5 -10 days and then expire, so the store will need to capture the charge in this time period or risk it expiring.

Vaulting is great as it’s not limited to the average 5-10 day window, as the details are recorded on file before triggering the payment.


Authorization is less flexible due to this limited window in which the payment can be charged, but does have the advantage that the credit card company will check that sufficient funds are available at checkout.

However, if the vaulted card has insufficient funds or is expired, supporting apps (like PreProduct) will show the reason for the error and let you deploy a dunning flow to try and rescue the order.

Another approach which is often used by wholesale stores is Shopify “draft orders”. These aren’t technically deferred charge as they work by sending out payment invoice emails. These invoice emails contain links which customers can use to check out.

Whilst it is technically a ‘pay later’ method (as the customer can lodge an order with you and then pay later) no future transaction is captured, it’s just a way of capturing the order intent, then starting the transaction later on.

Unless you have a specific use-case that requires draft orders, we recommend using the ‘vaulted card’ method as it allows you to send the customer through checkout once at the time of order, and then capture the payment in the future at your convenience.


When to offer deferred-charge as a customer’s payment method?

For pre-order campaigns

Deferred payments can be really helpful for pre-order campaigns, and can assist you to sell more products, as customers do not need to pay the full amount upfront, and instead pay at a later date. You can either choose to collect the full amount via deferred billing at a later date, or you can use deposits and bill a portion upfront (the deposit) and then the remaining at a later date.


pre-order

Made to order

When there is very high demand for a product, or the product requires extensive time to create/make, ‘made to order’ can be a great strategy; as it allows you to control the number of orders you accept and manage inventory. Deferred payments can be useful for this strategy, especially if customers may be waiting for an extended period to receive the product.


Try-before-you-buy

‘Try before you buy’ is a sales technique that lets customers try on or test a product before committing to purchasing. This is commonly used for larger price point products, as well as when the customer is deciding between multiple products, models or styles. Using deferred payments with this type of selling method would be be a great way to reduce risk and sell more. The customer accepts the future payment, but then is only billed if they choose to keep the item.


Which payment method is supported and what are the requirements?

Currently both Shopify payments, PayPal and Authorize.net support deferred-charge for Shopify stores. Any type of credit card can be ‘vaulted’ as it is simply recording card details for when the payment’s due. If the card can go through checkout in a buy-now situation it should work for deferred payment (as long as you’re using Shopify payments/PayPal/Authorize.net).


Payment methods

Shopify ‘pay later’ advantages

Shopify pay later offers many advantages for merchants as well as customers. For merchants the biggest advantage is that you can make the payment due request when it suits your business. You may have manufacturing delays, or shipping hold ups, and want to delay the payment due date.

Another advantage for merchants is that you are not limited to short 5/10/30 day periods like when using credit card authorization. As the card is instead vaulted with Shopify and the time period is not limited.

For consumers, there is a both a psychological and convenience factor, as they are able to commit to a purchase without having to give immediate payment.

Shopify ‘pay later’ disadvantages

The only real disadvantages of using Shopify ‘pay later’ is the potential for failed charges. This can happen because of expired cards or the customer not having sufficient funds in their account.

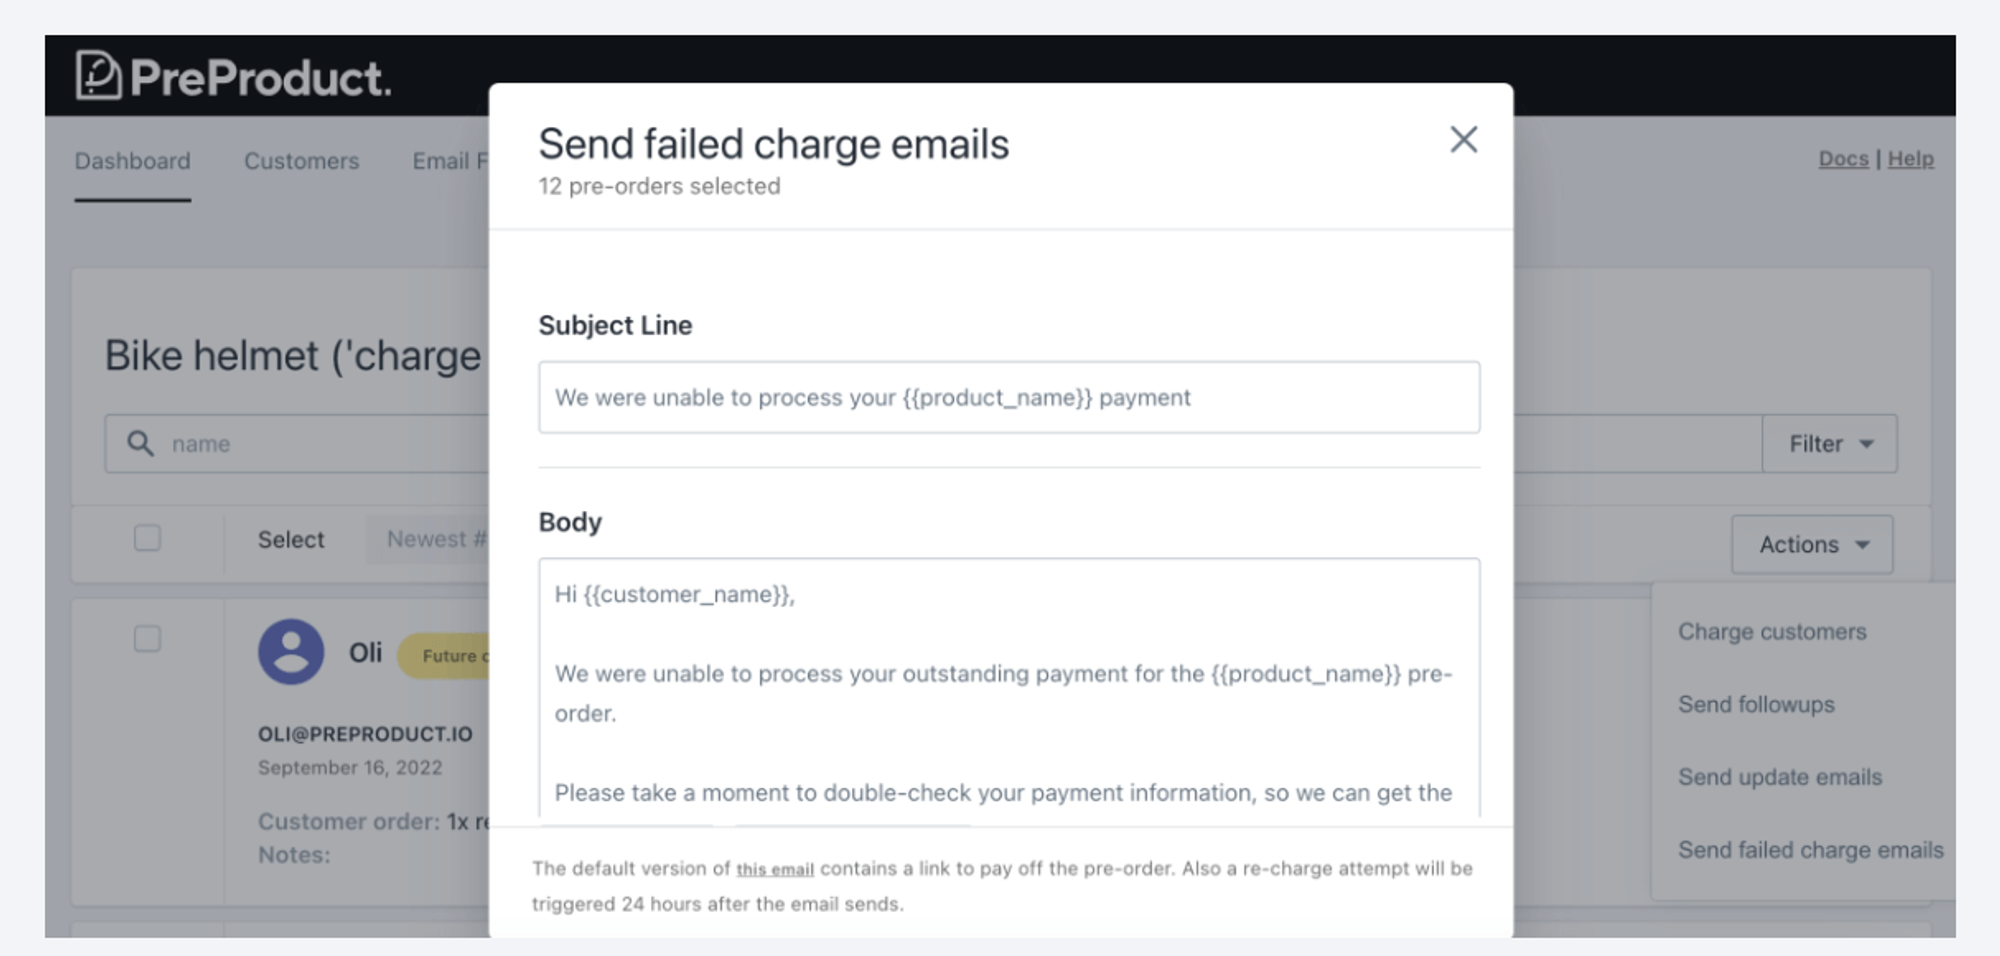
A supporting third party app (like PreProduct), should have the ability to send failed charge emails for failed deferred charge payments which will allow the buyer to rectify the payment or pay with another card.


Summary

Integrating Shopify’s Deferred Payment and Vaulted Card technology into your store offers a practical solution for managing pre-orders and cash flow, especially during uncertain manufacturing and shipping times.

By deferring payments, customers are more inclined to commit to a purchase, knowing they aren’t immediately out of pocket, particularly for items not instantly available. This method significantly reduces the administrative hassle of refunds should they change their mind. Offering a much more seamless experience than charge-upfront pre-orders.

Overall, Shopify deferred payment provides merchants increased flexibility in managing revenue streams while maintaining customer satisfaction and trust.


Shopify Deferred Payment Method FAQ

Can you delay payment on Shopify?

Yes if you use a 3rd party app (like PreProduct) with a payment provider (like PayPal, Shopify Payments or Authorize.net) that supports deferred payments, you are able to delay charging until a later time.

How do I allow customers to pay later on Shopify?

To allow customers to pay later on Shopify, you can use deferred charge via a 3rd party app. The customer will place the pre-order, no money is exchanged immediately, and then when you are ready to charge, you will trigger the deferred charge.

What happens if I don’t use Shopify payments?

Currently Shopify Payments, PayPal and Authorize.net are supported on Shopify for deferred charge, so you could use PayPal or Authorize.net instead.

How does pre-order payment work?

You trigger the deferred payment when you are ready to charge, Shopify will then use vaulted card details and charge the consumer for the remaining amount (if using a deposit) or the full amount (if 100% charge later).

Do subscriptions use deferred payments?

Yes. Subscriptions use periodically trigger deferred charges on the customers card; Typically right before the due item is set to be fulfilled.

How can customers check on their deferred payments?

Some Shopify pre-orders apps (like PreProduct) generate a customer portal where shoppers can check the payment status of their pre-order’s deferred payments and when it is expected to ship.

Pre-sell With PreProduct

7 day free trial with all plansMigrate pre-orders

How to set up pre-orders on Shopify

1. Introduction

Pre-orders can be a great tool for your online store, with potential to increase hype around new releases whilst solving your cash flow problems. It’s beneficial to understand how to set up Shopify pre-orders.

What is a pre-order?

A pre-order is where customers can place orders for products or services before they become available for general sale. Essentially, customers are buying an item before it is physically in stock or released.

There are several benefits to setting up pre-orders:

Pre-orders can provide insight for Shopify stores about the demand for their products.

By seeing how many people are pre-ordering an item, stores can adjust their production and inventory management to meet demand. This can help them avoid overproduction, which can lead to excess inventory and financial losses. If you plan to use pre-orders for probing future demand, we recommend capture-only or charge-later pre-orders, that way customers aren’t being charged anything until you’re comfortable moving forwards.

Pre-orders can generate buzz and excitement for a product before its release.

By allowing customers to pre-order, store owners can boost hype and create a sense of exclusivity around new releases. It also gives you an opportunity to launch twice in a way, once for the pre-order release and once again when the product arrives and you start taking regular buy-now orders.

Pre-orders can boost your online store cashflow, as they can capture revenue upfront.

When customers pre-order products, they typically pay the full price or a deposit at the time of the order, which provides stores with a cash flow boost before the product is even released. This can be especially helpful for small businesses or startups that may not have access to significant capital or financing (although financing options for small e-comm brands is in improving!) .


Image ref: piggybank.ca

2. Set up pre-orders on Shopify

Does my Shopify store support pre-orders?

All Shopify stores are capable of supporting pre-orders, however not all payment processors support deferred-charge pre-orders. Currently both Shopify Payments and PaPal are supported, however you will run into issues when using an unsupported third party payment gateway or even Shop Pay.

That said, Shopify will automatically hide any unsupported payment providers from your checkout. So, as long as you have Shopify Payments or PayPal enabled, you’re good to go and move forward to set up pre-orders on Shopify.

Installing a Pre-order App

To get started and set up pre-orders on Shopify, visit the Shopify App Store and search for “pre-order”, then select the app you wish to install.

Once you have located the app, click on it to access the app listing page, and then select the “Add app” option.

To grant the app access to your Shopify admin account, click “Install app” and authorize its use.

Integrating the App with Your Storefront

Shopify 1.0

If your Shopify theme is Shopify “store 1.0” and you’re not comfortable with customising the code of your product template, then I’d recommend contacting the app developer, as they’ll need to edit code to add their snippet to your online store.

Generally the process is to locate the Shopify theme file containing the “buy” button and insert the app’s customized code beneath the {% endform %} liquid tag. This will let the app’s script determine which product the pre-order button should apply for (if any) when running on that page.

Keep in mind that the file name may differ, but commonly it will be one of: product-template.liquid, product-form.liquid, or product-main.liquid, among others. (Typically in your ‘sections’ or ‘snippets’ folder)

*We also recommend saving your theme file locally first, incase of any mistakes. That way you have a backup if anything goes wrong, as well as being able to take advantage of powerful code editor ‘file find’ tools like ‘find in project’.

Shopify 2.0

With the introduction of Shopify 2.0, app blocks can now seamlessly integrate into the Shopify admin’s drag-and-drop theme customizer, making it much easier to set up pre-orders on Shopify. (‘app block’ is effectively the same as a ‘snippet’ in this context)

App blocks streamline the product pre-order template installation process, as well as automatically removing themselves if you uninstall the app.

Listing Pre-orders on Shopify

Once you’ve completed the above steps to integrate the app with your Shopify storefront, you can now start pre-selling!

Begin by listing a product in your selected pre-order app. Most if not all pre-order apps sit on top of your existing Shopify product listings. Once listed in the app, the pre-order product page’s cart button text should be replaced with a pre-order version, accompanied by any other front-end additional information, i.e. special pre-order messaging.


You will need to decide which type of pre-order to use, generally depending on the payment settings they use. The general pre-order types are:

  • Charge upfront pre-order – 100% charged upfront (Most apps will offer this).
  • Charge Later pre-orders – 100% charged later when you trigger the charge.
  • Deposit-based pre-orders – A percentage paid upfront, with the outstanding charged later.
  • Capture-only pre-orders – A payment link is sent once you’re ready to send customers through your payment gateway.

Different apps may support or not support any of the above, so it’s important to research this ahead of installing (for example, PreProduct’s list is here).

What kind of pre-order should you use?

pros, and, cons

The below is just a set of rough guidelines from what I’ve seen running a pre-order solution over the years.

Charge upfront pre-orders are useful if you need the cash flow upfront, and appropriate if you have a good idea of when the pre-order items will be ready for shipping. Charging upfront also comes with a higher commitment from customers, over something like capture-only or notify-me-when-in-stock.

Charge upfront may not be the best type of pre-order if you’re worried about manufacturing delays or freight issues. Customers could become frustrated if they’ve fully paid, but then have unexpected delays receiving the product.


Charge later pre-orders can be one of the better choices when you’re not sure how long manufacturing may take, or when there is some uncertainty around production and supply chain. As customers will be less inclined to be annoyed by delays when they haven’t parted with any money yet. It’s still important to keep customers informed of delays though.

Charge later is also convenient if customers have a change of mind, whilst waiting for the out of stock product to come in; because no refund is needed, the pre-order can just be cancelled (without any bank transaction started/cancellation needed).

Deposit-based pre-orders is a good alternative that sits between charge upfront pre-order and charge later pre-order. This type of pre-order shows commitment from customers, but also means customers do not need to pay for the full product upfront, which can help increase pre-order sales by lowering the price to buy for customers.

Capture-only pre-orders can be a great pre-order option when you need to gauge interest. They require the least amount of commitment from both the buyers and shop owners. Similar to a back-in-stock flow, customer’s only go through checkout once the product’s available and can be imminently shipped.


Deciding on a pre-order shipping statment

When creating a pre-order listing, you will also need to set a shipping statement. This could be in a period of days or fixed phrase (ie ‘Next Summer’). The balance here is that a pre-order listing with too vague a shipping statement can deter potential buyers, however an exact shipping statement with a much longer duration can also detract from the willingness to buy.

At PreProduct, generally we advise merchants to keep it specific when they can. With the caveat that you should go with what’s comfortable and if that’s not committing to an exact date, then that’s a completely sensible decision. You should also bear in mind that the communicated shipping statement can be changed at any point (well in a lot of apps at least).


Choosing an exact pre-order shipping statement

Using a less specific pre-order shipping statement

Shopify product settings

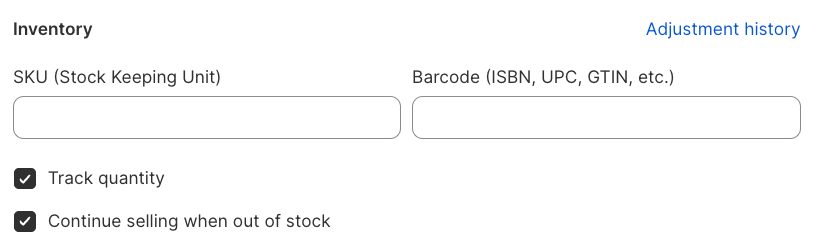
The product/variant section of the Shopify admin dashboard contains an option to enable the ‘continue selling when out of stock’ feature. This setting is crucial when utilising pre-orders and has two important purposes:

  1. If a product has zero stock and the box is unchecked, customers will not be able to purchase it. However, if the box is checked, the product can still pass through the checkout, whatever the inventory level. Some apps (eg PreProduct) automatically manage this box, when creating/finishing a pre-order listing.
  2. Furthermore, most Shopify themes display an ‘out of stock’ message when a product/variant has zero stock and the box is un-ticked. Ensuring the ‘continue selling when out of stock’ box is ticked will prevent this message from being displayed.


3. Offering Discounts on Pre-orders


Basic Discount Setup

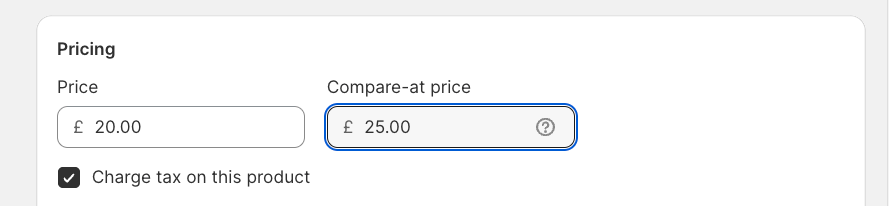
If you’re not using a pre-order app, you can set up a discount in any theme by altering the ‘Price’ and ‘Compare at Price’ in the Shopify product admin. The ‘Compare at Price’ is the original price and the ‘Price’ is the discounted price. This means the Shopify will know that there is a discount and your theme will most likely reflect this on your front-end. 


Purchase Options Discounts

For pre-order listings that use purchase options (in PreProduct’s case, this is every kind apart from capture-only listings), rather than altering the price of the product directly on Shopify, the discount is applied at the pre-order listing and order level.

This means that the discount is fixed for any pre-orders already captured, but if you decide to change the discount for future pre-orders, they’ll have the updated subtraction applied. This is great, as you don’t need to worry about the price change; and furthermore, can even change the Shopify product price without impacting previous pre-orders.

With early bird discounts, you can enable customers to commit to a purchase early on and capture more sales, this is due to a created sense of exclusivity and urgency. Tapping into the classic psychology of ‘wanting more for less’ and FOMO.

Letting early adopters get in early can boost customer loyalty, and rewarding these customers with a discount can boost this dynamic even more so.


4. Setting up pre-orders on Shopify to use deposits

Creating Deposit-based pre-orders

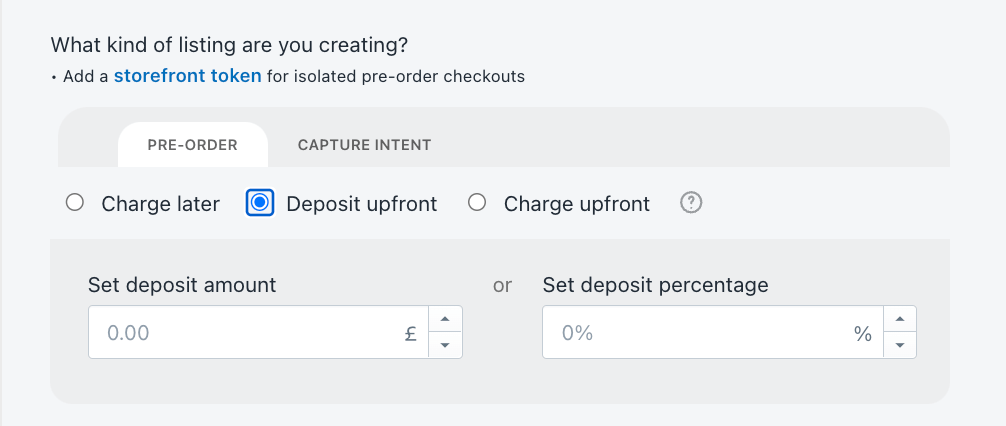
When you set up pre-orders on Shopify and create a listing, there should be an option to choose whether to capture deposits/partial payments for pre-order listings in supporting deposit pre-order apps.

When creating a pre-order listing, you will just need to select the deposit type: fixed amount or percentage. This will be communicated on the product and cart pages, as well as next to the payment authorization section of the checkout.


How do deposit pre-orders work?

Pre-order listings that use deposits will communicate to customers the price and terms of the order before they click the pre-order cart button. They’ll then be directed through your usual checkout process, however there will be details of the deposit price, the outstanding price, as well as when the merchant plans to charge it. Then once you’re ready to trigger the outstanding payment, you can trigger the charge via your pre-order app. Usually this is is powered by vaulted credit card technology so no further action is needed from the customer.

Using deposits can be beneficial as they require customers to commit a portion of the pre-order payments upfront, demonstrating a genuine interest and commitment to purchasing the product.

Deposits provide an immediate influx of cash for the business, which can be crucial for covering production costs, marketing efforts, or other expenses related to fulfilling pre-orders. It’s completely up to you whether you implement a non-refundable deposit policy.

Charging Tax and Shipping Fees

When using deposit based pre-orders, both shipping and taxes will be charged in the final outstanding amount, not in the deposit amount. Your existing tax and shipping profiles will be respected.

5. Summary and Conclusion

In summary, to use and set up pre-orders on Shopify offers several powerful advantages for ecommerce stores.

  • They provide valuable insight into product demand for pre-order products, enabling stores to predict inventory amount and avoid overproduction.
  • Pre-orders generate anticipation for a product, improving hype for your future releases.
  • Lastly, pre-orders can generate upfront revenue, providing cash flow before product release, something that ecommerce companies of all sizes can get excited about.

If you are interested in giving pre-orders on Shopify a go and experiencing some of these benefits I mentioned above, we’d love you to start a free trial of PreProduct today.

Get the Shopify App


Eliza Wegener

Co-founder @PreProduct

Pre-sell With PreProduct

7 day free trial with all plansMigrate pre-orders

How to do Pre-orders on Shopify: Complete 2026 Guide

Prefer to watch a video? Click here to see Oli explain four different pre-order methods on Shopify.

Shopify pre-orders let you capture demand before inventory arrives. Whether you’re launching a new product, managing out-of-stock items, or building hype for an upcoming release, pre-orders help you take orders and revenue sooner while validating market interest.

This guide covers everything you need to know about Shopify pre-orders: choosing the right payment model, planning your strategy, setting up step by step, and running a campaign that converts.

What are pre-orders and why use them?

A Shopify pre-order allows customers to purchase products before they’re available for general sale or when inventory is temporarily out of stock. Unlike backorders (where customers order products already in transit) or waitlists (where customers express interest without commitment), pre-orders involve a customer commitment to purchase upfront. Instead of waiting until products hit your warehouse, you start taking orders immediately.

Business benefits of Shopify pre-orders

Validate demand before committing to inventory

Shopify pre-orders help you gauge genuine customer interest before investing in large production runs. By tracking pre-order volume, you can adjust inventory levels to match actual demand, reducing the risk of stockouts, overstocking, or having to discount unsold products.

Improve cash flow and take revenue sooner

Taking payment upfront or capturing payment details earlier gives you working capital before products ship. This is particularly valuable for small businesses and startups managing tight cash flow, or when you need capital to fund production runs.

Build hype and marketing momentum

Pre-orders create anticipation around product launches. You effectively launch twice: once when you announce the pre-order and again when the product becomes available. This dual-launch approach generates sustained buzz and gives you multiple marketing touchpoints.

Secure committed customers

Customers who pre-order demonstrate higher commitment than those who add items to wishlists. Pre-order customers have already made a purchase decision, reducing the risk they’ll buy from a competitor when your product finally launches.

Shopify pre-orders

Customer benefits

Guaranteed access to new or limited products

Pre-orders ensure customers secure their spot for highly anticipated releases or limited-edition items that might sell out quickly.

Early-bird incentives

Many brands offer exclusive discounts, bonus content, or limited-edition packaging to reward customers who commit early.

First access to innovation

For customers who value being first to try new products, pre-orders provide that exclusive early-adopter experience.

How Shopify pre-orders work

Understanding the pre-order flow helps you design a better customer experience. Here’s how a typical Shopify pre-order journey unfolds:

  1. Announcement: You announce the upcoming product with details about features, pricing, and expected delivery. This typically happens through email campaigns, social media, and on-site banners.
  2. Pre-order period opens: A designated window begins where customers can place orders. This period can range from a few weeks to several months depending on your product and lead time.
  3. Customer places order: Customers order through your Shopify store. The checkout experience includes clear messaging about estimated delivery dates and when payment will be processed.
  4. Payment processing: Depending on your pre-order model (covered below), customers either pay immediately, accept a future charge, pay a deposit, or receive a payment link when you’re ready to charge.
  5. Order confirmation and updates: Customers receive confirmation via email. Throughout the pre-order period, you keep them updated on production progress and shipping timelines.
  6. Charges processed and product ships: When inventory arrives, any deferred charges are processed and products ship to pre-order customers.
Hands hold a cellphone showing the Shopify home page

Shopify pre-order payment models

Shopify supports multiple pre-order payment models. Your ideal approach depends on your product lead times, price point, and cash flow needs.

Most models use card vaulting (secure card storage) rather than traditional authorization holds, giving you flexibility for longer lead times.

Charge upfront pre-orders

Customers pay 100% at the time of pre-order placement. This model works best when you need immediate working capital or when lead times are relatively short (under 60 days).

Best for:

  • Products with short lead times (under 60 days)
  • Lower-priced items where customers are comfortable paying in full
  • Brands with established trust and reputation
  • Situations requiring immediate cash flow for production

Considerations:

Charge-upfront tends to be less popular than deferred payment models for longer lead times. Customers may hesitate to pay months in advance, especially for higher-priced items or brands they’re less familiar with.

Charge later pre-orders

Customers proceed through checkout and accept a future charge. Their card information is securely vaulted with your payment processor, and you trigger payment when inventory arrives and you’re ready to ship. No authorization hold is placed, so there’s no expiration window to worry about.

This is the most popular model among merchants running pre-orders with longer lead times.

Best for:

  • Products with longer lead times (60+ days)
  • Mid-high priced items where customers prefer not to pay months in advance
  • First-time orders of a product or from a new supplier, where flexibility matters
  • Any timeline where authorization holds would expire before you’re ready to charge

Considerations:

When you’re ready to ship, you trigger the charge. If the card has expired or been cancelled, the charge will fail and you’ll need to collect updated payment information via a dunning flow (automated emails requesting updated payment details).

Deposit pre-orders

Customers pay a partial amount upfront (typically 10-50% of the total price), with the remaining balance charged later when you’re ready to ship. Like charge-later orders, the customer’s card is vaulted for the future balance charge.

Best for:

  • Mid-high priced items ($50-200+)
  • Products with long lead times but requiring some upfront capital
  • Merchants who want assurance that buyers are committed
  • Balancing cash flow needs with customer comfort

Considerations:

Deposits signal stronger commitment than charge-later-only models while being less intimidating than full upfront payment. This middle-ground approach works well for premium products where you need some working capital but want to reduce purchase friction.

Capture-only pre-orders

This model captures customer information without taking any payment. You replace the standard purchase button with a pre-order button, and email a payment link later when ready to process orders.

Best for:

  • Conservative markets where merchants are hesitant to exchange any payment details upfront
  • Products with highly uncertain timelines
  • Testing demand before committing to production
  • Situations where you want zero checkout friction upfront

Considerations:

This approach has the lowest commitment level, which can lead to lower conversion rates when payment time comes. However, it’s excellent for demand validation since customers can opt in without any payment friction. It’s also one step above waitlists, as the order is already captured and can be prepopulated at checkout.

Weighing up your pre-order options

Authorization period pre-orders

The most basic approach is placing a traditional authorization hold on the customer’s card. In Shopify, this is the “manual payment capture” method. You must capture payment within the authorization window (typically 7-30 days) before the hold expires.

Best for:

  • Very short lead times (under 7-30 days)
  • Products arriving imminently where you know exact ship dates

Considerations:

This model is limited by authorization hold expiration windows. For most products with longer lead times, charge-later with card vaulting is more practical. The extended 30-day authorization period is currently only available to Shopify Plus merchants and adds a 1.75% fee if charged after day 7.

Planning your Shopify pre-order strategy

Before launching pre-orders, strategic planning ensures better outcomes.

Planning a strategy

When to use pre-orders

Pre-orders work well for:

  • New product launches: Build anticipation and validate demand before committing to large production runs
  • Seasonal or limited releases: Create urgency for products available only during specific periods
  • Out-of-stock bestsellers: Continue taking orders when inventory temporarily runs out
  • Custom or made-to-order products: Collect orders before beginning production
  • High-ticket items: Gauge serious buyer interest before investing in expensive inventory

Setting realistic timelines

Your estimated timeline should account for:

  • Manufacturing or production time: Factor in supplier lead times plus buffers for delays
  • Shipping and freight: Expected shipping times from the supplier, whether sea or air freight
  • Quality control: Building in time for inspection, especially for first runs or new suppliers
  • Customs and import processing: For international products, adding 1-2 weeks can be sensible
  • Buffer for unexpected delays: Add 10-20% padding to your estimated timeline

Be conservative with your customer-facing shipping statement. It’s better to over-deliver than create frustration by missing promised dates. You can always update your shipping statement along the way and send out updates to your customers.

Pricing strategies

Early-bird discounts: Consider limited-time discounts (typically 10-20% off) to reward customers who commit earliest. This creates urgency and helps you gauge initial demand quickly.

Pay early and save: Some pre-order apps let you offer a discount to customers who want to pay off a deferred-charge pre-order early, improving cashflow while giving them the option to pay later.

Pay in installments: Optional multi-step payment plans let customers pay in installments, improving conversion for price-sensitive customers or high-ticket items.

Tiered pricing: Consider Kickstarter-style pricing tiers:

  • Super early bird: 20% off (first 50 customers)
  • Early bird: 15% off (next 100 customers)
  • Standard pre-order: 10% off (remaining slots)
  • Launch price: Full price at product release

Inventory planning

Use pre-order volume to inform production quantities. If you’re taking capture-only pre-orders (where no payment is collected upfront), build in an expected conversion rate (typically 70-85%) when planning inventory. Charge-later and deposit models typically have higher conversion since cards are vaulted.

Setting up pre-orders on Shopify

Shopify’s native pre-order options

Shopify offers basic pre-order functionality through its “continue selling when out of stock” checkbox. This allows products with zero inventory to pass through checkout normally.

In 2024, Shopify also introduced “Purchase Options” functionality that allows apps to facilitate deferred-charge pre-orders through Shopify’s native checkout.

What Shopify’s native options handle well:

  • Simple charge-upfront pre-orders for products temporarily out of stock
  • No additional app cost

Where you may need a dedicated pre-order app:

  • Charge-later, deposit, or capture-only payment models
  • Automated customer communication and progress updates
  • Customer portals for order status visibility
  • Pre-order analytics and performance tracking
  • Variant-specific pre-order controls

For smaller merchants running occasional, simple pre-orders that can be charged upfront, Shopify’s native option may suffice. For brands building Shopify pre-orders into their core strategy, dedicated apps provide significantly more control.

Payment processor requirements

Not all payment methods support pre-orders, particularly deferred charging models. Currently supported options include:

  • Shopify Payments (full support for all pre-order models)
  • PayPal (supports most pre-order types)
  • Cybersource – as of early 2026, merchants have reported Cybersource support for deferred charges as well

Third-party gateways often don’t support deferred charging. Shop Pay, Apple Pay, and Google Pay also have limitations with charge-later pre-orders. Shopify automatically hides incompatible payment providers at checkout for pre-order products.

Setting up a pre-order app

Once you’ve chosen a pre-order app from the Shopify App Store (our round-up of the best Shopify pre-order apps compares the main options by use case), setup typically follows these steps:

Do more with Shopify apps

Step 1: Install from Shopify App Store

Search “pre-order” in the Shopify App Store and install your chosen app.

Step 2: Integration based on theme version

For Shopify 2.0 themes (recommended):

If your app doesn’t support auto-install, you’ll need to add its app block from the Shopify Customize editor:

  1. Navigate to your theme customizer
  2. Select the product template
  3. Drag and drop the pre-order app block where you want it to appear (typically above the add-to-cart button)
  4. Save changes

For Shopify 1.0 themes:

If your app doesn’t support auto-install, you’ll need to add its snippet code to your theme:

  1. Access Theme Code Editor from the “Online store” section of your Shopify admin
  2. Locate your product template file (usually in the snippets directory, within a file like: product-template.liquid, add-to-cart-button.liquid or product-form.liquid)
  3. Add the app’s snippet code above the buy button’s <button> tag
  4. Save changes

Most modern themes use Shopify 2.0, making integration significantly simpler.

Listing your first pre-order product

After integration, configure your first pre-order listing. This can be done via an automation/rule-based setup, or manually product by product.

  1. Select product or variant: Choose which products or specific variants to list as pre-order. Advanced apps allow variant-specific pre-ordering, so you can pre-order only out-of-stock sizes or colors while keeping others available for immediate purchase.
  2. Choose payment model: Select your preferred payment approach: charge upfront, charge later, deposit, or capture-only.
  3. Set estimated delivery date: Provide a realistic delivery timeframe. This date appears to customers and can be updated as circumstances change.
  4. Configure pre-order limits (optional): Decide whether to limit quantity to create scarcity or leave unlimited.
  5. Add early-bird discount (optional): Set discount pricing to incentivize early commitment.
  6. Customize messaging: Check the front-end wording on your product, cart, and checkout screen. If it doesn’t match your brand voice or clearly communicate the pre-order, change it via the app’s settings.

Fulfillment holds and order management

Pre-order apps typically place fulfillment holds on pre-order items, preventing them from flowing prematurely to your 3PL, ERP, or fulfillment system. This ensures pre-orders stay isolated until you’re ready to ship.

When inventory arrives and you’re ready to fulfill:

  1. For charge-later, capture-only, or deposit pre-orders, trigger payment from your app
  2. For charge-upfront pre-orders, trigger fulfillment from your app
  3. Either approach releases the fulfillment hold on the Shopify order, changing its status from “On hold” to “Unfulfilled”
  4. Orders then flow to your fulfillment system like regular orders

Auto-charge automation can trigger charges based on inventory levels in Shopify, streamlining this process further.

Running a successful Shopify pre-order campaign

Getting your Shopify pre-order set up is only half the picture. Running a successful pre-order campaign requires thoughtful marketing, clear communication, and awareness of your obligations.

Planning marketing

Marketing your pre-orders

Strong pre-order marketing turns a product announcement into a successful campaign. Start by building anticipation before the pre-order period opens: tease the product, build an email waitlist, and create countdown content.

When pre-orders open, maximize visibility through email announcements, social media, influencer outreach, and paid advertising. Create urgency with early-bird pricing, limited quantities, and exclusive bonuses.

Customer communication best practices

Clear communication builds trust and reduces cancellations. The typical pre-order cancellation rate sits around 5-7%, with proper communication helping minimize this.

Front-end messaging: Clearly indicate pre-order status on product pages, cart, and checkout. Display estimated delivery dates prominently. If you allow mixed carts (combining pre-order and ready-to-ship items), note that orders may ship in multiple shipments.

Email communication: Send immediate order confirmations, periodic progress updates (every 2-4 weeks for long lead times), and shipping notifications. For charge-later or deposit-balance orders, send an upcoming charge email to give customers advance notice before their card is charged.

Customer portals: Quality pre-order apps offer customer portals where buyers can view order status, see estimated shipping dates, access payment schedules, and request cancellations—reducing support inquiries while giving customers transparency.

Customer shopping

Legal requirements

Understanding pre-order legal obligations protects your business and builds customer trust.

In the United States, the FTC’s 30-Day Rule requires you to ship within the timeframe you advertise, or within 30 days if no timeframe is specified. If delays occur, notify customers and offer full refund options.

Be transparent about pre-order status, delivery timelines, payment terms, and cancellation policies. If selling internationally, research requirements for the UK, EU, and Australia.

Shopify pre-order shipping en route

Common issues and how to fix them

Payment charge failures: Customer’s vaulted card can fail when you attempt a deferred charge (card expired, cancelled, or insufficient funds). Set up automated emails requesting updated payment information, and provide a customer portal where buyers can update their cards.

Theme compatibility: If the pre-order button doesn’t display correctly, check that your theme supports Shopify 2.0 app blocks. Contact app support for theme-specific assistance, especially for custom themes.

Fulfillment hold confusion: If pre-order items accidentally ship early, double-check fulfillment hold settings in your app. Set up tag-based workflows if your 3PL does not support fulfillment holds. Some ERPs and 3PLs use “virtual warehouses” for pre-order stock allocation.

Managing delays: Communicate proactively as soon as delays are known. Explain the reason honestly, offer options (wait with bonus incentive, partial refund, or full cancellation), and update estimated delivery dates across all touchpoints.

Measuring pre-order success

Measuring pre-order success

Track these metrics to optimize your pre-order strategy over time:

  • Conversion rate: Percentage of product page visitors who complete pre-orders
  • Pre-order volume: Total orders taken, which validates demand and informs inventory planning
  • Average order value (AOV): Revenue per transaction, often higher for pre-orders due to early-bird bundles
  • Cancellation rate: Rates above 8-10% may indicate overly long lead times or poor communication
  • Email engagement: Open and click rates for pre-order update emails

Integrate with Google Analytics using UTM parameters to track which marketing channels drive the highest pre-order conversions, and Integrate with a product like TrueProfit to track which pre-order products bring you highest profit margin.

Pre-order cash flow

Frequently asked questions about Shopify pre-orders

Does Shopify have built-in pre-orders?

Yes, Shopify has a “continue selling when out of stock” checkbox that allows zero-stock products to pass through checkout. However, it only supports charge-upfront models and lacks advanced features like automated customer communication, multiple payment models, and analytics. Most serious pre-order campaigns benefit from dedicated apps.

What payment methods work with Shopify pre-orders?

Shopify Payments and PayPal support all pre-order payment models. Third-party payment gateways often don’t support deferred charging (charge-later models). Shop Pay, Apple Pay, and Google Pay have limitations with certain pre-order types. Shopify automatically hides incompatible payment options at checkout.

Can I offer partial payment or deposits?

Yes, with pre-order apps that support deposit models. Customers pay a percentage upfront (typically 10-50%), with the remaining balance charged when you’re ready to ship. This balances cash flow needs with customer comfort, especially for higher-priced items.

How do I handle pre-order cancellations?

Pre-orders can be cancelled through standard Shopify order cancellation procedures or via your pre-order app. Quality pre-order apps offer customer portals where buyers can request cancellations directly. Your refund policy is at your discretion.

Are there legal requirements for pre-orders?

Yes. In the US, the FTC 30-day rule requires shipping within stated timeframes or within 30 days if no timeframe is specified. You must notify customers of delays and offer cancellation options. Other countries have similar consumer protection requirements.

How long should a pre-order period be?

Most pre-order campaigns have fulfillment windows between 30-150 days, with longer windows (90-150 days) being common for manufactured products. Your timeline should match production realities plus buffer for delays. Shorter is generally better for maintaining customer excitement and reducing cancellations.

Can I mix pre-order and regular products in the same cart?

Yes, though many merchants prefer isolated pre-order workflows to avoid complications with their fulfillment processes. Mixed carts can increase average order value, but if you allow them, place some test pre-orders first to verify your 3PL and ERP handle fulfillment holds correctly.

How do pre-orders affect my Shopify inventory management?

Pre-order apps place fulfillment holds on pre-order items, preventing them from flowing to your 3PL or fulfillment system prematurely. When ready to fulfill, you release holds and orders process normally. Advanced apps integrate with Shopify inventory systems to trigger automatic charging when stock arrives.

What’s the typical pre-order cancellation rate?

Pre-order cancellation rates typically range from 5-8%, increasing with longer lead times and poor communication. Keep customers engaged with regular updates and realistic delivery estimates.

Should I offer early-bird discounts for pre-orders?

Early-bird discounts (typically 10-20% off) create urgency and reward early commitment. They help gauge initial demand quickly and can accelerate word-of-mouth marketing. Test different discount levels to find the sweet spot between incentivizing purchases and maintaining margins.

How do I prevent pre-order items from shipping early?

Pre-order apps automatically apply fulfillment holds to prevent premature shipping. These holds integrate with Shopify’s fulfillment system, blocking orders from flowing to 3PLs or ERPs until you’re ready. When inventory arrives, you release holds manually or through automated triggers based on inventory levels.

Shopify pre-order shipping

Conclusion

Shopify pre-orders are a powerful strategy for validating demand, improving cash flow, and building marketing momentum around product launches.

The key to running successful Shopify pre-order campaigns comes down to:

  • Choosing the right payment model for your product and lead time
  • Setting realistic delivery timelines with buffer for delays
  • Communicating clearly and frequently with customers
  • Marketing strategically to build urgency and maintain momentum
  • Measuring performance to optimize future campaigns

Whether you’re launching your first product, managing out-of-stock bestsellers, or building hype for seasonal releases, Shopify pre-orders let you take orders and revenue sooner while keeping customers informed and engaged.

If you’re looking for a Shopify pre-order app to handle charge-later, deposits, and automated customer communication, we’ve built one that handles all the payment models covered in this guide.

Pre-sell With PreProduct

7 day free trial with all plansMigrate pre-orders
Adding pre-orders to the Shopify Turbo theme

The Turbo Shopify Theme

The Turbo Shopify theme is one of Out of the Sandbox’s flagship themes and a favourite of Kurt Elster. This article will go through adding pre-orders to the Shopify Turbo theme. Turbo is fully featured and performant, as well as being Shopify store 2.0 compatible. Meaning it’s pretty straight-forward to add third-party apps. However, we’ll also go through a more limited ‘free’ way of setting up pre-orders with Turbo.


There are many great reasons to offer pre-orders, including a positive influence on cash flow, the wiggle room it can afford your product launches, and the supply chain risks that can be offset. If you’d like to read more about the advantages of Shopify pre-orders, we talk about them extensively on our homepage.

Turbo theme

ref: Out of the sandbox

Adding Pre-orders Manually

We do not recommend this method at all, but realise that some people would prefer to see a free of charge version of offering pre-orders. Backup your themeAlways backup theme files before you change code. This way, you’ll always have a safe version to revert to if something goes wrong.

Word of warning

It’s possible to collect pre-orders without any apps and with minimum developer work, by using the following bare-bones approach. Although I don’t recommend doing this for several reasons that we’ll go into after the step-by-step:

  1. Shopify has a checkbox in the Shopify product section under ‘inventory’ called ‘continue selling when out of stock’. When ticked, Shopify will accept orders for that product, even when the stock level is empty or negative.
  2. It’s also possible to change your add-to-cart button’s text via the Shopify theme files so that it shows ‘pre-order’ when a product has 0 in stock and the above setting is enabled. Using something like the liquid code below within the button tag.
{%- if product.variants.first.inventory_policy == "continue" and product.variants.first.inventory_quantity == 0 -%} pre-order {%- endif -%}

As well as the overhead of hardcoding a change into your store’s theme that doesn’t localise to the user’s language, the above method will also mean:

  • ‘pre-orders’ and ‘buy-now’ orders are mixed together in your Shopify order section, leading to mistakes and laborious admin.

  • No efficient control of what product is on pre-order and what is on ‘buy now’.
  • Your store’s front-end won’t communicate to customers when they’ll receive their pre-order.
  • You have no way of communicating with customers during the pre-order process. e.g. A ‘Your natural deodorant is three weeks away from shipping’ email or customer portal.
  • Pre-order payment has to be upfront (no pay later or deposit option)
  • No way to place limits or any advanced pre-order features on your listing.

All of these drawbacks can very quickly add up to a negative customer experience with a lot of work on your end to manage and stay in control. Luckily Shopify’s app ecosystem has many apps who work on these problems and ways to increase your pre-orders. Thanks to Turbo’s Store 2.0 compatibility, you won’t need to write a line of code to integrate one either.

Using PreProduct for pre-orders

Like I just mentioned, Shopify’s Appstore is home to many pre-order apps that will help you find success with your pre-sales.
PreProduct offers the below benefits, as well as a customisable pre-order cart. After selecting PreProduct from the AppStore, simply click ‘install app’ from the top of the page and Shopify will take you through a quick install process.

PreProduct’s feature set includes:

  • The ability to choose which specific product/variants will be on pre-order.
  • A designated dashboard for your pre-orders, without regular orders being mixed in.
  • Customisation of the design/messaging of the pre-order button and front-end, including dynamic variables like shipping time.
  • Email campaigns to keep customers in the loop and engaged throughout the pre-order campaign.
  • Different payment options like; ‘pay later’, ‘deposit’ and ‘pay now’. Meaning you can list pre-orders much earlier and with better flexibility (+ in some countries, conform to necessary legal requirements).
  • Analytics and dashboards for reporting/interacting/merging the individual pre-orders.

Using the Shopify store 2.0 ‘customize’ editor you won’t have to add permanent code to your theme. You can just drag and drop a block into your product page. Meaning you’re in complete control of where the pre-order section goes in your storefront, as well as when it gets taken out.

Adding a pre-order app block to your Shopify turbo theme

Once you have PreProduct installed, you’ll be able to drag it’s block into your product page exactly where you want it. Here’s how:

  • Navigate to the ‘Online store’ section of your Shopify dashboard.
  • Click ‘Customize’.
  • You will now be greeted with Shopify’s customize editor. It will be set to your home page. Click ‘catalogue’ to go to a collection page and then click on any product to select your product page.
  • Notice the different areas of your product page in the left-hand side bar, signified by the tag icon and name in bold. We want to add to your ‘Product Information’ section, so click the blue ‘Add block’ link at the bottom of that list.
  • A pop-up should appear with a list of blocks under the ‘APPS’ heading. Click the PreProduct block.
  • The PreProduct block has now been added to the ‘Product information’ section. To choose it’s position, click the little back arrow to the left of its nam and drag it up or down until you’re happy with the position.
  • That’s it, you should be all good to go. Don’t forget to save! (Top right corner of the page).

Summary

You have now finished setting up pre-orders for the Shopify Turbo theme. You can now start listing products for pre-order and taking pre-sales for your future and out of stock products.

Pre-sell With PreProduct

7 day free trial with all plansMigrate pre-orders